

Overview
This guide will walk you through how to use the Cloudamize Agentless Data Collector, including how to add and configure hosts, change credentials for a set of machines, and view any error messages pertaining to your infrastructure. Please contact helpdesk@cloudamize.com if you have any questions.
Launching the UI
First, you will need to open the Cloudamize Agentless Data Collector. This can be done from the Windows taskbar.
Add and Configure Hosts
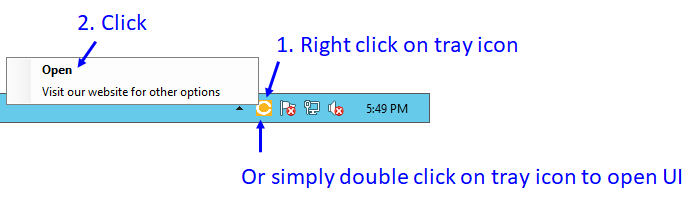
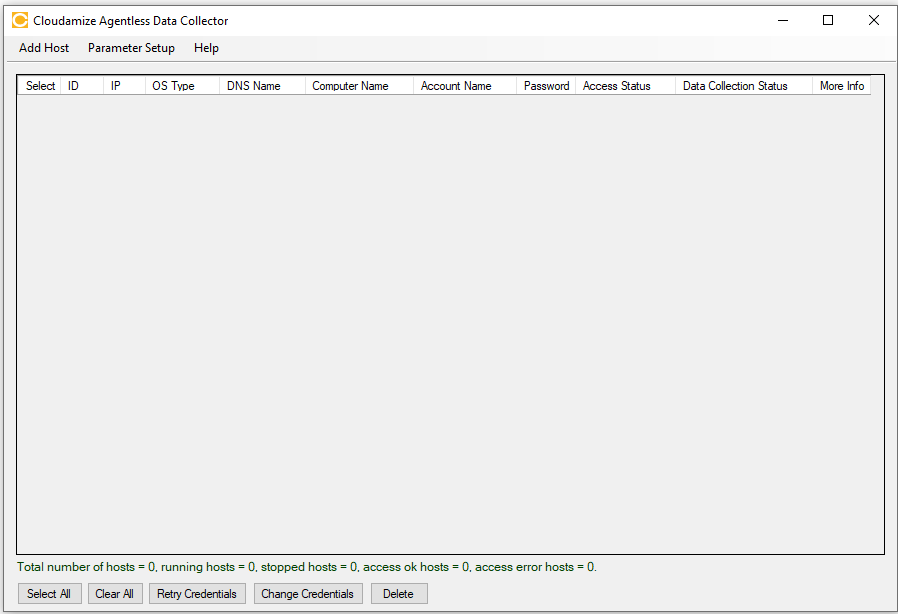
Follow the instructions contained in the above image to open the collector. Once you have clicked Open, you will see the UI.
Adding Hosts
Adding a Remote Host
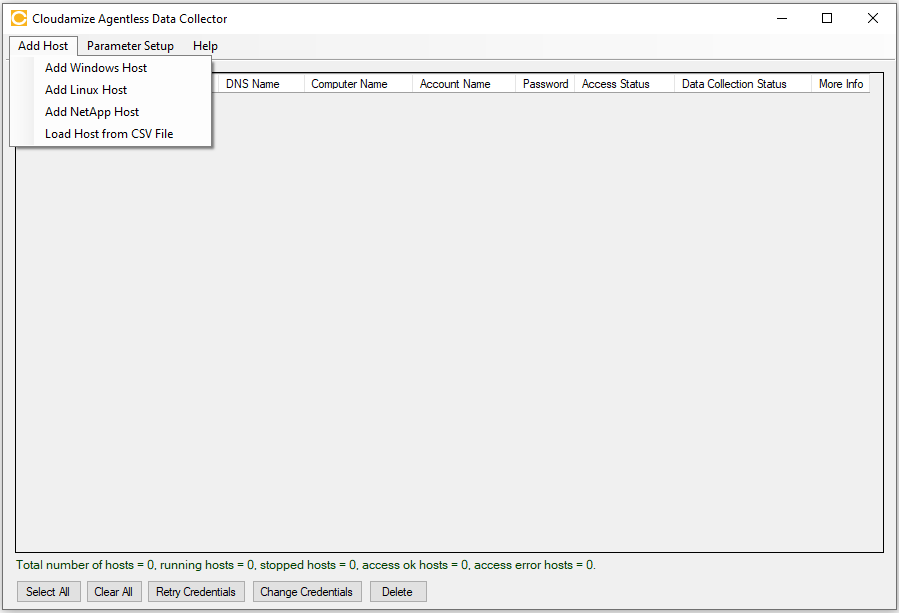
You can add a Windows, Linux, or NetApp host using the 'Add Host' menu as follows-
You will now need to add the hosts that you would like to monitor. You may enter IP addresses individually (10.1.1.2), as a range (10.1.1.2-50), or as a subnet (10.1.4.0/24). You may use any combination of these formats separated by commas. Once the IP addresses have been entered, click Add Host(s).
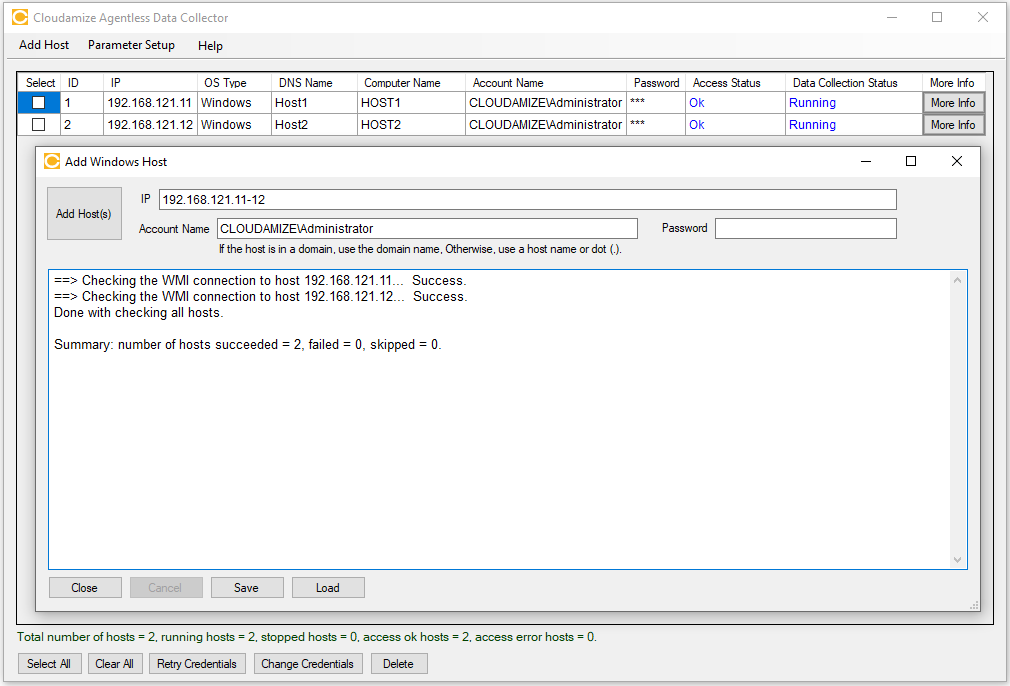
The screenshot above shows that two Windows hosts have been added successfully.
This will open another window that will check the WMI connection to each host and report Success or Failure. A summary will be printed at the bottom displaying the number of hosts that succeeded, failed, and were not checked. Hosts will not be checked if Cancel is clicked during the checking process.
Instructions for adding a Linux host.
A Linux host uses SSH and may use either a password or an SSH Key. We recommend providing the key in PuTTY’s ppk format; however, PEM and OpenSSH-style keys will attempt to be converted automatically. If an authentication error occurs, you should manually convert the key to a ppk format and try again. Passwords are stored encrypted via a local application encryption key, whereas SSH keys are protected only by Windows ACLs.
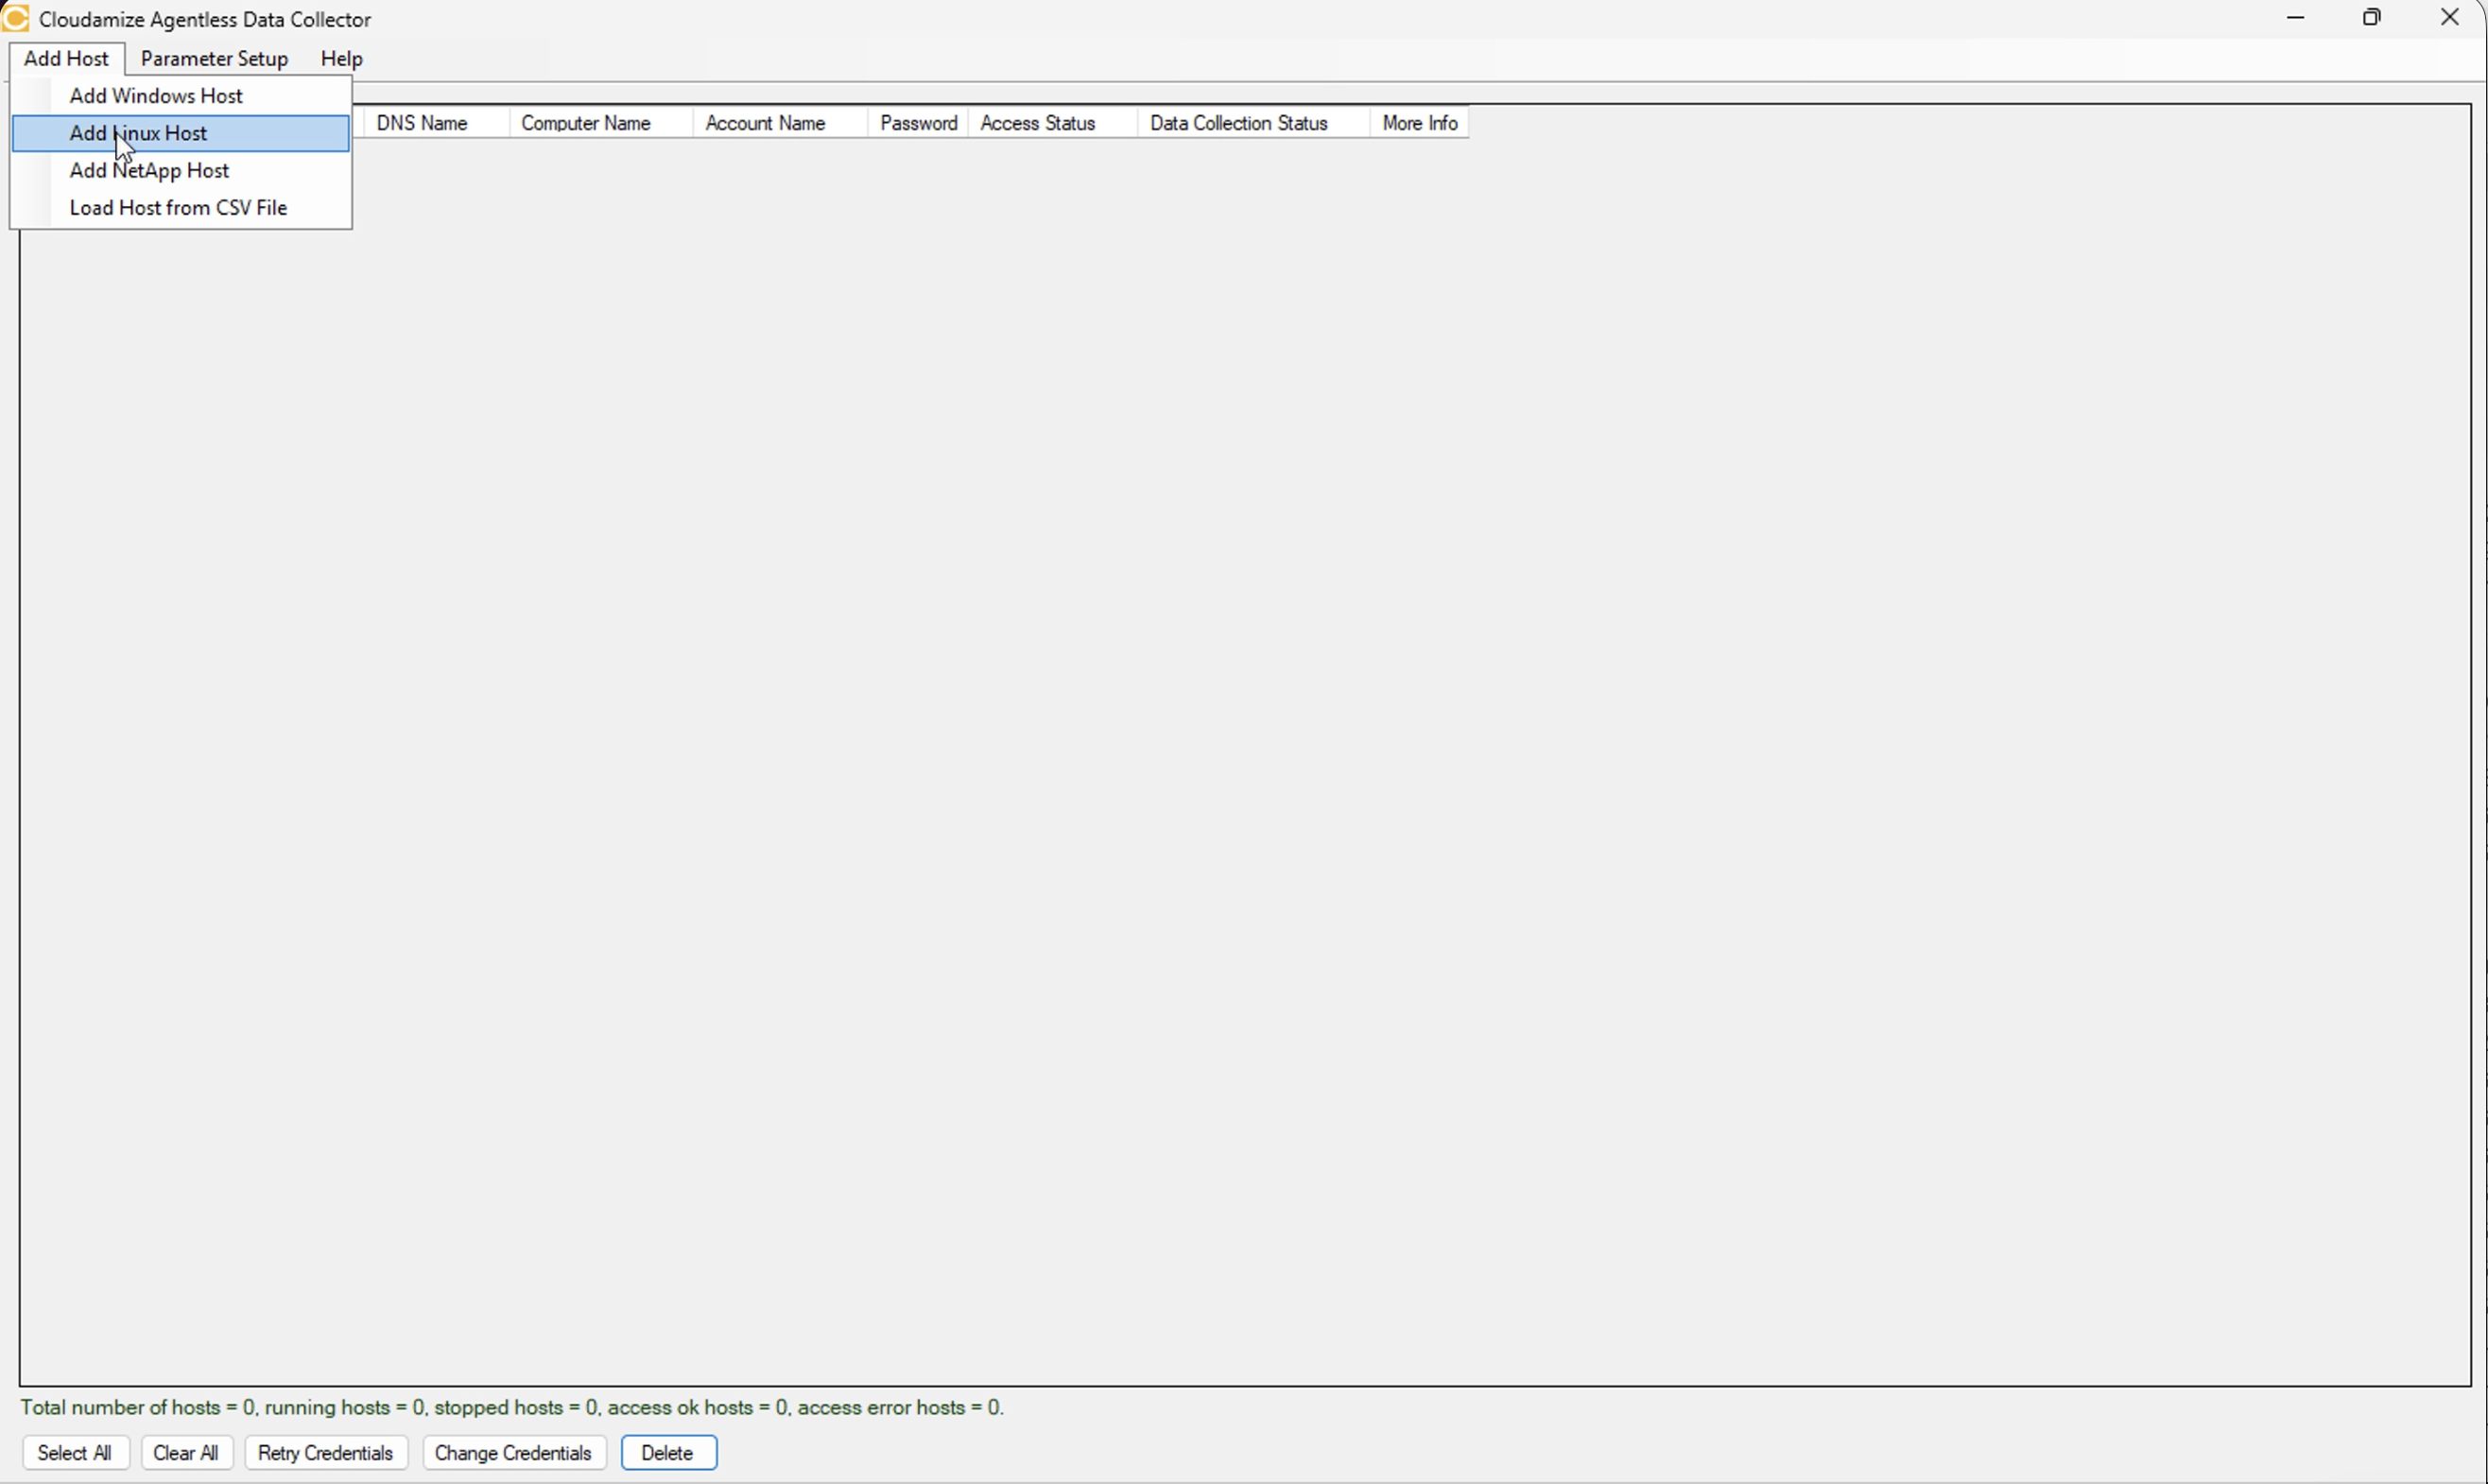
Step 1: Click Add Host, and then select Add Linux Host, as shown in the screenshot below. The Add Linux Host window opens, where you can enter the required host details.
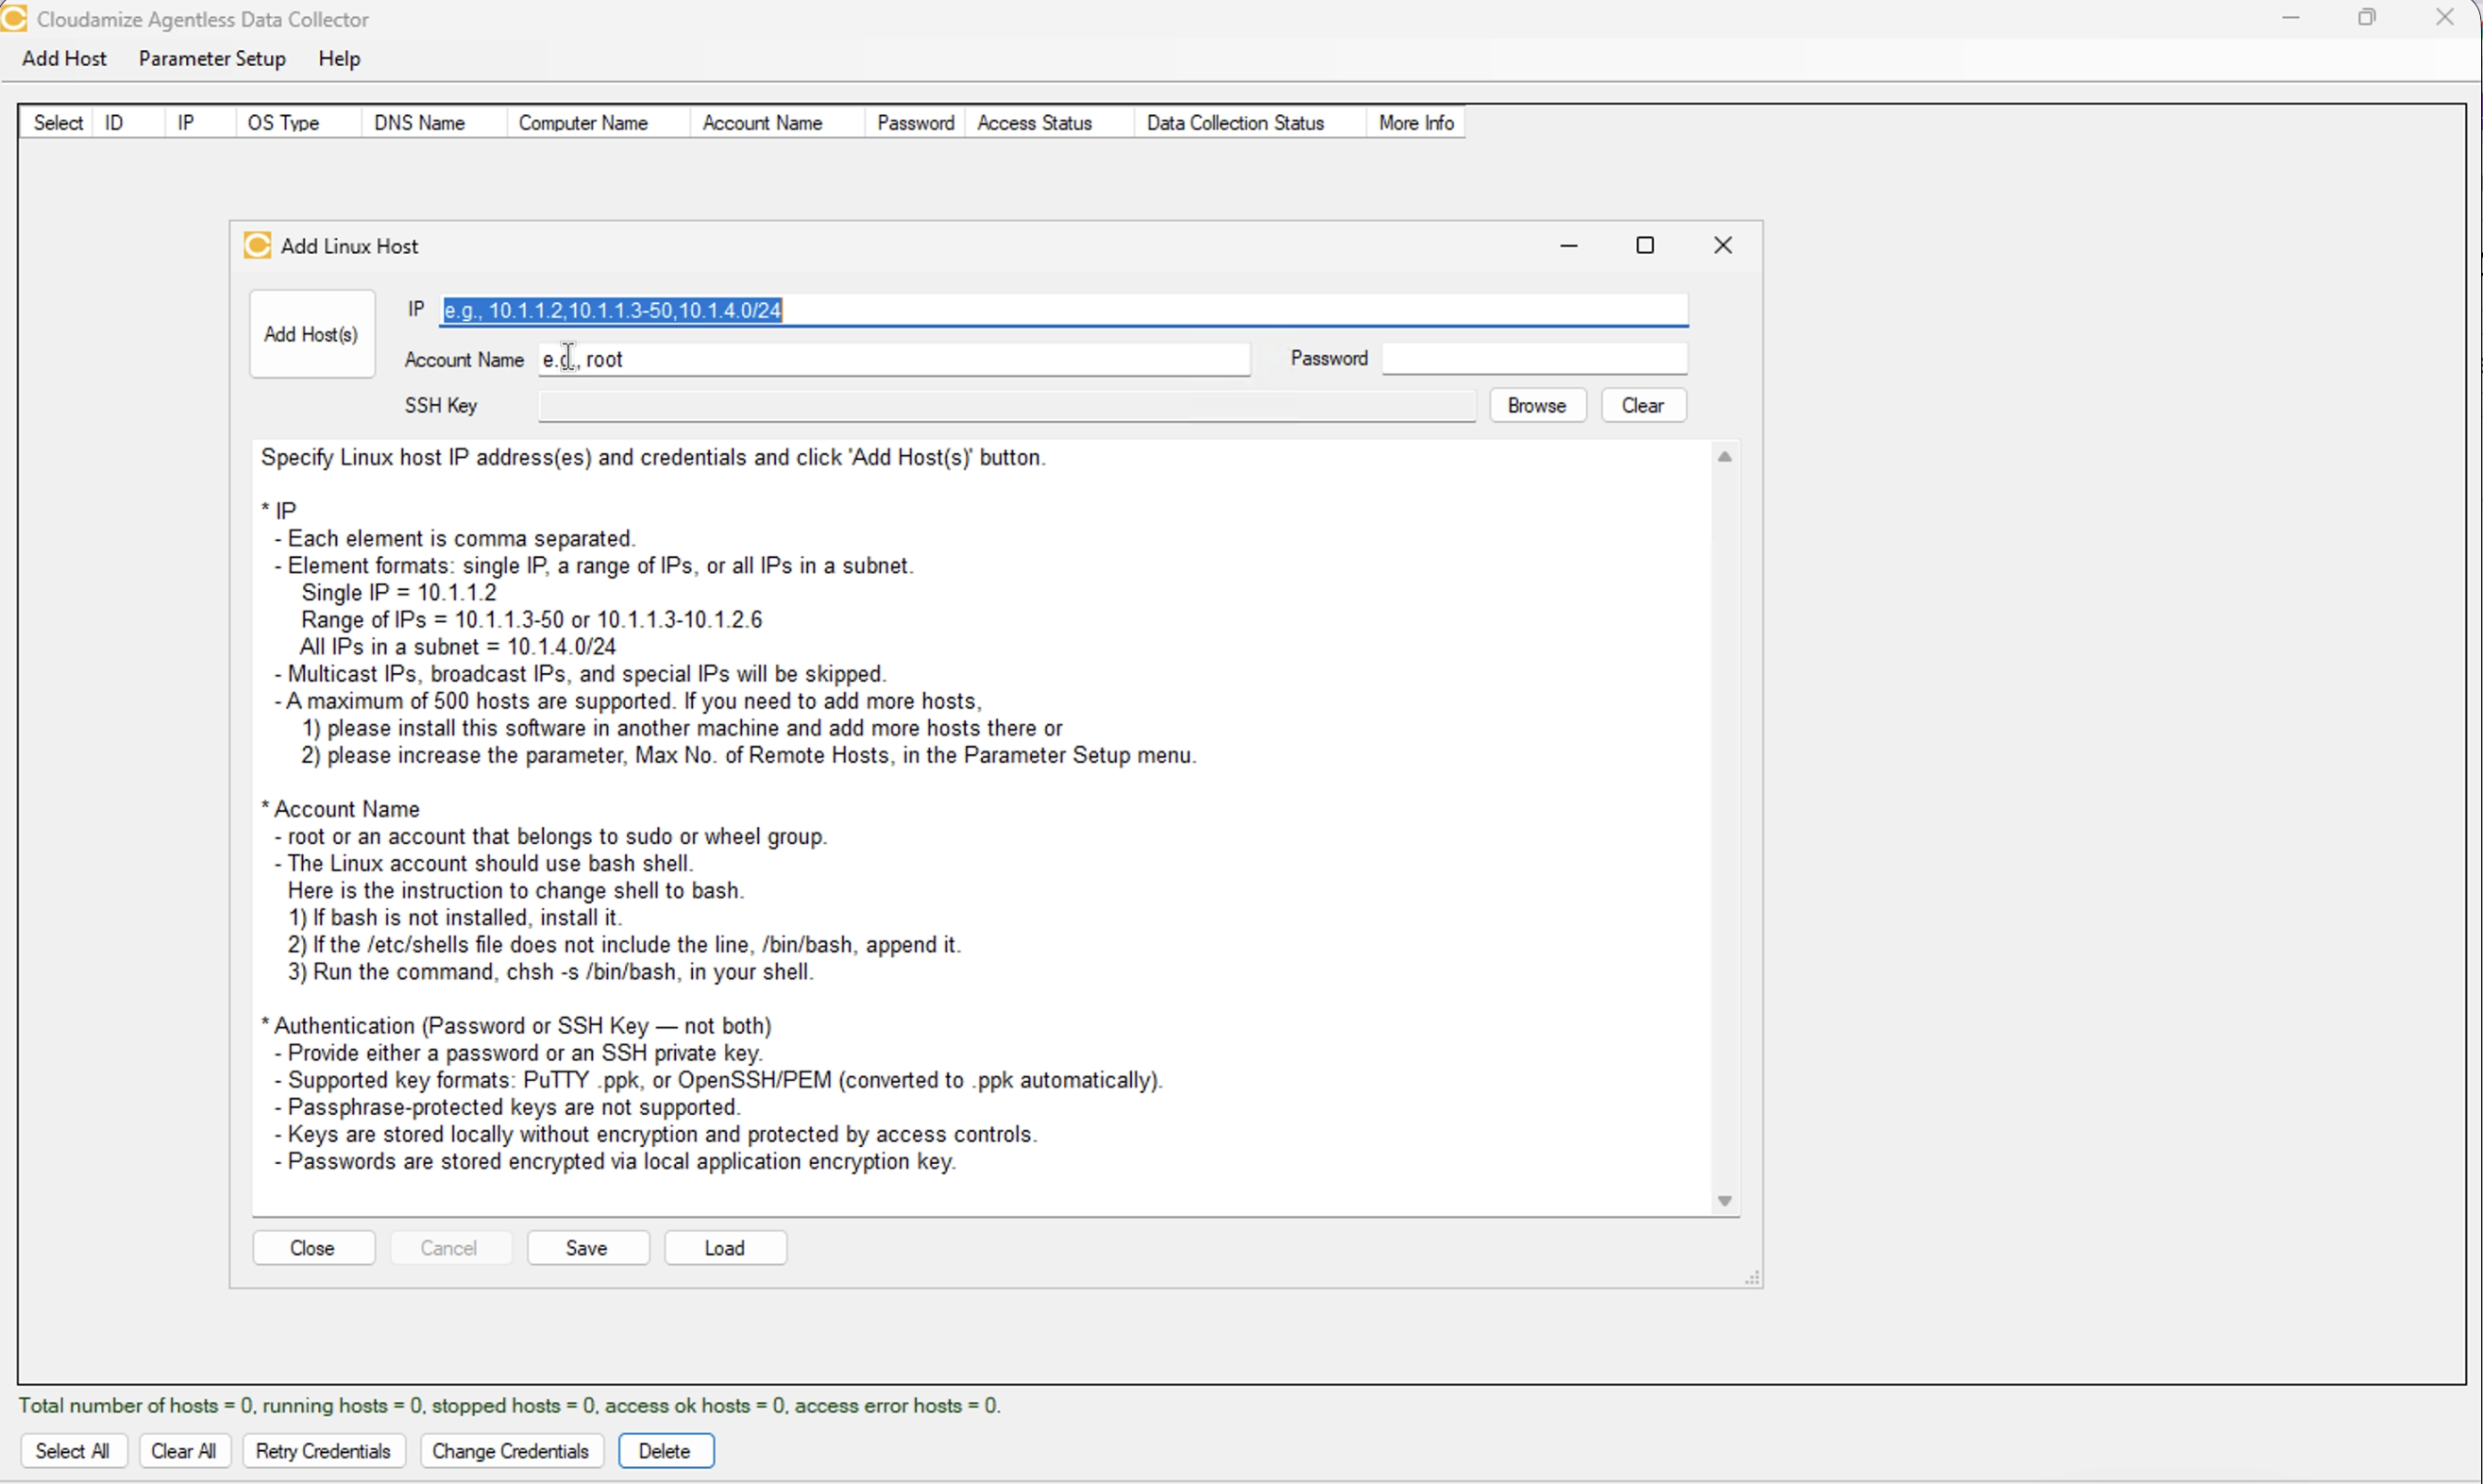
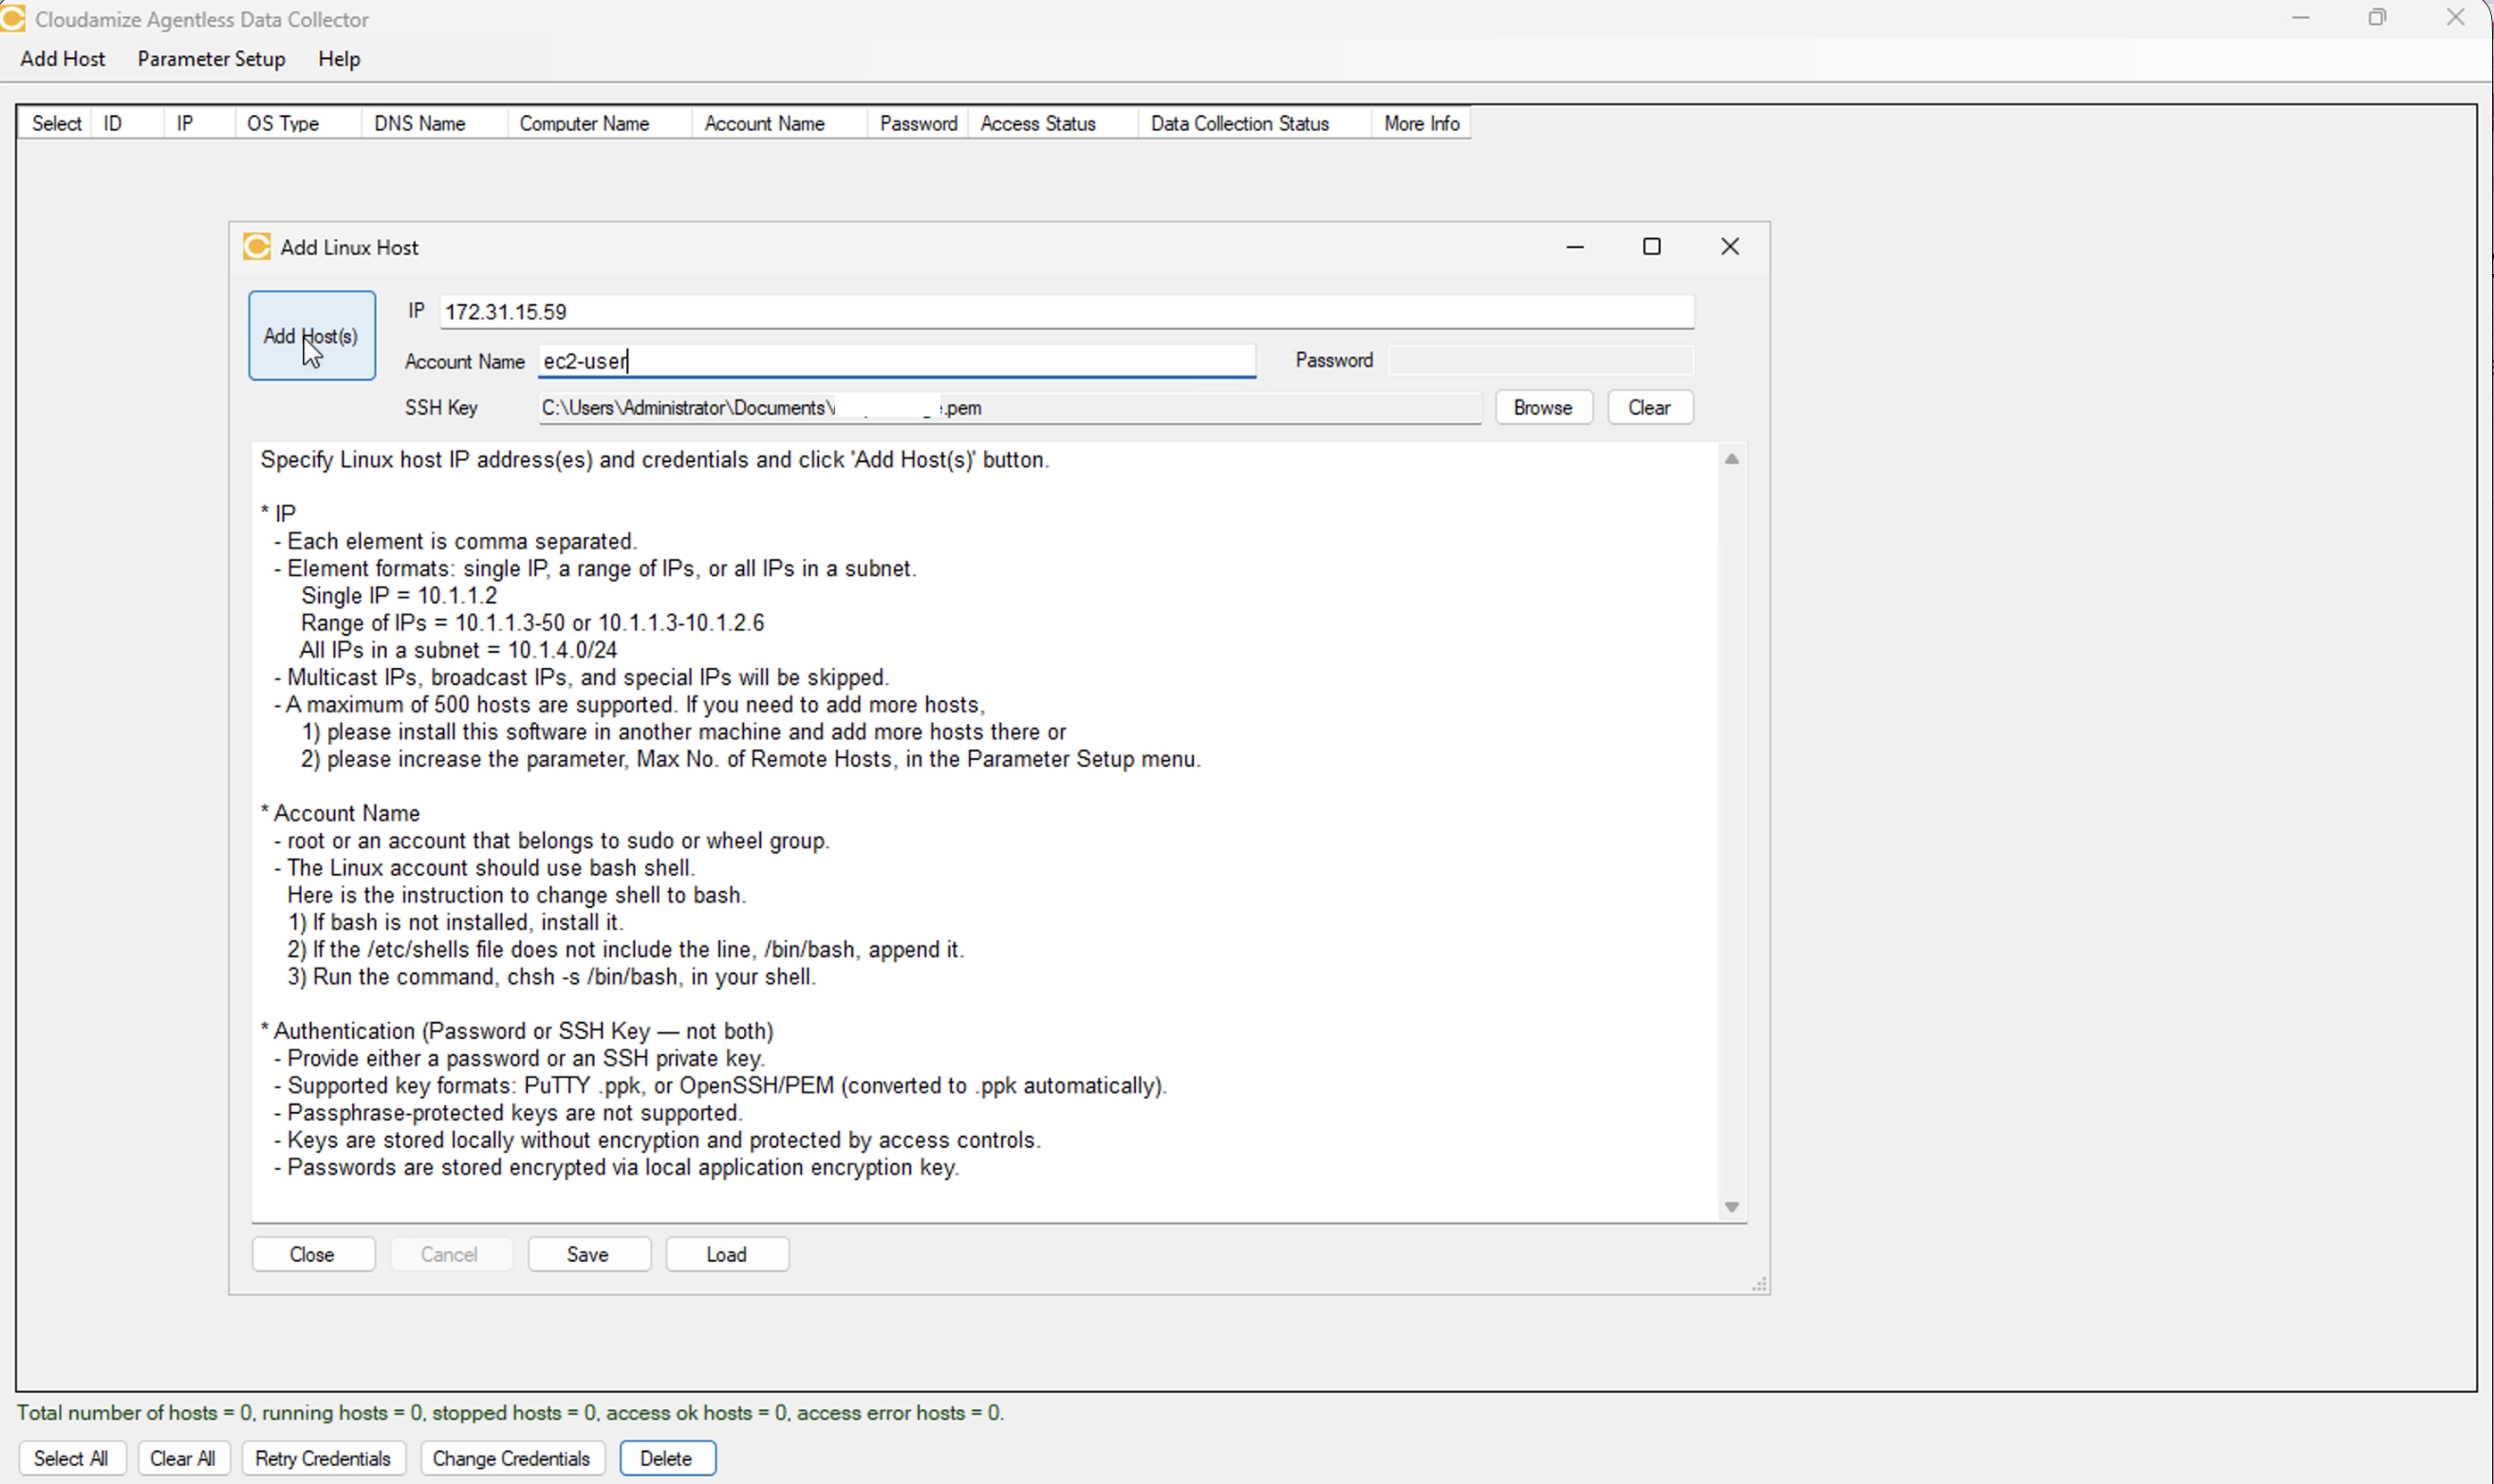
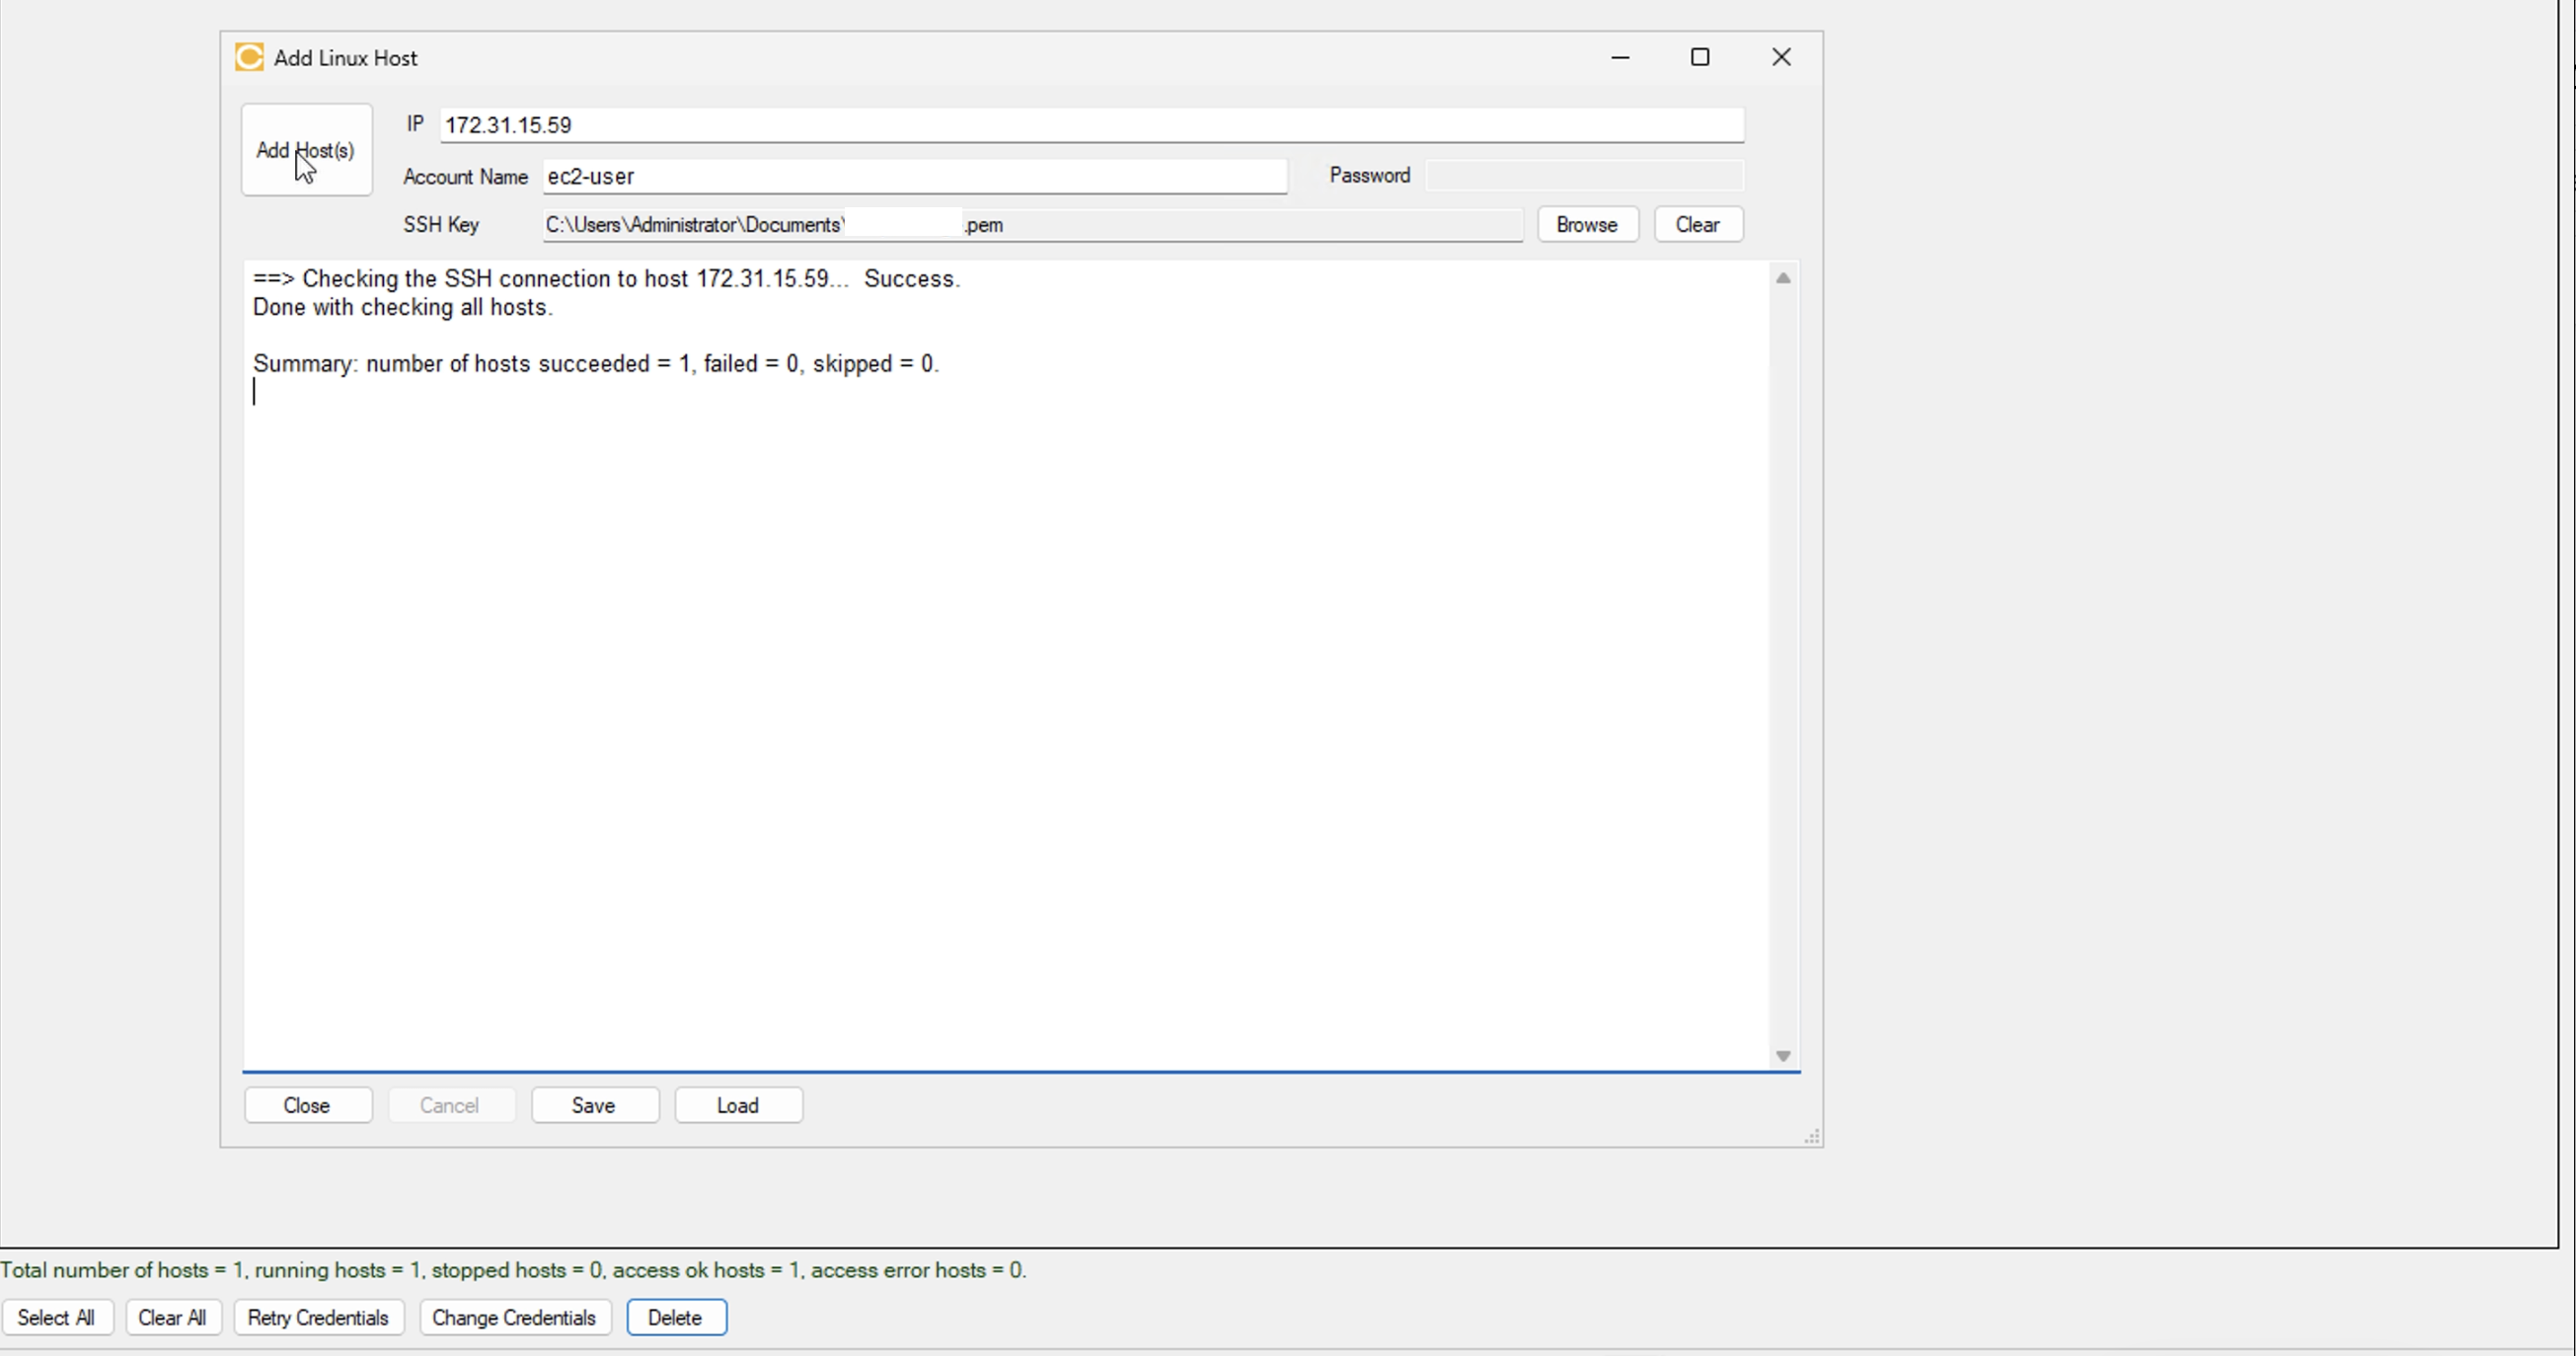
Step 2: Enter the IP Address of the host and the corresponding Account Name. Under SSH Key, click Browse and select the required SSH key. Once all the required details are entered, click Add Host. The host will be added successfully and displayed in the host list, as shown in the screenshot below.
Note: Ensure that the SSH key is saved on the machine where the ADC (Agentless Data Collector) is installed.
Bulk Onboarding for Linux Hosts (Multi-Server Batch Addition)
You can onboard multiple target Linux servers simultaneously in a single operation, provided they share identical SSH authentication credentials.
-
Multi-Server Batch Addition: Multiple Linux targets utilizing the same SSH key pair (or standard root/sudo credentials) can be uploaded and configured together during a single Agentless Data Collector (ADC) onboarding workflow.
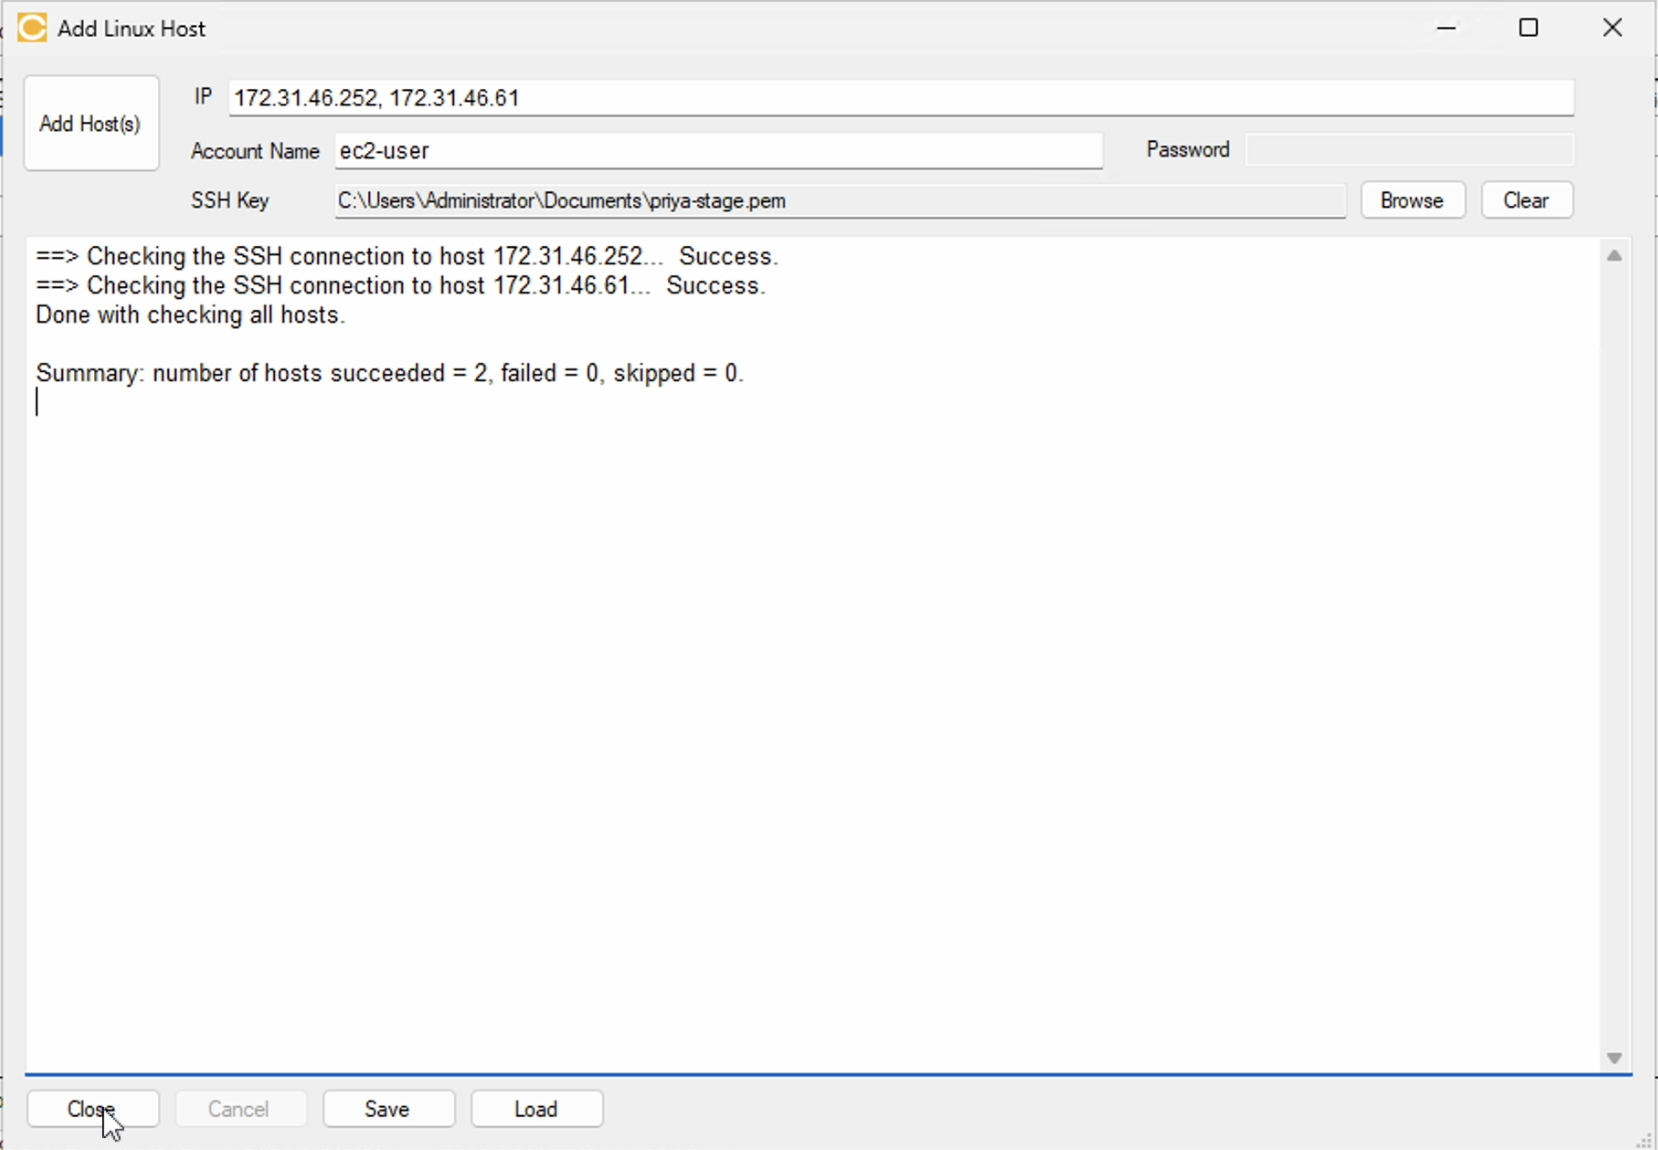
IMPORTANT NOTE ON SSH KEYS:
If your target Linux servers utilize different SSH keys, they must be added individually in separate operations. The Cloudamize ADC interface allows you to browse and select only one SSH key file per onboarding operation. Multiple distinct SSH key files cannot be uploaded simultaneously in a single batch.
Instructions for adding a NetApp host.
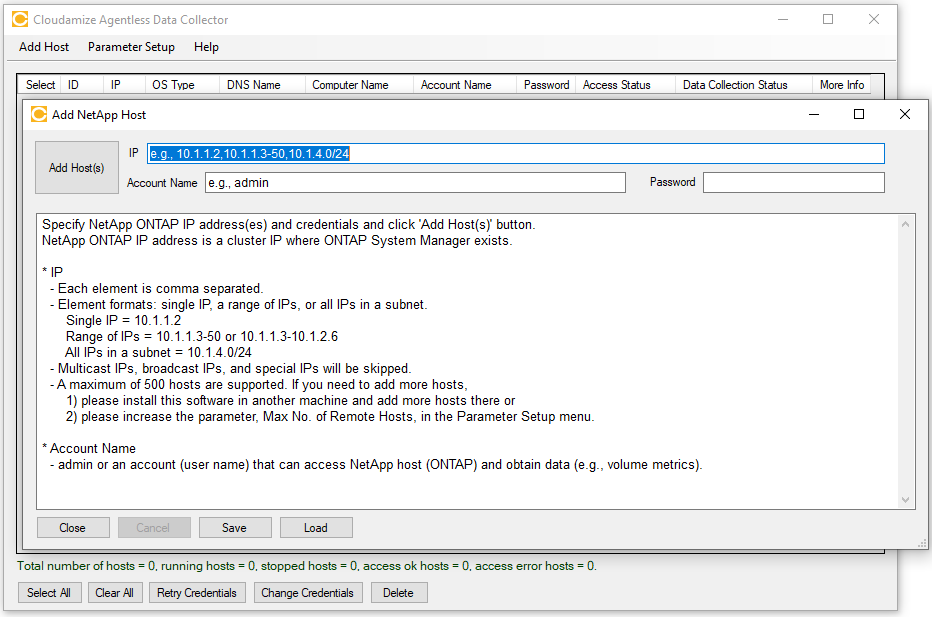
Adding and updating credentials in bulk
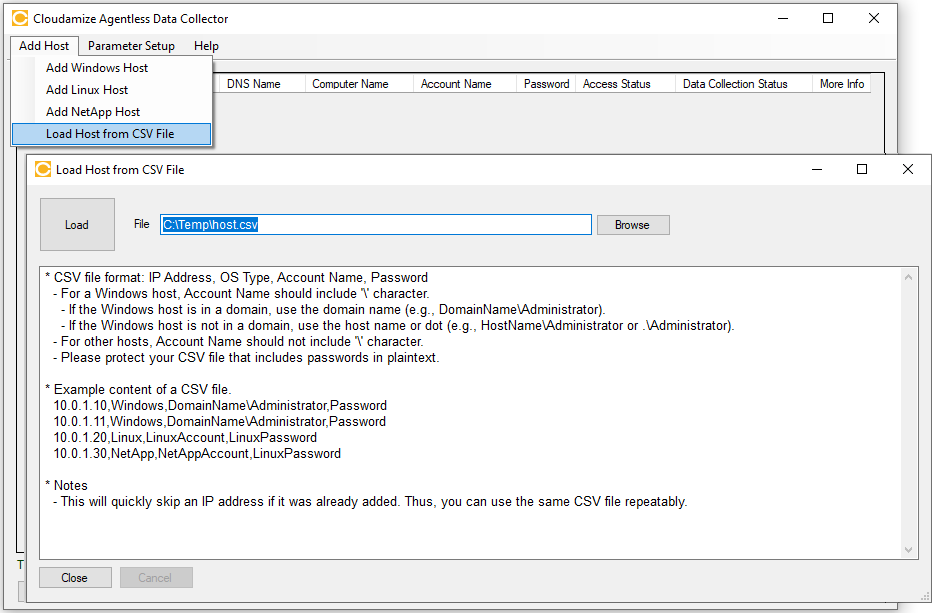
When there are a lot of hosts to add, you can add credentials in bulk by uploading a .csv file containing the following information in this order:
-
IP Address
-
OS Type
-
Account Name
-
Password
If you are having any issues adding hosts, please send the following log file to helpdesk@cloudamize.com with a description of the errors as reported in the UI:
-
C:\Program Files (x86)\CloudamizeAgentlessDC\log_backup.txt
Example csv file:
View Error Messages
If the WMI connection fails for any reason, the Status column of the UI will display "Error". You can click on the Show error button to the right of Status to learn more.
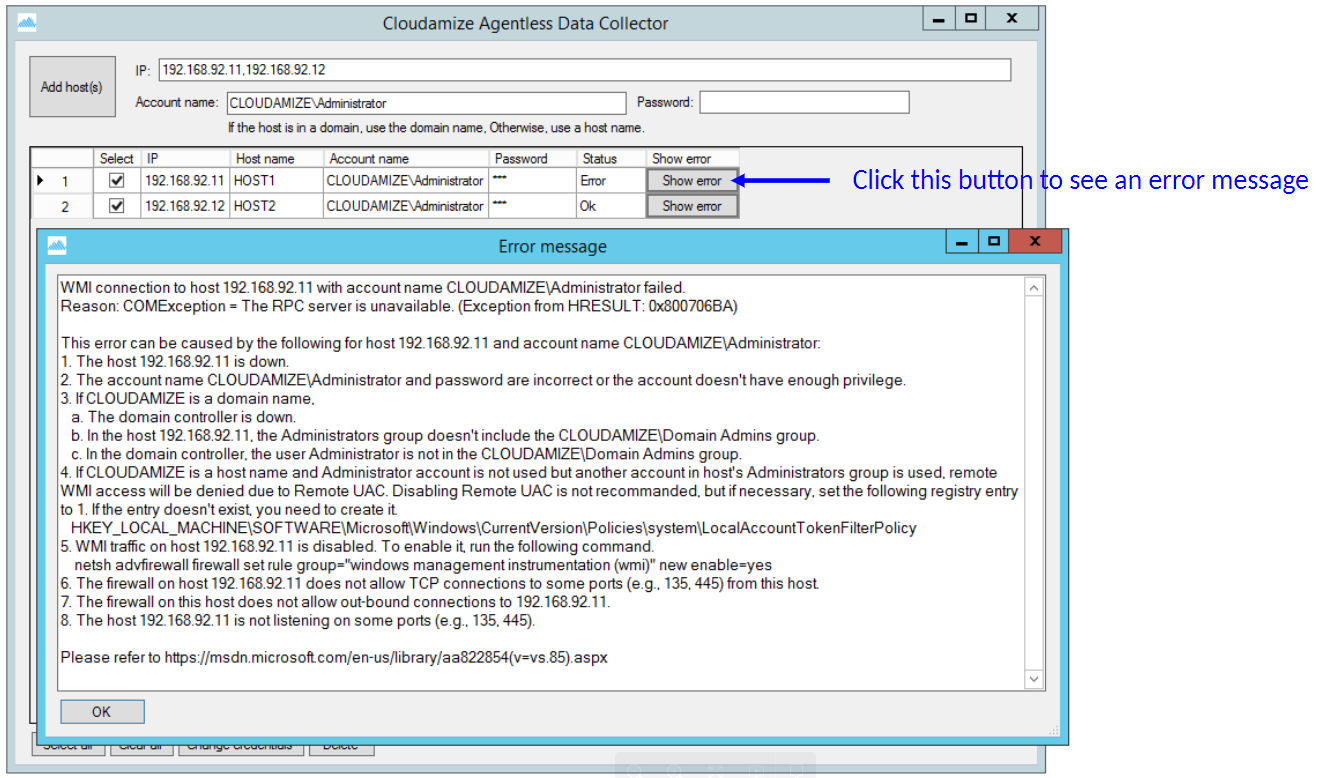
Another window will open with more information about the error. Please refer to this page for troubleshooting WMI connection issues. You can review the information in the pop-up window and attempt to fix the error or contact helpdesk@cloudamize.com for assistance.
Change Access Credentials
You can edit the credentials of a host by clicking the checkbox on the left of the row and selecting Change Credentials at the bottom of the UI.
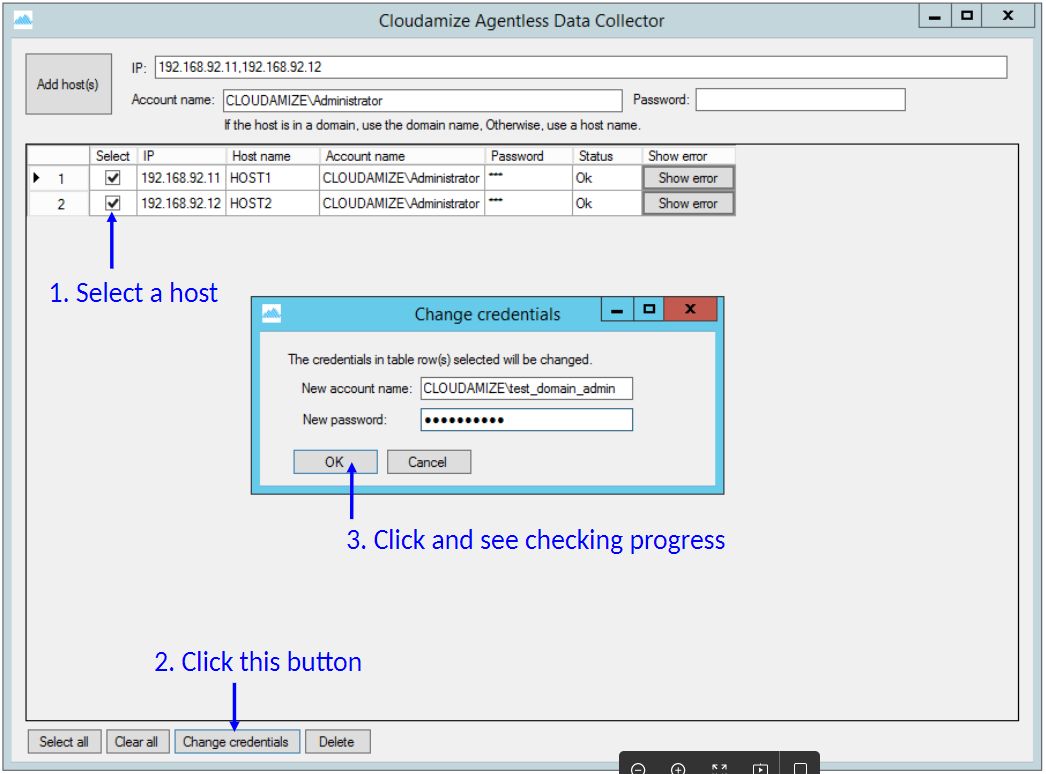
The changes made to the credentials will now be displayed in the UI.
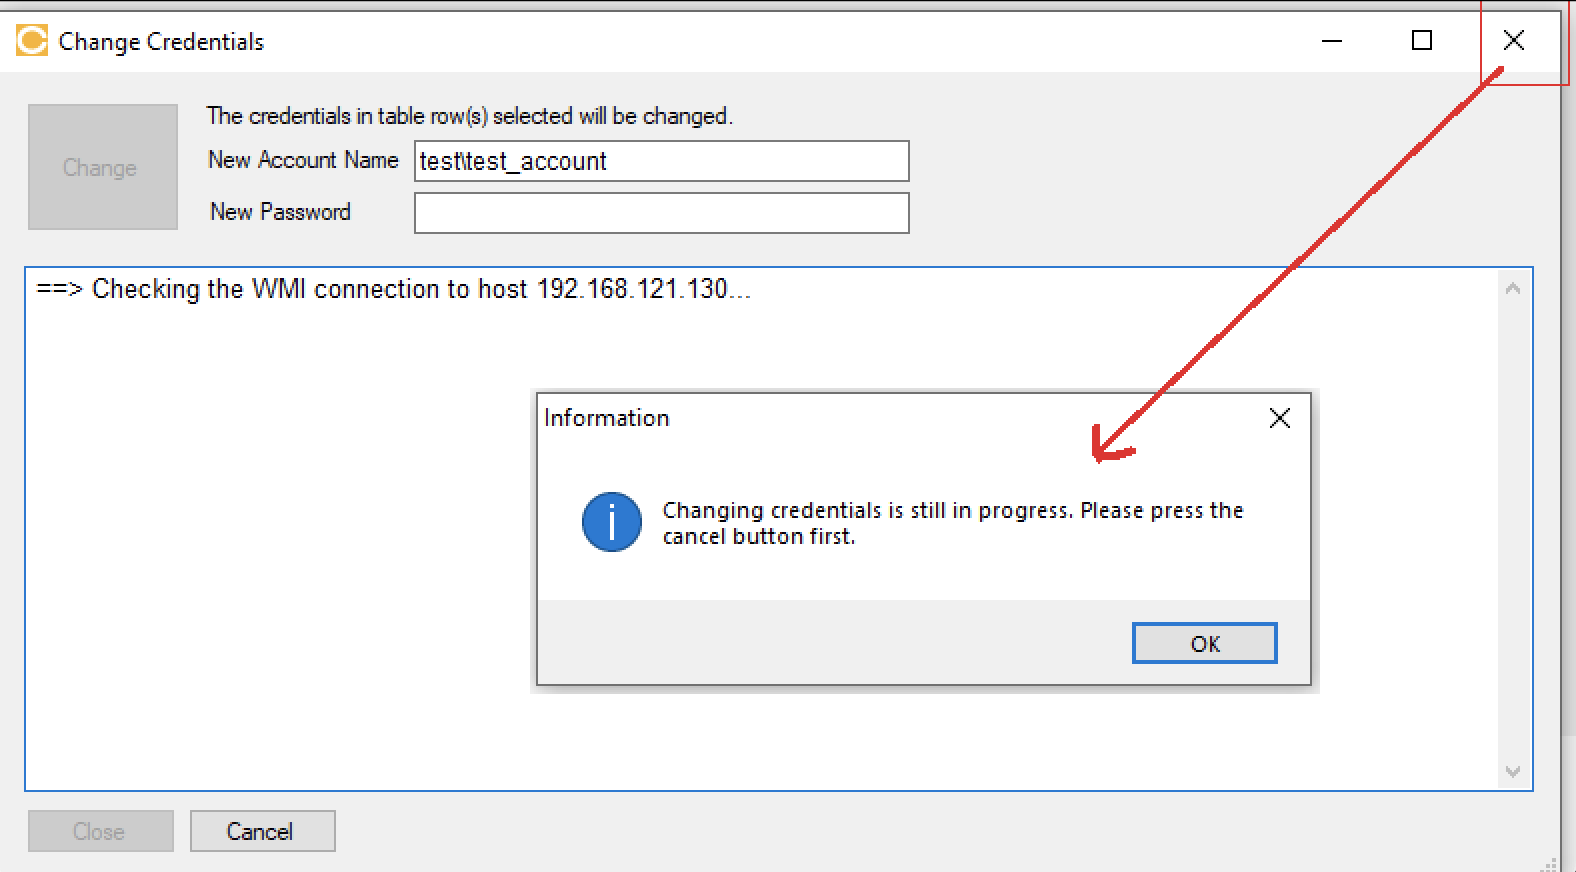
If the Change Credentials process is running, you will not be able to close the window until the process is stopped by the user canceling the process or the process completes on its own.
You can retry credentials without having to open the Change Credentials window

Deleting a Remote Host
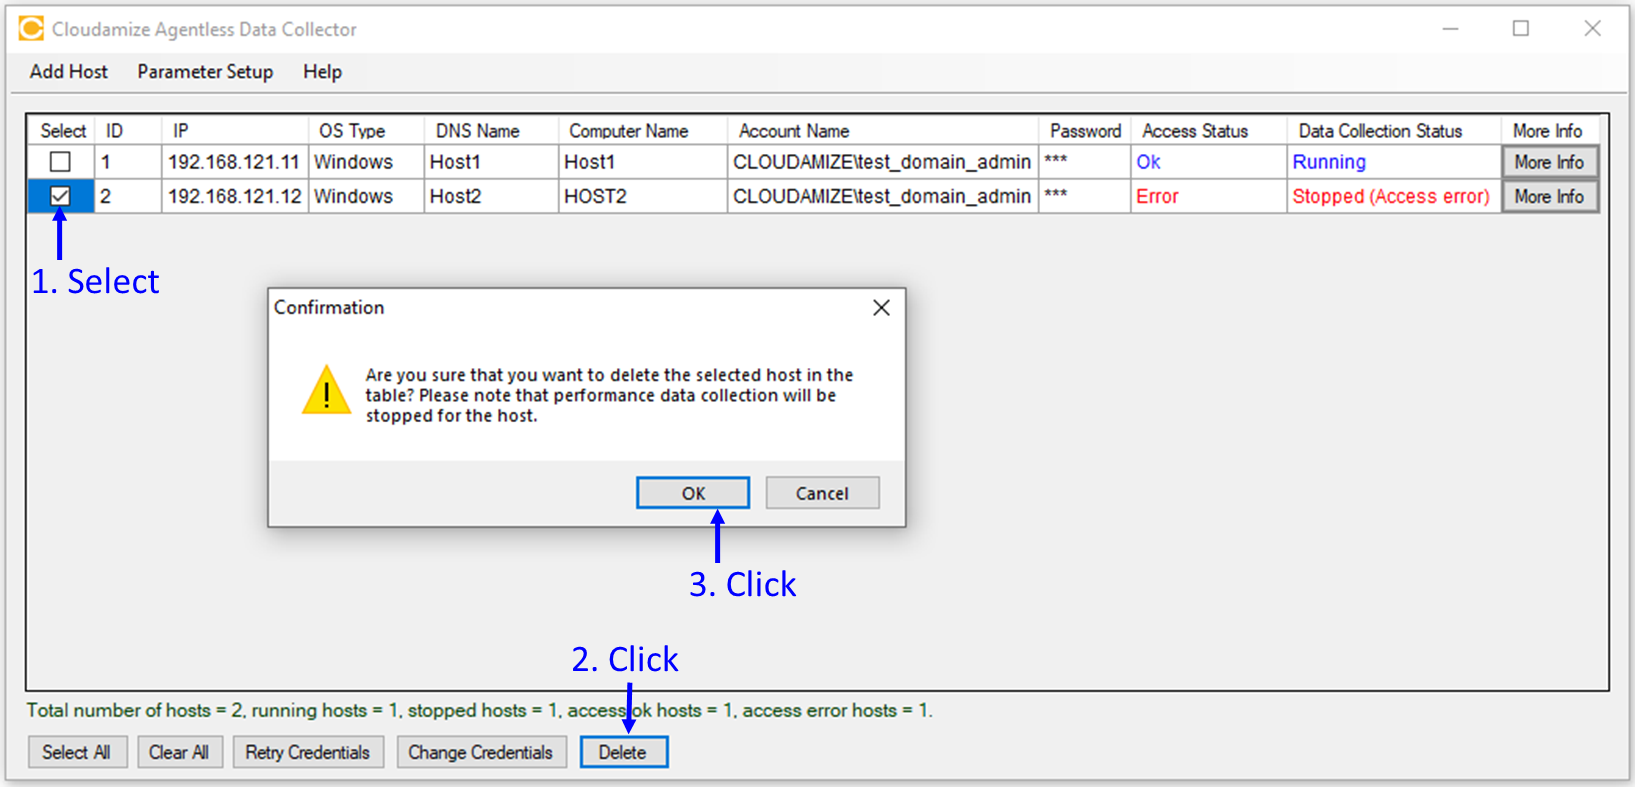
To delete one or more remote hosts, select the host(s), click the Delete button, and click the OK button on the confirmation pop-up window.
Parameter Setup
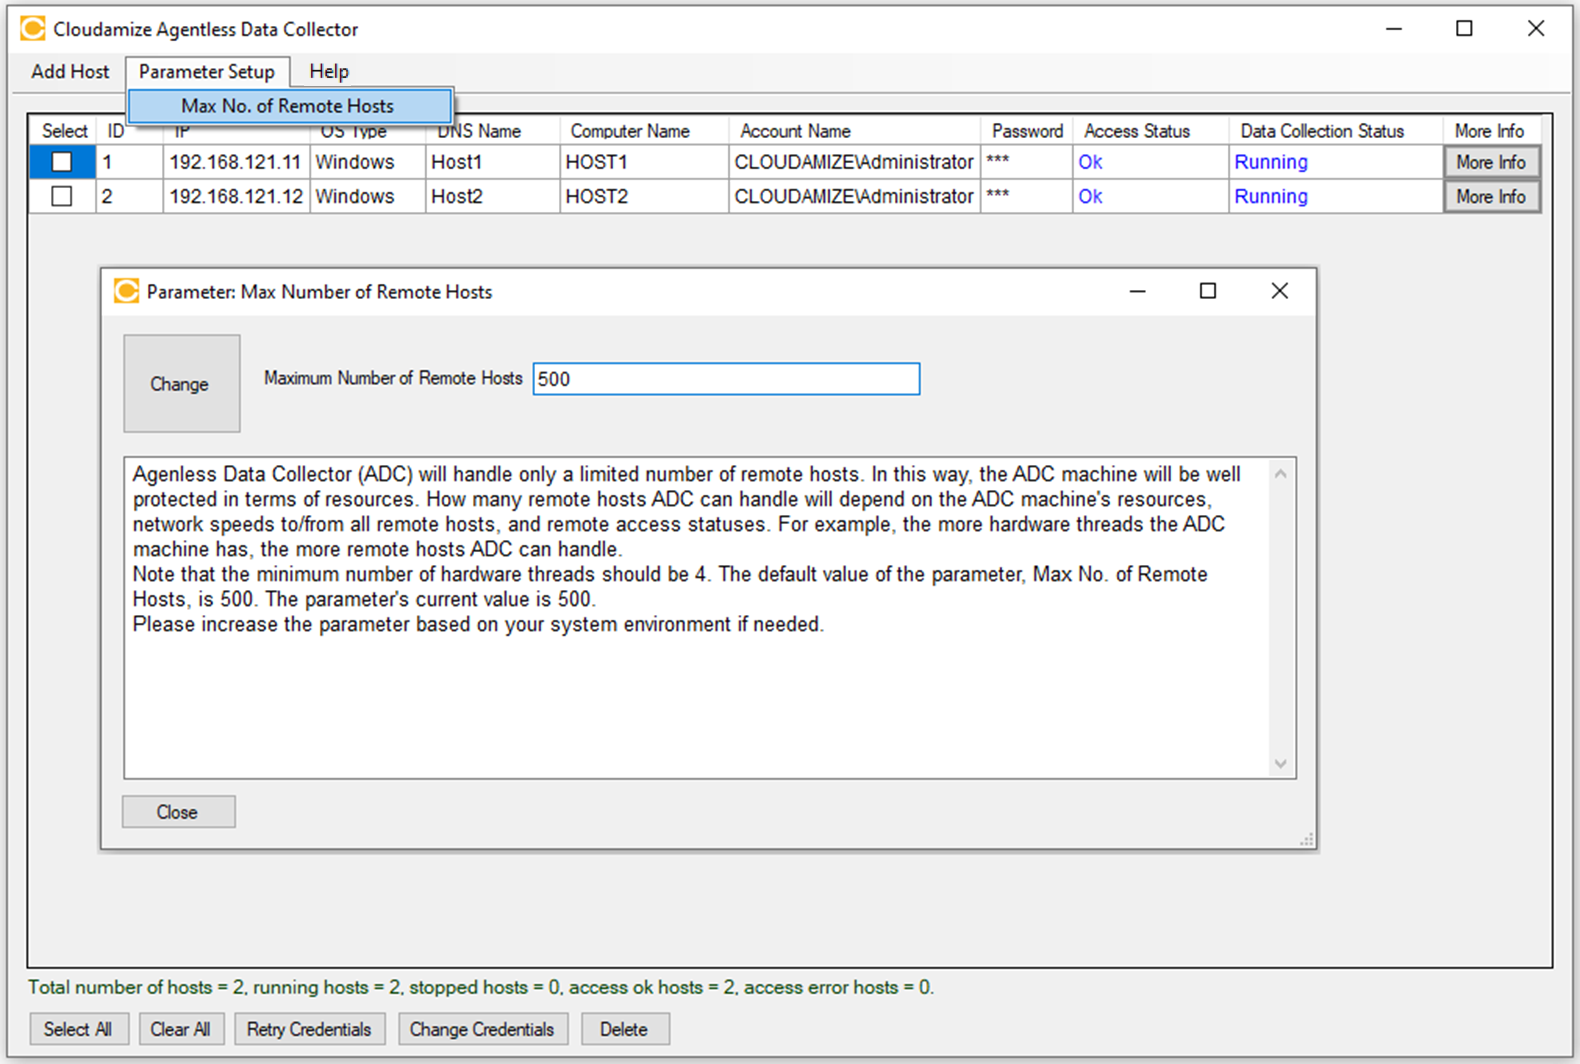
You can set up the max. number of remote hosts. The default value is 500, and we suggest 500. If you want to increase it, computer resources need to be increased too (e.g., number of hardware threads).
Error Message
Adding Hosts More Than Limit
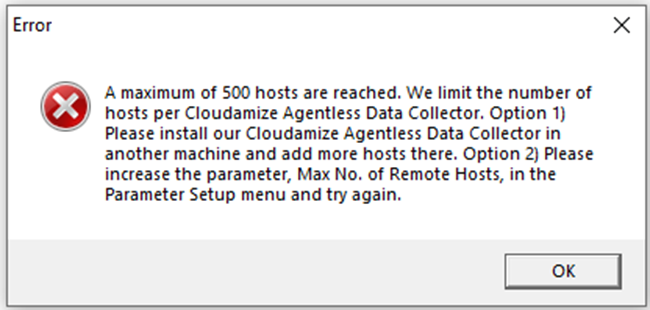
The default limit of adding hosts per Agentless Data collector is 500 to protect ADC well in terms of resources, and if you try to add hosts more than the limit (e.g., 500 hosts), the following error message will appear.
If you have any queries, please get in touch with the helpdesk via our Helpdesk Portal or by email at helpdesk@cloudamize.com.