
Agentless Data Collector Errors Troubleshooting
When adding Windows remote hosts to an Agentless Data Collector, occasionally the error output will include a WMI error, usually along with an error code that identifies the issue.
Your first point of call for any issues relating to WMI should be Microsoft, and you can find a guide to the error codes on this page: https://learn.microsoft.com/en-gb/windows/win32/wmisdk/wmi-troubleshooting?redirectedfrom=MSDN
We’ll cover the most commonly seen errors in this article, along with the troubleshooting steps for resolving them.
WMI is a Windows framework produced and managed by Microsoft. Cloudamize Agentless Data Collector utilises this framework when remotely querying Windows hosts, but does not publish or support the WMI framework itself. Please consult with your IT and/or security teams before making any changes to your Windows settings.
RPC Server is Unavailable
This error will appear in the following format in Cloudamize ADC output:
COMException = The RPC server is unavailable. (Exception from HRESULT: 0x800706BA)The Cloudamize ADC sends WMI commands to remote Windows hosts via the Remote Procedure Call RPC service. When the ADC is unable to use this service, this error message may be output. There are two troubleshooting steps to check in this case:
Changing firewall settings is a security-sensitive action. Cloudamize includes these troubleshooting steps as a how-to guide but cannot actively recommend making any changes to access permissions without following the correct change procedure for your organisation. Please consult with your IT and/or security teams before making any changes listed here.
Ensure that the Remote Procedure Call service is running on the Windows remote host that is being added to the ADC (it should appear in Services as RpcSs). If it is stopped it will need to be started.
Ensure that the full range of RPC firewall ports are open between the ADC server and the remote host:
TCP port 135 for RPC
The full dynamic RPC port ranges appropriate for the remote host’s OS version:
Windows Server 2008 and later: TCP ports 49152 to 65535
Windows Server 2003 and earlier: TCP ports 1025 to 5000
TCP port 445 for SMB (Server Message Block, required for RPC connections)
The RPC dynamic port ranges are customisable, so if they have been changed in your environment to a different range, use this custom range in place of the previously listed dynamic port ranges.
With the service running and the firewall ports open, you can re-add the remote host and it should clear this error message. If these steps do not clear this error, capture the error output and a copy of the log_backup.txt file in the Cloudamize Agentless DC directory immediately after the error is shown and get in touch with helpdesk@cloudamize.com with these for further assistance.
Access is Denied
This error will usually appear in the following format in the Cloudamize ADC output:
Access is denied. (Exception from HRESULT: 0x80070005 (E_ACCESSDENIED))When running commands via remote WMI, additional permissions are checked on the remote host by the Distributed Component Object Model (DCOM). If DCOM is not configured to allow remote WMI commands, it will return this error message and this specific error code, which the ADC will report in its output.
General WMI troubleshooting using the WBEMTEST tool provided by Microsoft may miss this error if the tool is run locally on the server that is producing this error. Local WMI commands and remote WMI commands require different levels of permission, and a particular WMI command that succeeds locally may fail remotely due to insufficient DCOM permissions. It’s important to keep this distinction between local and remote in mind when troubleshooting WMI errors using this, or any other, tool.
Changing DCOM permissions is a security-sensitive action. Cloudamize includes these troubleshooting steps as a how-to guide but cannot actively recommend making any changes to access permissions without following the correct change procedure for your organisation. Please consult with your IT and/or security teams before making any changes listed here.
Microsoft provides advice for configuring DCOM permissions for remote access at this link: https://learn.microsoft.com/en-us/windows/win32/wmisdk/troubleshooting-a-remote-wmi-connection#dcom-access-denied
Full step-by-step instructions are linked here: https://learn.microsoft.com/en-us/windows/win32/wmisdk/securing-a-remote-wmi-connection#setting-dcom-security-to-allow-a-user-to-access-a-computer-remotely
The solution involves allowing the user account (the one connecting from the ADC) Remote Launch and Remote Activation permissions in dcomcnfg (the DCOM configuration file). Please follow the guides as laid out by Microsoft if you are implementing this fix.
If you have updated the DCOM remote launch and remote activation permissions for the user account that the ADC is connecting with and are still experiencing the same error code output when trying to add the remote host, please capture the error output and take a copy of the log_backup.txt file located in the Cloudamize Agentless DC directory and get in touch with helpdesk@cloudamize.com with these.
Management Exception = Access Denied
This error will usually appear in the following format in the Cloudamize ADC output:
management exception=access deniedThis error appears when the remote host is not configured to allow local WMI commands for the user account the ADC is connecting with.
Changing WMI permissions is a security-sensitive action. Cloudamize includes these troubleshooting steps as a how-to guide but cannot actively recommend making any changes to access permissions without following the correct change procedure for your organisation. Please consult with your IT and/or security teams before making any changes listed here.
In order to resolve this error, you will need to allow the user account to run WMI commands via the WMI Control Windows snap-in which can be accessed via the Control Panel or by opening a Run window, typing wmimgmt.msc and clicking run.
In the WMI Control settings, locate the user account in question and make sure it has Remote_Access set to true.
If WMI Control shows the user account the ADC is connecting with present and shows Remote_Access is true, please get in touch with helpdesk@cloudamize.com with the ADC error output, a copy of the log_backup.txt file located in the Cloudamize Agentless DC directory, and a screenshot of the WMI Control window from the remote host that is returning the error.
CustKey is missing or empty
This error will usually appear in the following format in the Cloudamize ADC log output:
CloudamizeCurl.exe output = {"response":"parseRegisterXml(): In registration XML file, custKey is missing or empty.This error appears when the customer key is missing or empty in property.xml.
The solution involves here is to follow below steps to update the Customer Key, it needs to be updated under the below location on the ADC machine.
1-> C:\ProgramData\CloudamizeAgentlessDc\VERSION\Property.xml
2-> Update <customerkey value="customerkey"/>
3-> Restart agent services (Cloudamize Agent, Cloudamize Watchdog)
Once the customer key is updated please relaunch the ADC UI. The nodes should change the status to collecting data on http://console.cloudamize.com/ within an hour or so.
Windows Troubleshooting
Account Credentials

This error occurs when a Domain name is not specified. The format for the username is DomainName\Administrator
Cloudamize Agentless Data Collector is flagged by Antivirus
An anti-virus may flag our agentless data collector as the installation package includes obfuscated code to protect our Intellectual Property. When the Cloudamize agentless data collector is flagged by an antivirus, re-installing on the same host is sometimes not possible due to remnants left behind during the uninstallation process. Cloudamize recommends a fresh installation of the agentless data collector on a different host that meets the prerequisites.
In the event that hosts were added to the agentless data collector, the HostInfo.xml and HostInfoBackup.xml files should be backed up in a separate folder, such as C:\Temp, before uninstalling the Cloudamize agentless data collector. These files are located in: C:\Program Files\CloudamizeAgentlessDC or C: Program File (x86)\CloudamizeAgentlessDC depending on your architecture. Please note that these files can only be accessed by accounts that belong to the Administrators group.
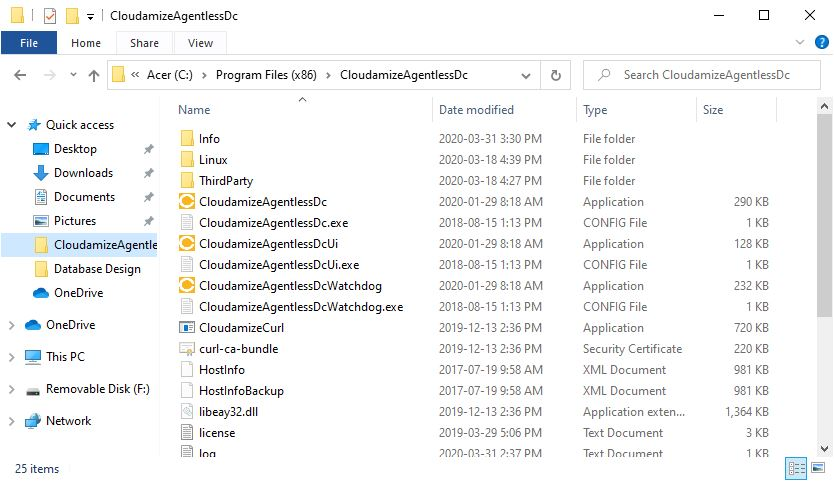
Folder showing the location of HostInfo.xml and HostInfoBackup.xml on (x86) architecture
When the HostInfo.xml and HostInfoBackup.xml files are backed up, the Cloudamize agentless data collector can be uninstalled. You can download the latest version of the data collector from the portal.
Follow the usual process (above) to install. Once the installation has completed, copy the HostInfo.xml and HostInfoBackup files back into C:\Program Files\CloudamizeAgentlessDC\ or C:Program Files(x86)\CloudamizeAgentlessDC and restart the Cloudamize Watchdog and Cloudamize Agent services.
Unable to resolve a node
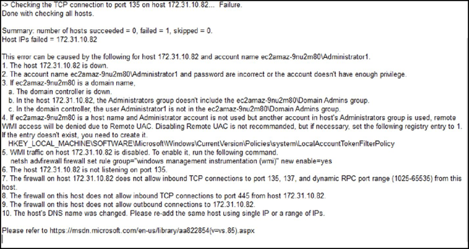
The host [IP Address] is down
The account name and password are incorrect, or the account does not have sufficient privileges.
If the server is domain joined, the domain controller itself may not be running.
The Active Directory administrator group may not include the domain administrator group.
The user account provided may not be in the domain admin group, or it may not be the local administrator account.
A local account on the server is in use, and it is a member of the administrator's group but not the administrator account itself.
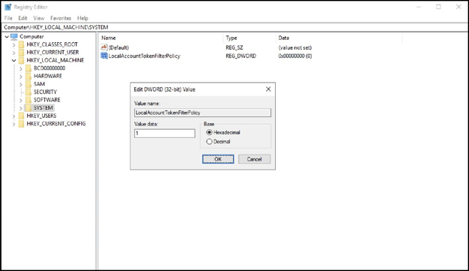
Entry Key to disable UAC:
HKEY_LOCAL_MACHINE\SOFTWARE\Microsoft\Windows\CurrentVersio n\Policies\system\LocalAccountTokenFilterPolicy
Note: A new registry key will be required if the file path does not exist. Please note that this will require administrative privileges.
Open Regedit, right-click on the System folder, and select “New” and “DWORD (32-bit)”
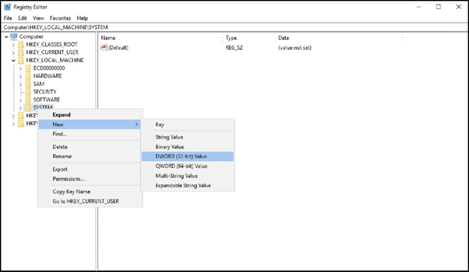
Change the name of the new registry entry to LocalAccountTokenFilterPolicy.
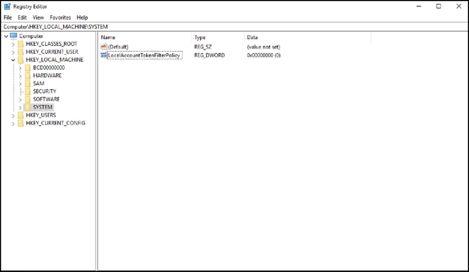
Right-click on the registry entry and select “Modify”
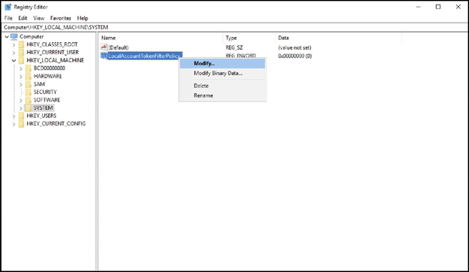
Change the value from 0 to 1 and select “OK”
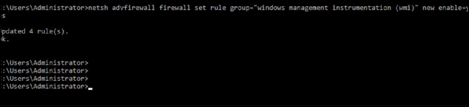
WMI traffic is not enabled. Run the following command in an elevated command prompt:
netsh advfirewall set rule group=“windows management instrumentation (wmi) new enable=yes
6, 7, 8, 9, 10. Windows Firewall issues. Refer to the Firewall requirements section Under Window Agentless Data Collector Setup.
Linux Troubleshooting
Creating a user
To create a new user:
sudo useradd [username]

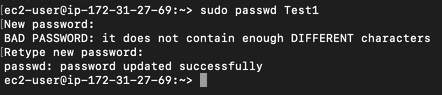
Update the user password:
sudo passwd [username]
Root permissions
Navigate to the /etc directory:
cd /etc

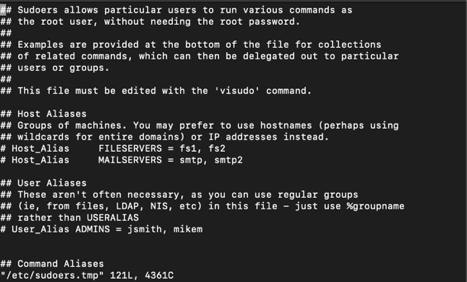
Open the Sudoers file by entering the following command in the /etc directory:
sudo visudo
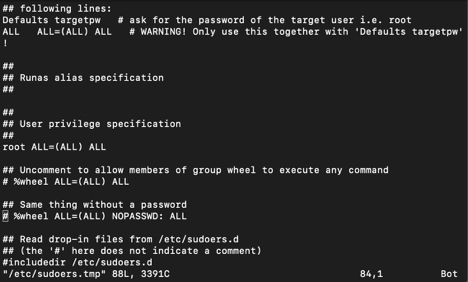
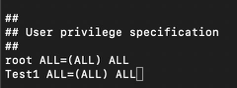
Navigate to root ALL=(ALL) ALL underneath the header User Privilege. Move the cursor to the end of the line and enter the letter “o”, this will create a new line. Enter the following text:
[username] ALL=(ALL) ALL
Press the Esc key, type “:wq!” and press Enter
Redhat
Create a new user:
sudo useradd [username]

Update the user password:
sudo passwd [username]

Navigate to the /etc directory:
cd /etc

Open the Sudoers file by entering the following command in the /etc directory:
sudo visudo
Navigate to %wheel ALL=(ALL) ALL in the sudoers file
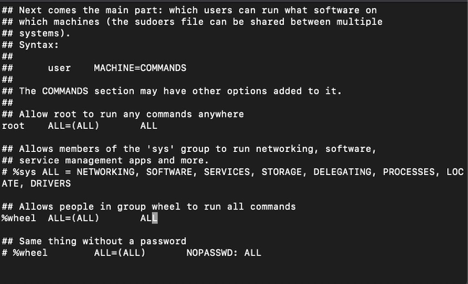
Note: If there is a # symbol in front of %wheel ALL=(ALL) ALL then it must be removed before editing the configuration. Remove the #, press the Esc key, type “:wq!” and press Enter
Add the user to the wheel group
sudo usermod -aG wheel [username]

Verify that the [username] account has been added to the group.

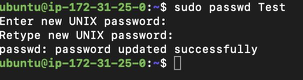
Ubuntu
Create a new user:
sudo useradd [username]

Update the user password:
sudo passwd [username]
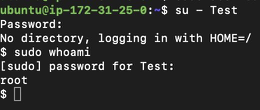
Add the user account to the sudo group:
sudo usermod -aG sudo Username

To verify the user account has been added to the sudo group:
su - [username]
Enter the password for the account and type the following command:
sudo whoami
If you are still experiencing issues, please send log files of the affected node(s) to helpdesk@cloudamize.com. The log files are located in C:/Program Files/Cloudamize for Windows machines, /usr/local/cloudamize/logs/ for Linux.