

Troubleshooting issues with the Cloudamize Linux agent
Issues:
-
After installation, the Inventory Settings page does not display your machine in the list of available machines, or your machine is listed on the Inventory Settings page, but the Data Collection column displays "Inactive."
-
The Agent will not install.
-
During an installation of an agent as a root user, after running the install command throws an error “failed to execute operation: Access denied.”
Solution 1 - Issues after installation:
-
Verify that the Linux agent is installed by running the following command:
cd /usr/local/cloudamize/-
You will receive output that the file or directory does not exist if this is the case
-
-
Verify that the Cloudamize agent process is running by typing the following command into the terminal:
ps -aux | grep CCAgent-
If running, a line will output similar to:
user 8462 0.0 0.0 14224 936 pts/4 S+ 17:24 0:00 /bin/bash /usr/local/cloudamize/bin/CCAgent
-
-
Verify that the agent watchdog process is running by typing the following command into the terminal:
ps -aux | grep check_cloudamized-
If running, a line will output similar to:
user 8462 0.0 0.0 14224 936 pts/4 S+ 17:24 0:00 /bin/bash /usr/local/cloudamize/bin/check_cloudamized.sh
-
-
If the check_cloudamized.sh process or the agent process is not running, you can start it manually by entering the following two commands into the Linux terminal:
cd /usr/local/cloudamize/bin/sudo ./check_cloudamized.sh -
The machine where the Cloudamize agent is installed needs to have access to the internet.
-
Verify that your machine's network firewall is permitted to send and receive traffic to the Cloudamize servers at 35.171.170.26 (for US infrastructure) and 18.194.12.63 (for EU infrastructure) on port 443 by typing the following into the terminal:
curl -v https://am.cloudamize.com/cxf/test (for US infrastructure)curl -v https://am-de.cloudamize.com/cxf/test (for EU infrastructure)curl -v https://am-ae.cloudamize.com/cxf/test (for UAE infrastructure)
-
Solution 2 - Agent won't install:
-
Verify you're using one of the following OSes:
-
Red Hat Enterprise Linux Server release 7.0 or higher
-
Oracle Linux 6.5 or higher
-
Ubuntu 16.04 or higher
-
CentOS release 7 or higher
-
Debian GNU/Linux 8.0 or higher
-
Amazon Linux AMI release 2013.03 or higher
-
Fedora release 12 or higher
-
Suse Linux 11 or higher
-
-
Verify you have root access.
-
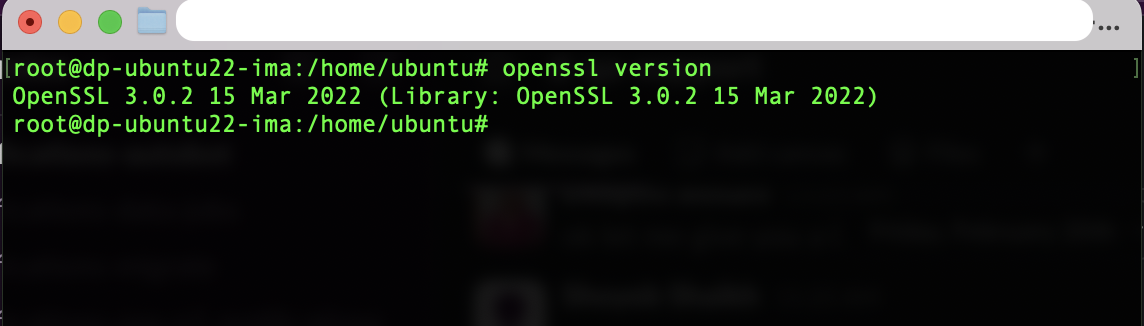
Verify your OpenSSL version is supported. Example on Red Hat (note different distros will use different commands):
Solution 3 - Issues during an installation:“failed to execute operation: Access denied”:
-
The issue is probably related to the restrictive SELinux policies.
-
After an installation, try to enable the service directly by running the following commands
systemctl enable cloudamizedsystemctl start cloudamized -
It’s possible that it might work after running the above commands. If so, check that the service is running, and if yes, the Installation should be successful.
-
If the above steps do not work, then the issue is probably due to SELinux, and then try just temporarily disabling SELinux and running the installer (as root):
Step 1: Export your customer key.
export CLOUDAMIZE_CUSTOMER_KEY=<YOUR CUSTOMER KEY>
setenforce 0
Step 2: Execute the command listed in the assessment portal as root, eg:
$ sh <(curl 'https://am.cloudamize.com/cxf/downloadFileV3?custkey=<YOUR CUSTOMER KEY>&filename=installCloudamizeAgentV2.sh' -L) setenforce 1 -
If it’s not possible to disable it due to company policies or other concerns, running the below command can confirm it is a SELinux issue. After executing the Cloudamize install commands, run:
ausearch -m avc -ts recent -
This command will return all recently blocked access requests by SELinux. If systemctl enable/start is among them, it is definitely a SELinux policy that is blocking it.
-
Starting the service directly as root does not work, so it’s unlikely any method will be able to start it without modifying or disabling the SELinux policy, causing the deny.
If starting the services directly does work, and the solution for that is then downloading and executing the script may work, i.e.export CLOUDAMIZE_CUSTOMER_KEY=<YOUR CUSTOMER KEY>curl 'https://am.cloudamize.com/cxf/downloadFileV3?custkey=<YOUR CUSTOMER KEY>&filename=installCloudamizeAgentV2.sh' -L -o installCloudamizeAgentV2.shbash installCloudamizeAgentV2.sh rm installCloudamizeAgentV2.sh
-
To test the return of data from our Agent Manager, run the following command:
-
curl -v https://am.cloudamize.com/cxf/test (for US infrastructure)
-
curl -v https://am-de.cloudamize.com/cxf/test (for EU infrastructure)
-
curl -v https://am-ae.cloudamize.com/cxf/test (for UAE infrastructure)
-
If you're still having trouble with installation after going through these steps, or do not understand the output from the return of data from our Agent Manager, contact support at helpdesk@cloudamize.com. You should include the log files (if available) for the affected machines. You can compress this directory to send by running the following command:
tar -czvf cloudamize-logs.tar.gz /usr/local/cloudamize/logs/
If you have any queries, please get in touch with the helpdesk via our Helpdesk Portal or by email at helpdesk@cloudamize.com.