

Overview
The Cloudamize Linux Agent is a lightweight service installed locally on your Linux hosts. It collects performance and inventory metadata and transmits it securely via an outbound connection to the Cloudamize analytics engine. This method is ideal for machines where local data collection is preferred over remote polling.
Prerequisites
Before beginning the installation, please ensure your environment meets the necessary network and system requirements.
-
Requirements: Review the Cloudamize Agent Installation Prerequisites.
-
Root Access: You must have
sudoor root privileges to install and start the service. -
Customer Key: Have your unique Cloudamize Customer Key ready (found in your Cloudamize console).
Note: The Cloudamize Linux Agents are designed exclusively to support the x64 machine architecture.-
This means the agents do not support other architectures, including AArch64 (ARM64), ARM32,“
-
Note: The Linux agent/agentless approach requires a user with root permissions to get PID-to-network mapping, certain hardware details, and data on logical/physical disk volumes. Become a root user either through "sudo -s" or "su"; most systems use sudo.
Procedure (default install method):
Log in to your Cloudamize console here, or launch the application from your Partner Dashboard if you have one.
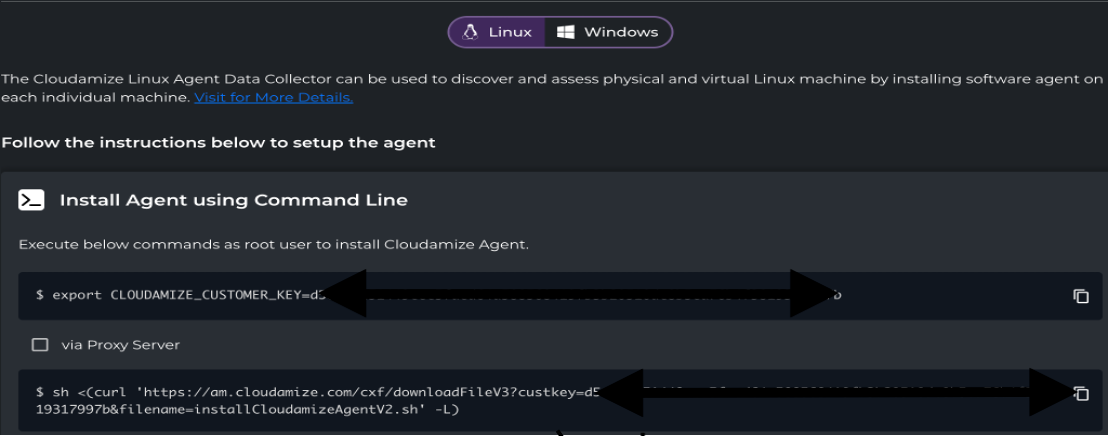
Navigate to the Discover section on the console portal. Click the Setup tab on the left-hand side, navigate to Agent Setup, then select the Linux tab.
Note: the commands below represent our US infrastructure. If you use our EU infrastructure, copy and paste the commands directly from your assessment.
Step 1: Export your customer key.
export CLOUDAMIZE_CUSTOMER_KEY=<YOUR CUSTOMER KEY>
Step 2: Execute the command listed in the assessment portal as root, eg:
$ sh <(curl 'https://am.cloudamize.com/cxf/downloadFileV3?custkey=<YOUR CUSTOMER KEY>&filename=installCloudamizeAgentV2.sh' -L)
The command does not work with sudo. If sudo must be used, it can be restructured like:
curl 'https://am.cloudamize.com/cxf/downloadFileV3?custkey=<YOUR CUSTOMER KEY>&filename=installCloudamizeAgentV2.sh' -L | sudo -E bash
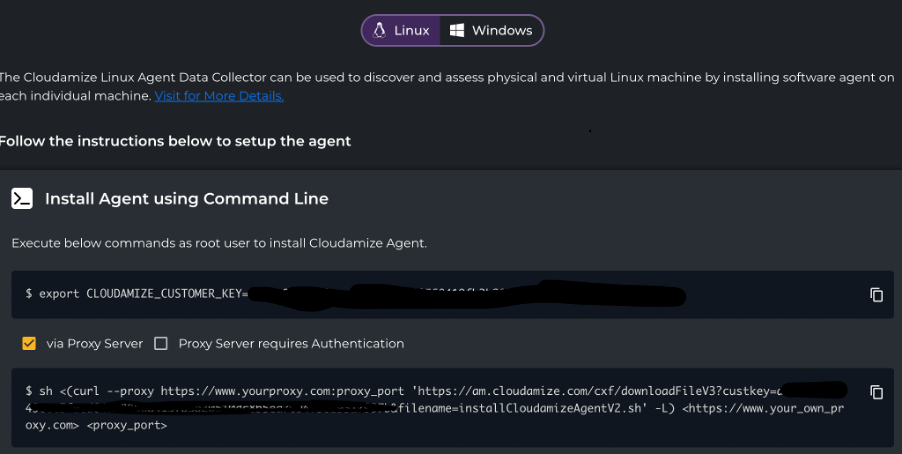
If you prefer to route the data through your own proxy server, check the box shown in the image below and use the commands provided in the consolehttp://console.cloudamize.com. The portal includes the necessary commands under the Assessments section.
Linux Install with Proxy
The agent can be configured to use a proxy. You will need to provide the proxy information both to the download application (curl) and as parameters to the installer script, as shown below.
Take care to use the correct type of proxy prefix - http vs https. Most proxies are HTTP proxies - this does not mean they cannot handle HTTPS traffic, as they will pass the encrypted traffic through if allowed. HTTPS proxies are generally security appliances that are used to inspect encrypted traffic prior to leaving the network. Connecting to a HTTP proxy with the https:// prefix will result in failure.
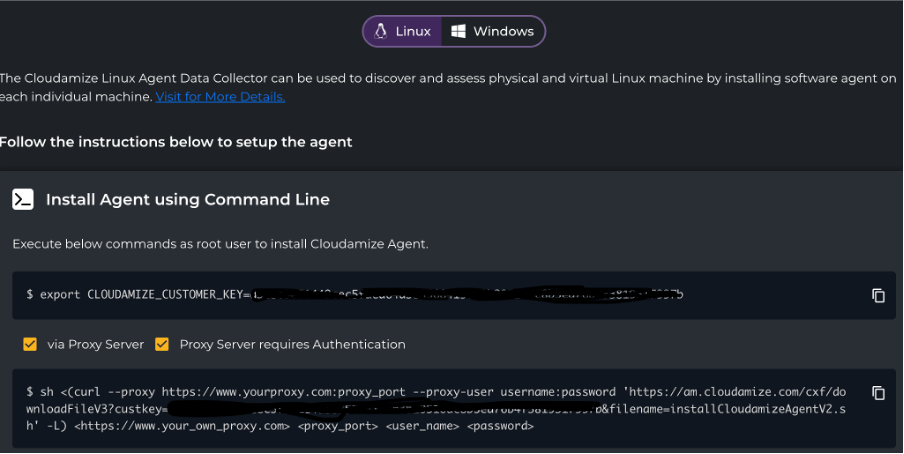
Linux Install with Authenticated Proxy
Deploy from Central Repository:
If each machine downloading the agent is not desired, one of the following offline installers can be used. This is particularly useful for machines that have older OpenSSL installations, as these packages contain an up-to-date curl/openssl application that can communicate with our servers.
You must decide whether to use RPM or DEB, but in general, RPMs are used by Red Hat, CentOS, SUSE, and Oracle Linux, and DEB is used by Debian and Ubuntu. A tgz archive is also available that contains all files necessary to install the agent and can be used for any supported Linux distribution.
Download:
Install:
The RPM/DEB/TGZ packages accept the same environment variables for configuration as the installer script. The “CLOUDAMIZE_CUSTOMER_KEY” variable must be set during the install for proper configuration; the agent must be configured later.
Proxy settings can be set via environment variables. If for some reason, environment variables cannot be used during the installation, please see “Configuring the Agent” below.
All installation methods require root access. If using sudo, please take care to ensure the environment variable is set (the easiest method being to use the -E flag of sudo).
Configuring the Agent
The agent can be configured while it is installed or after it is installed. The following environment variables can be used to configure during installation or when running the configure script: /usr/local/cloudamize/bin/configure.sh
The install.sh and configure.sh scripts can use command line options instead of environment variables, if desired.
An example configuration via command option:
sudo /usr/local/cloudamize/bin/configure.sh --customer-key <cust-key>
Example configuration via environment variables:
export CLOUDAMIZE_CUSTOMER_KEY=<cust-key>
sudo -E /usr/local/cloudamize/bin/configure.sh
Available options are:
|
Env Variable |
Parameter* |
Description |
|---|---|---|
|
CLOUDAMIZE_CUSTOMER_KEY |
--customer-key <cust-key> |
REQUIRED. The customer key to register with. |
|
PROXY_SERVER |
--proxy-server <proxy> |
Customer proxy server address to use with curl. |
|
PROXY_PORT |
--proxy-port <port> |
Customer proxy port. |
|
PROXY_UNAME |
--proxy-user <user> |
Customer proxy user name. |
|
PROXY_PSWD |
--proxy-pass <pass> |
Customer proxy user password. |
|
SERVER_IP |
--server-ip <ip> |
The Cloudamize server to connect to. Must also specify DNS. |
|
SERVER_DOMAIN_NAME |
--server-dns <dns> |
The Cloudamize server to connect to. Must also specify IP. |
|
USE_INSECURE_CURL=1 |
--insecure-curl |
Adds “-k” option to all curl commands to ignore certificate verification problems. |
|
PREFER_SYS_CURL=1 |
--prefer-sys-curl |
Attempts to connect using the curl installed on the system first instead of the cloudamize-packaged curl. |
|
REGISTER_IMMEDIATELY=1 |
--register |
TGZ or Script only. This will cause registration to occur during the installation and fail if registration is not successful. |
|
NO_ORACLE_DB=1 |
--no-oracle-db |
Does not collect Oracle Database information (no connection to databases) |
|
NO_CMD_COLLECTION=1 |
--no-command-collection |
Does not collect or process command lines |
|
NO_NET_COLLECTION=1 |
--no-network-collection |
Does not collect network connections |
|
NO_DOCKER_COLLECTION=1 |
--no-docker-collection |
Does not collect Docker information |
|
NO_DATA_MIGRATION=1 |
--no-data-migration |
Disables the ability to remotely install data migration agents like AWS MGN and Azure ASR. |
* Parameters are only for installCloudamizeAgentV2.sh and configure.sh
Click here for steps to troubleshoot installation issues.
Click here for instructions on how to uninstall the Linux agents.
If you're having trouble with installation after going through these steps, or do not understand the output from the return of data from our Agent Manager, contact support at helpdesk@cloudamize.com. You should include the log files (if available) for the affected machines. You can compress this directory to send by running the following command:
tar -czvf cloudamize-logs.tar.gz /usr/local/cloudamize/logs/
If you have any queries, please get in touch with the helpdesk via our Helpdesk Portal or by email at helpdesk@cloudamize.com.