

As a Cloudamize customer, you have access to various resources for software installation and data collection. We want you to understand what to expect from each installation method and the data they provide. You deserve excellent service while using our product, and we measure our success by your satisfaction.
Purpose
This document serves as a guide and reference for the various methods of installing our software, along with an overview of how each method collects data. The following sections will outline:
-
An introduction to the different installation types
-
Provide information regarding the data collected for each installation type
-
Roles and responsibilities for installation and data collection troubleshooting
-
Outline the assessment projected timeline
Installation Methods
Cloudamize can be installed on many different Linux flavors and Windows Server OSes. Click here for a full list of installation prerequisites. We can also collect data from many vCenter versions and Microsoft Hyper-V. Cloudamize is not intended to be installed on Desktop or laptop operating Systems. Unix systems and non-x86/64-based systems, such as ARM or Mainframes, are not supported.
Please note that Cloudamize employees cannot carry out the installation of any Cloudamize software on behalf of a customer, nor can they accept direct control of a customer’s system at any time during screen-share sessions. Installation is to be performed and managed by the customer only. Cloudamize does offer troubleshooting and installation advice as needed, including live support on screen-share sessions and support through our Helpdesk portal. See our Offerings and SLA document, and our Installation and Troubleshooting guides in this Knowledge Base for further details on support offerings and installation/troubleshooting processes.
Agent data collection
The Cloudamize Agent collects performance metrics, application dependencies, and SQL data from many Linux flavors and Windows Server OSes.
Note: Cloudamize won't be able to collect the data for storage from the servers that use NFS mounts; this is applicable for both the Agent and Agentless Data Collection methods. Though Cloudamize will be able to provide the results for the NFS-mounted servers, the results will not have accurate information for storage mapping. This includes both storage amount and performance characteristics, such as IOPS and throughput.
Agentless data collection
The Cloudamize Agentless Data Collector (ADC) collects performance metrics and application dependencies from each server discovered. The Agentless method can now be used to discover SQL workloads, though Agent-Based methods are still superior for this particular task.
Each ADC can collect metrics for up to 500 machines across your network. The ADC has an agent component that installs on the OS, and data from the OS is captured in that manner. This is important to note when installing an ADC on a hypervisor.
The ADC uses WMI to authenticate and collect data from Windows, and SSH to authenticate and collect data from Linux.
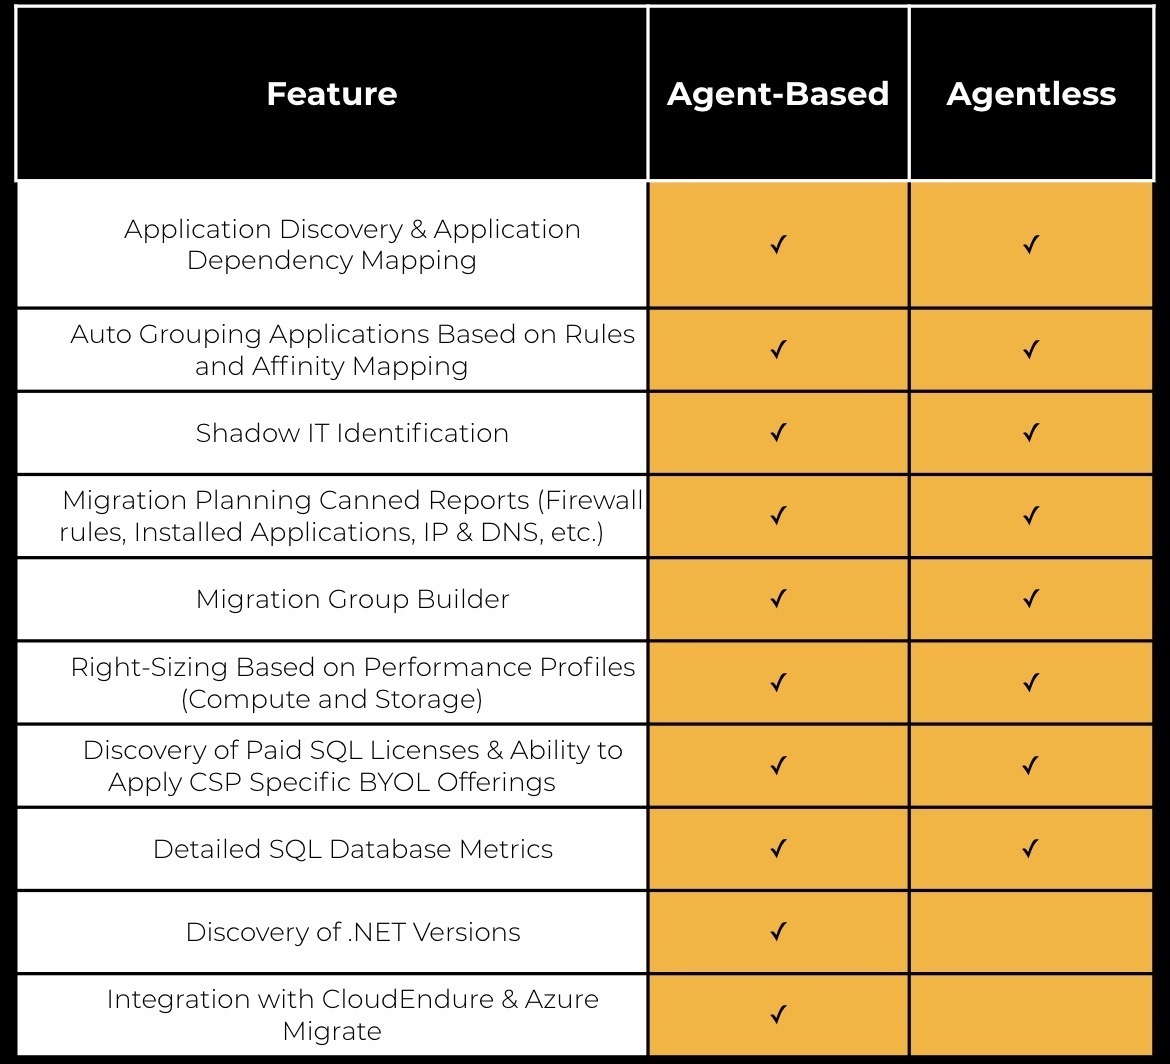
Note: There are key metrics that aren’t captured with the ADC, and subsequently, several features will not be available. Please reference the detailed feature comparison list before deciding on an installation method.
Hypervisor data collection
Cloudamize supports performance-level data collection from both vCenter and HyperV hypervisors. Speak with your Account Manager about collecting data from hypervisors.
Note: Unsupported hypervisors, such as KVM, will block CPU info from the Cloudamize agent and require manual entry by our support team.
When an agent is installed on a Hyper-V machine, it will capture performance-level data from the hypervisor level for all connected VMs. Each connected VM will account for (1) license. It is important to note that this method only captures performance data and will not give you access to the Cloudamize Migration Planner.
Hybrid installation
To gain access to the Cloudamize Migration Planner while still capturing performance-level data from a hypervisor, you will also install an agent on each VM or add each VM to an ADC to collect application-level data.
Before choosing this installation type, it is recommended that you speak with your Account Manager to go over the specifics of collecting data using 2 different sources, and how to ensure data collection is properly reconciled.
Note: Within 24 hours of installation, the application will reconcile the server count so that machines captured at the hypervisor level and have an agent or are being collected from an ADC will get reconciled. Meaning only (1) license will be used for each machine.
Data Collection in the Cloud Environment
Cloudamize software can be used to optimize existing cloud deployments, regardless of whether the customer is already operational in the cloud. While Cloudamize can be deployed on different cloud platforms, it is currently optimized for AWS, Azure, and GCP. Standard installation and functionality requirements must be met. Cloudamize Agent or Agentless data collection methods facilitate the assessment of the current cloud environment.
Getting Started: Installing Cloudamize
Overview
Cloudamize is a platform that enables you to capture detailed analysis of your predicted costs and performance, as well as design a successful roadmap for cloud migration based on application dependencies, suitability, and readiness, while ensuring cost-performance optimization at the moment applications are ready to migrate to the cloud.
Prior to Installation
Communication
Every Cloudamize installation method will need to communicate back to our server(s) over port 443, while others will require WMI and SSH to be configured internally to collect data. Additionally, the installation may require data to be sent through a proxy server, which may require our data collection server(s) to be whitelisted. It is important to know which systems, servers, or network administrators/technicians you will need for proper installation and effective troubleshooting during the planning phase.
The Cloudamize Agent and ADC use the utility ‘curl’ to test connectivity to our servers during installation and data collection. It is recommended that you test and resolve any communication issues prior to having your account provisioned.
See the troubleshooting documents below in the Installation & Troubleshooting section to test connectivity.
For Windows Agent, click here.
For Linux Agent, click here.
Whitelisting
The Cloudamize agent and ADC run obfuscated code to protect our intellectual property. Additionally, the ADC machine will try to communicate with upwards of 500 machines. Each of these, individually or together, could set off A/V software to flag Cloudamize as malicious. Whitelisting the software before installation is highly recommended.
Click here if your ADC gets quarantined by A/V software.
Authentication
When using the ADC, you will be required to authenticate to each server using a domain administrator account for Windows and an account in the wheel group (root or sudo) for Linux.
Important: To prevent any interruptions or data gaps, please ensure that the credentials used do not expire during the assessment
What makes a server unique?
Cloudamize software uses each server's UUID as its unique identifier. In some instances, we’ve seen VMs cloned with the same UUID. This is not supported by Cloudamize and will need to be resolved before installation begins. If a VM is cloned and rebooted with a new UUID, but is running the same workload as prior to the reboot, this machine will be captured as a new VM and consume another license. Citrix VDI environments are an example of an unsupported environment.
Conversely, if the IP address or hostname of a server changes during data collection, it will not create a duplicate record.
Data Collection Duration and Scope
By default, Cloudamize collects data for 11 days with 3 days of processing time for a total of 2 weeks from Assessment start to Results Delivery. The duration of data collection can be extended, provided it’s within the scope of the total assessment duration.
It is important to know if there are specific workloads you need to capture during the data collection period, e.g., month-end, database replication, etc., to accurately scope your project before your order is provisioned.
After Installation
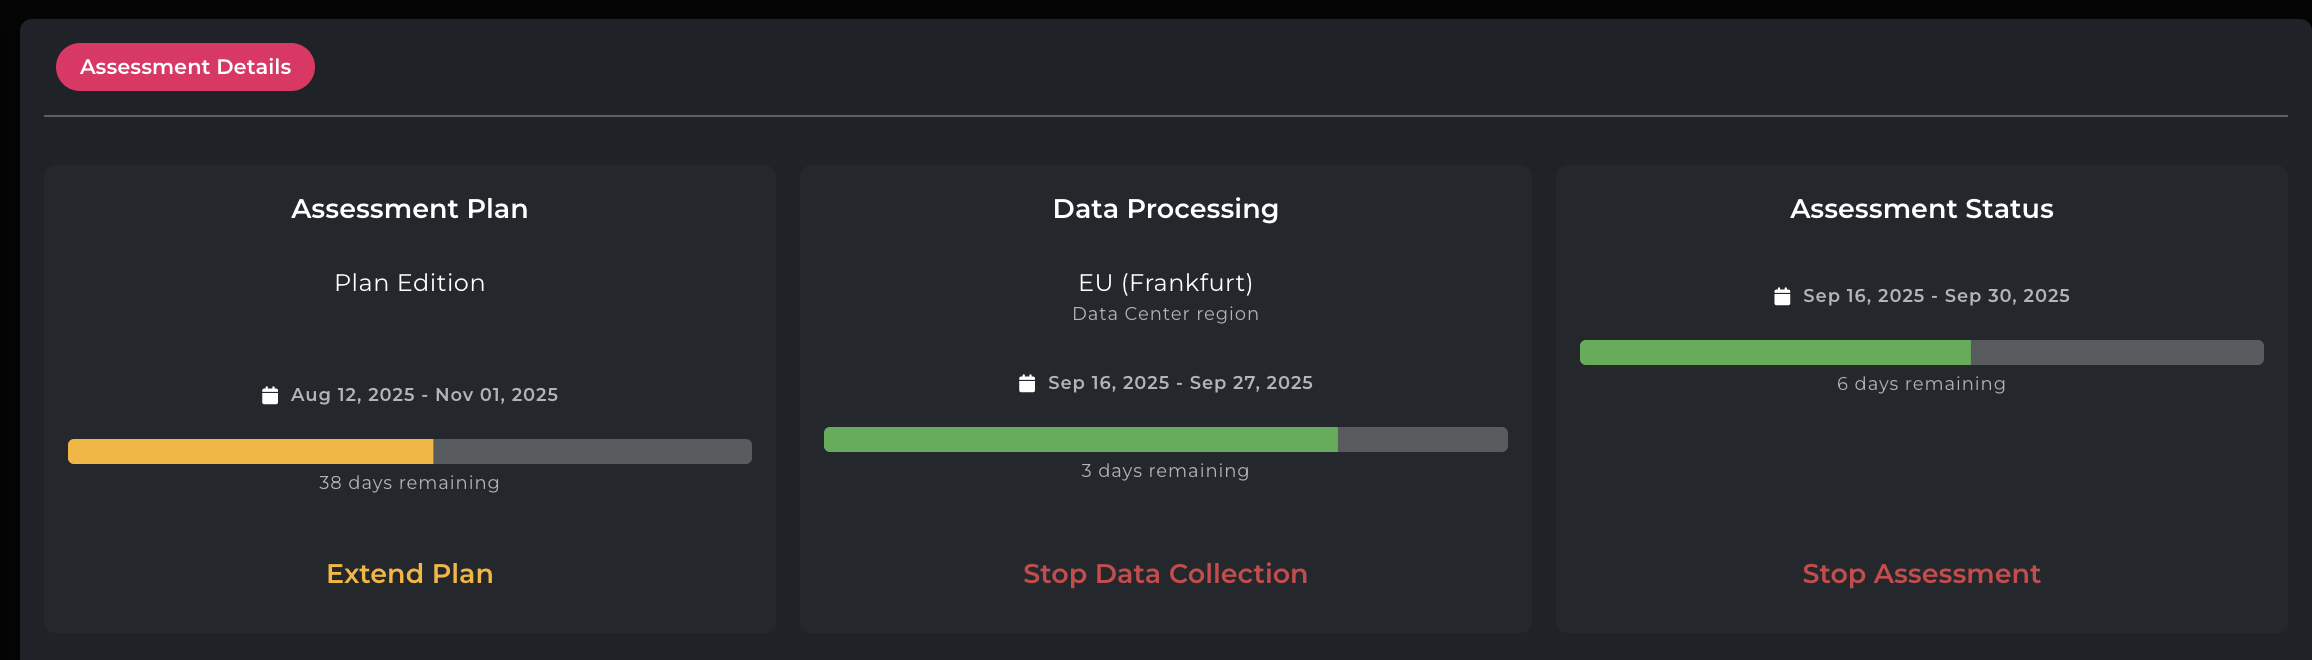
“After installation is completed on all necessary machines and all machines are included in the ‘Assessment Scope' with a status of ‘Collecting Data’, you are ready to click on the 'Start Assessment’ button. You will first be prompted to agree to the license terms. Once you have agreed to the license total, you will then be prompted to select a region and configure the assessment duration.
The region you select is considered for the pricing in the TCO results. We recommend selecting a region that is as close to the physical location of your machines as possible. Assessment duration should be configured as per the below guidelines to ensure the necessary amount of data is collected and time allowed for processing.”
Date Ranges mentioned below for reference:
Start Data Processing: select the Date on which you would like to start the assessment
End Data Processing: The tool will not allow you to select an End Data Processing date less than 11 days from the Start Data Processing date. You can request a shorter data collection period from the Delivery Manager. The Expected Assessment Completion date must be no less than 3 days more than the End Data Processing date. Requests for a shorter completion period are not possible.
Expected Assessment completion: Need at least 3 working days to process the collected data, and the assessment completion dates cannot be on the weekends(Sat and Sun)
Ex: If the End Data Processing is on “Thursday”, then the Expected Assessment completion date would be on the following “Monday” since the assessment completion dates cannot be selected for Weekends.
Note: For the node count above 1000 added to the assessment, then the duration b/w the End Data Processing and Assessment completion Date should be 5 days.
Click on the Start Assessment button → Click on Next on Node Summary page → Select the Region under Region Settings → Select the dates as required under Duration Settings → Click on Start Assessment.
-20240308-051412.png?cb=84f5d0c178a9909bd7960d545251ca35)
-20240308-051425.png?cb=08881063e0e4667a9aba7aa297c45dc3)
-20240308-051850.png?cb=2075a9f73cb8de55ebafb51db49088ae)
-20240308-051454.png?cb=9e8b28fe8bb2ee4aad144409066f7cf4)
Once your Assessment has started, you will see the following page. Click on the name of your assessment and click Settings to get back to the Inventory Settings page.
It is important to log in to your assessment frequently to check the status of data collection. The three statuses are as follows:
COLLECTING DATA: Data collection is working.
SLEEPING: We have a connection to the server, but data collection has stopped, and/or the agent is not running. Refer to the troubleshooting guides in the Index.
INACTIVE: We do not have an active connection to your server. Refer to the troubleshooting guides in the Index.
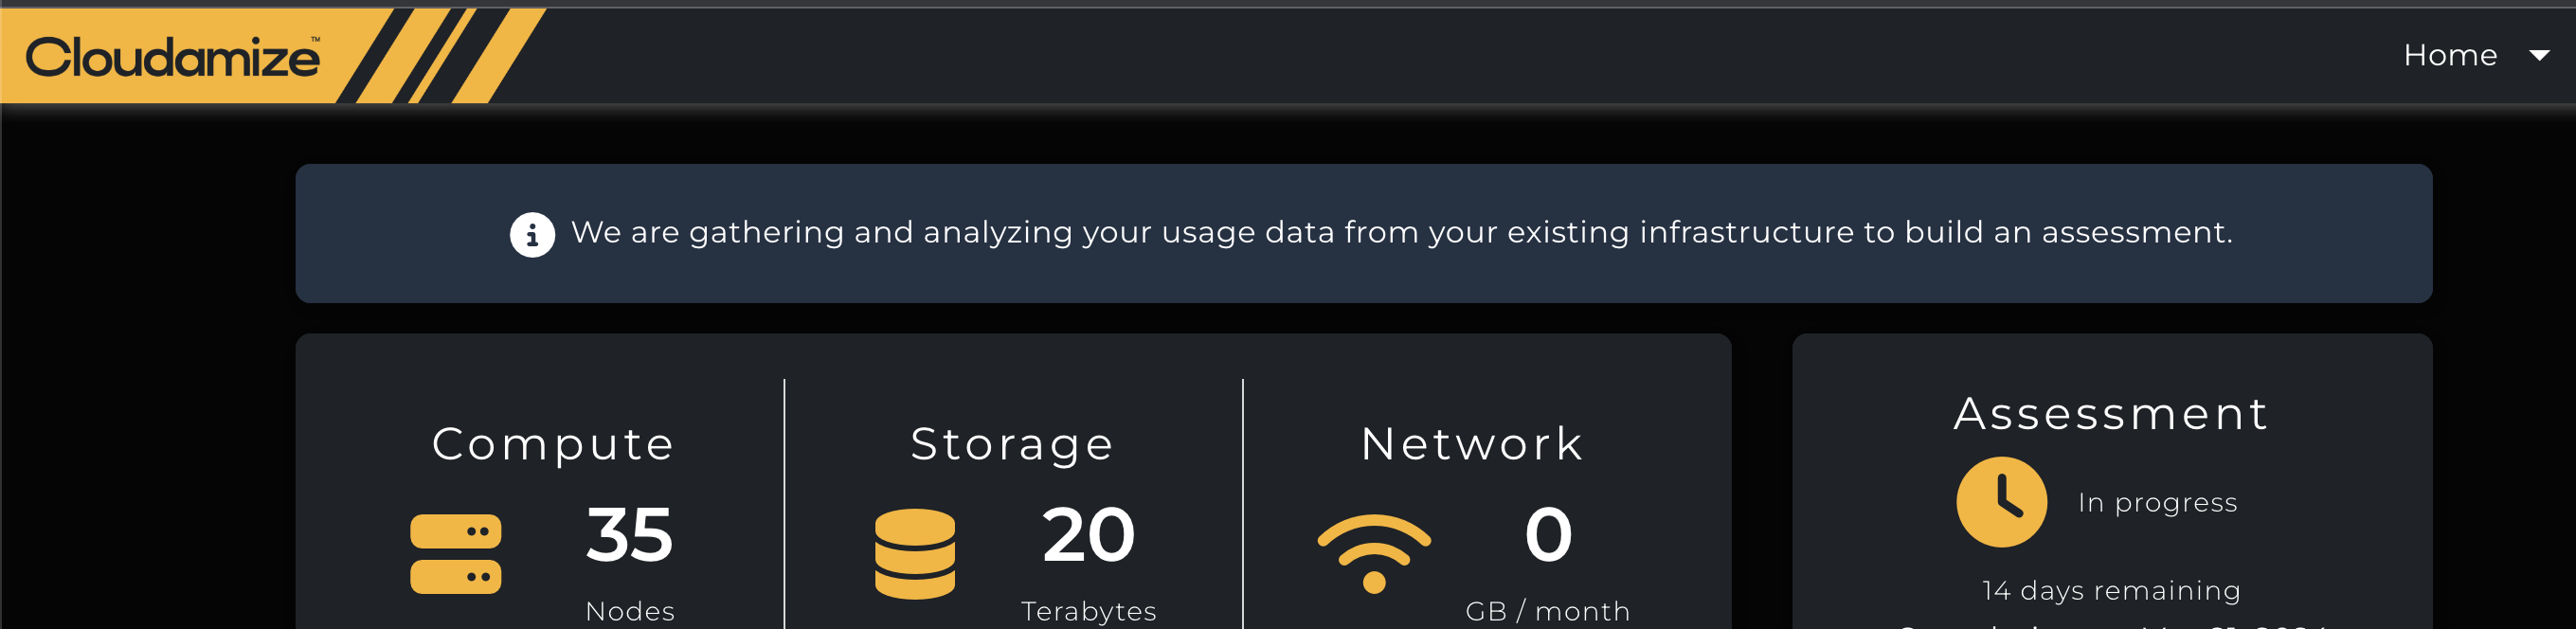
After 2-3 days, your Preliminary Hardware Results will be available. When you log in to your assessment, you will see the following screen. Note that there will not be any network data at this point. Click here to read about Preliminary Hardware Results.
Once the full results populate, you will have access to Network Data, Designer, and Migration Planner features.
Assessment Re-run Guidelines
For the re-run of an assessment, please review and acknowledge the following important information.
Important Considerations:
-
Existing Results Will Be Overwritten
Initiating a re-run will permanently overwrite all existing assessment results associated with the current assessment cycle. Once the re-run process has started, previous results and related data will no longer be available in the console and cannot be restored. -
Download Required Reports and Data
Before requesting a re-run, ensure that all required reports, exports, and assessment data are downloaded and securely stored for future reference. Data from the previous assessment cycle cannot be recovered after the re-run is initiated.
Next Steps:
Once you have reviewed the above information and confirmed your approval, the new assessment dates can be scheduled and the re-run process can be initiated.
Note: Migration Planner is not available in hypervisor-only installs. Agent or Agentless Data Collector data are required.
If you have any queries, please get in touch with the helpdesk via our Helpdesk Portal or by email at helpdesk@cloudamize.com.