

Overview
About RiverMeadow
A unified platform to migrate, optimize, and modernize workloads across hybrid and multi-cloud environments.
How to access RiverMeadow Extension Component
The Extensions Component is easily accessible directly from your main Cloudamize dashboard:
-
Log In: Login to your Cloudamize account https://console.cloudamize.com
-
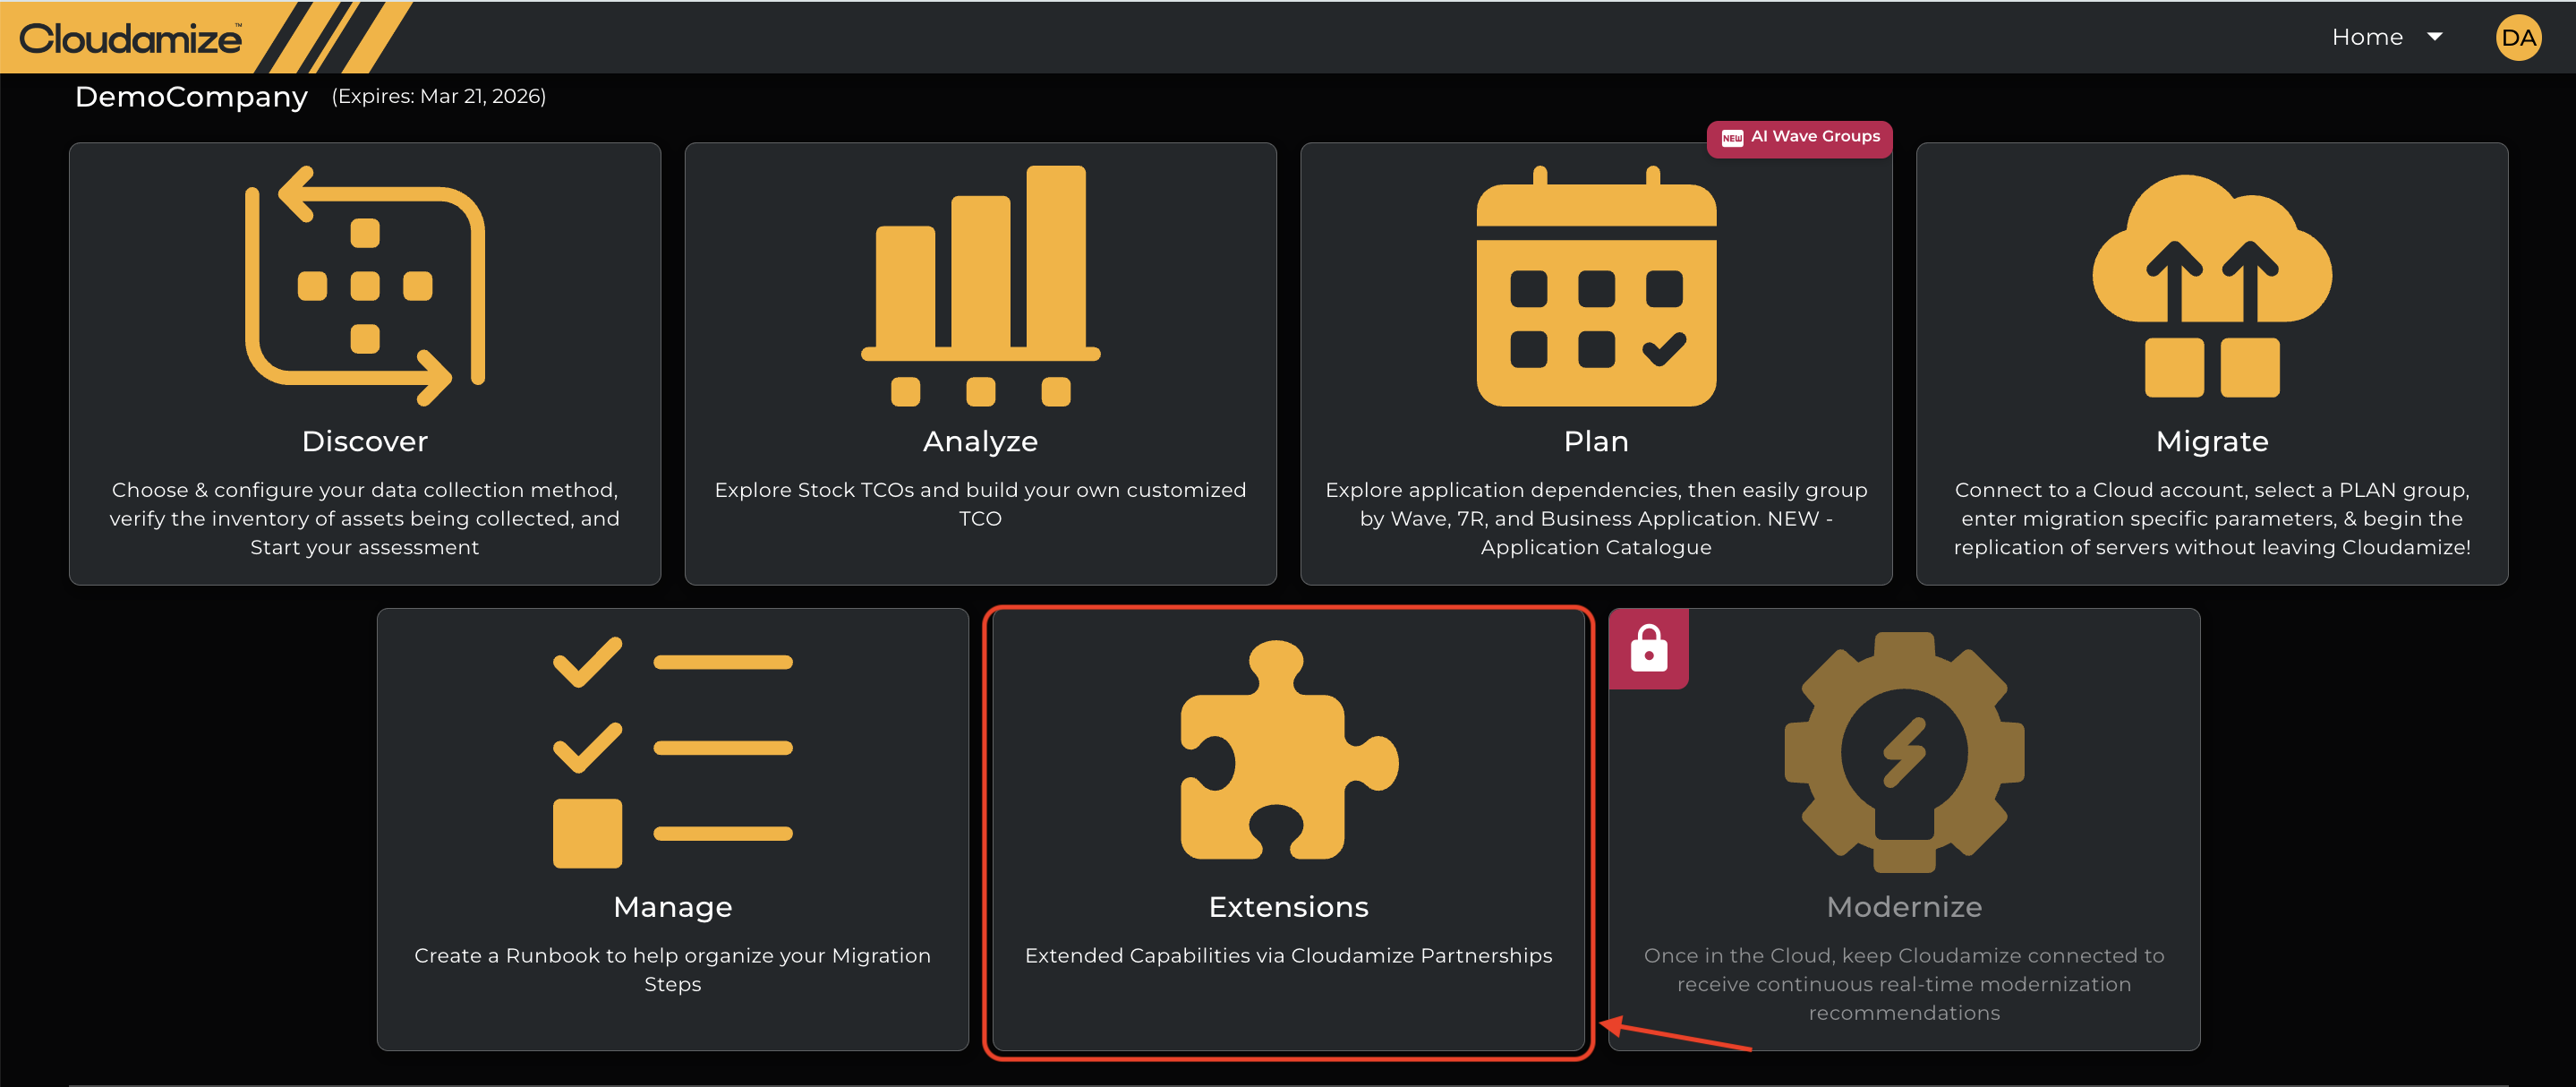
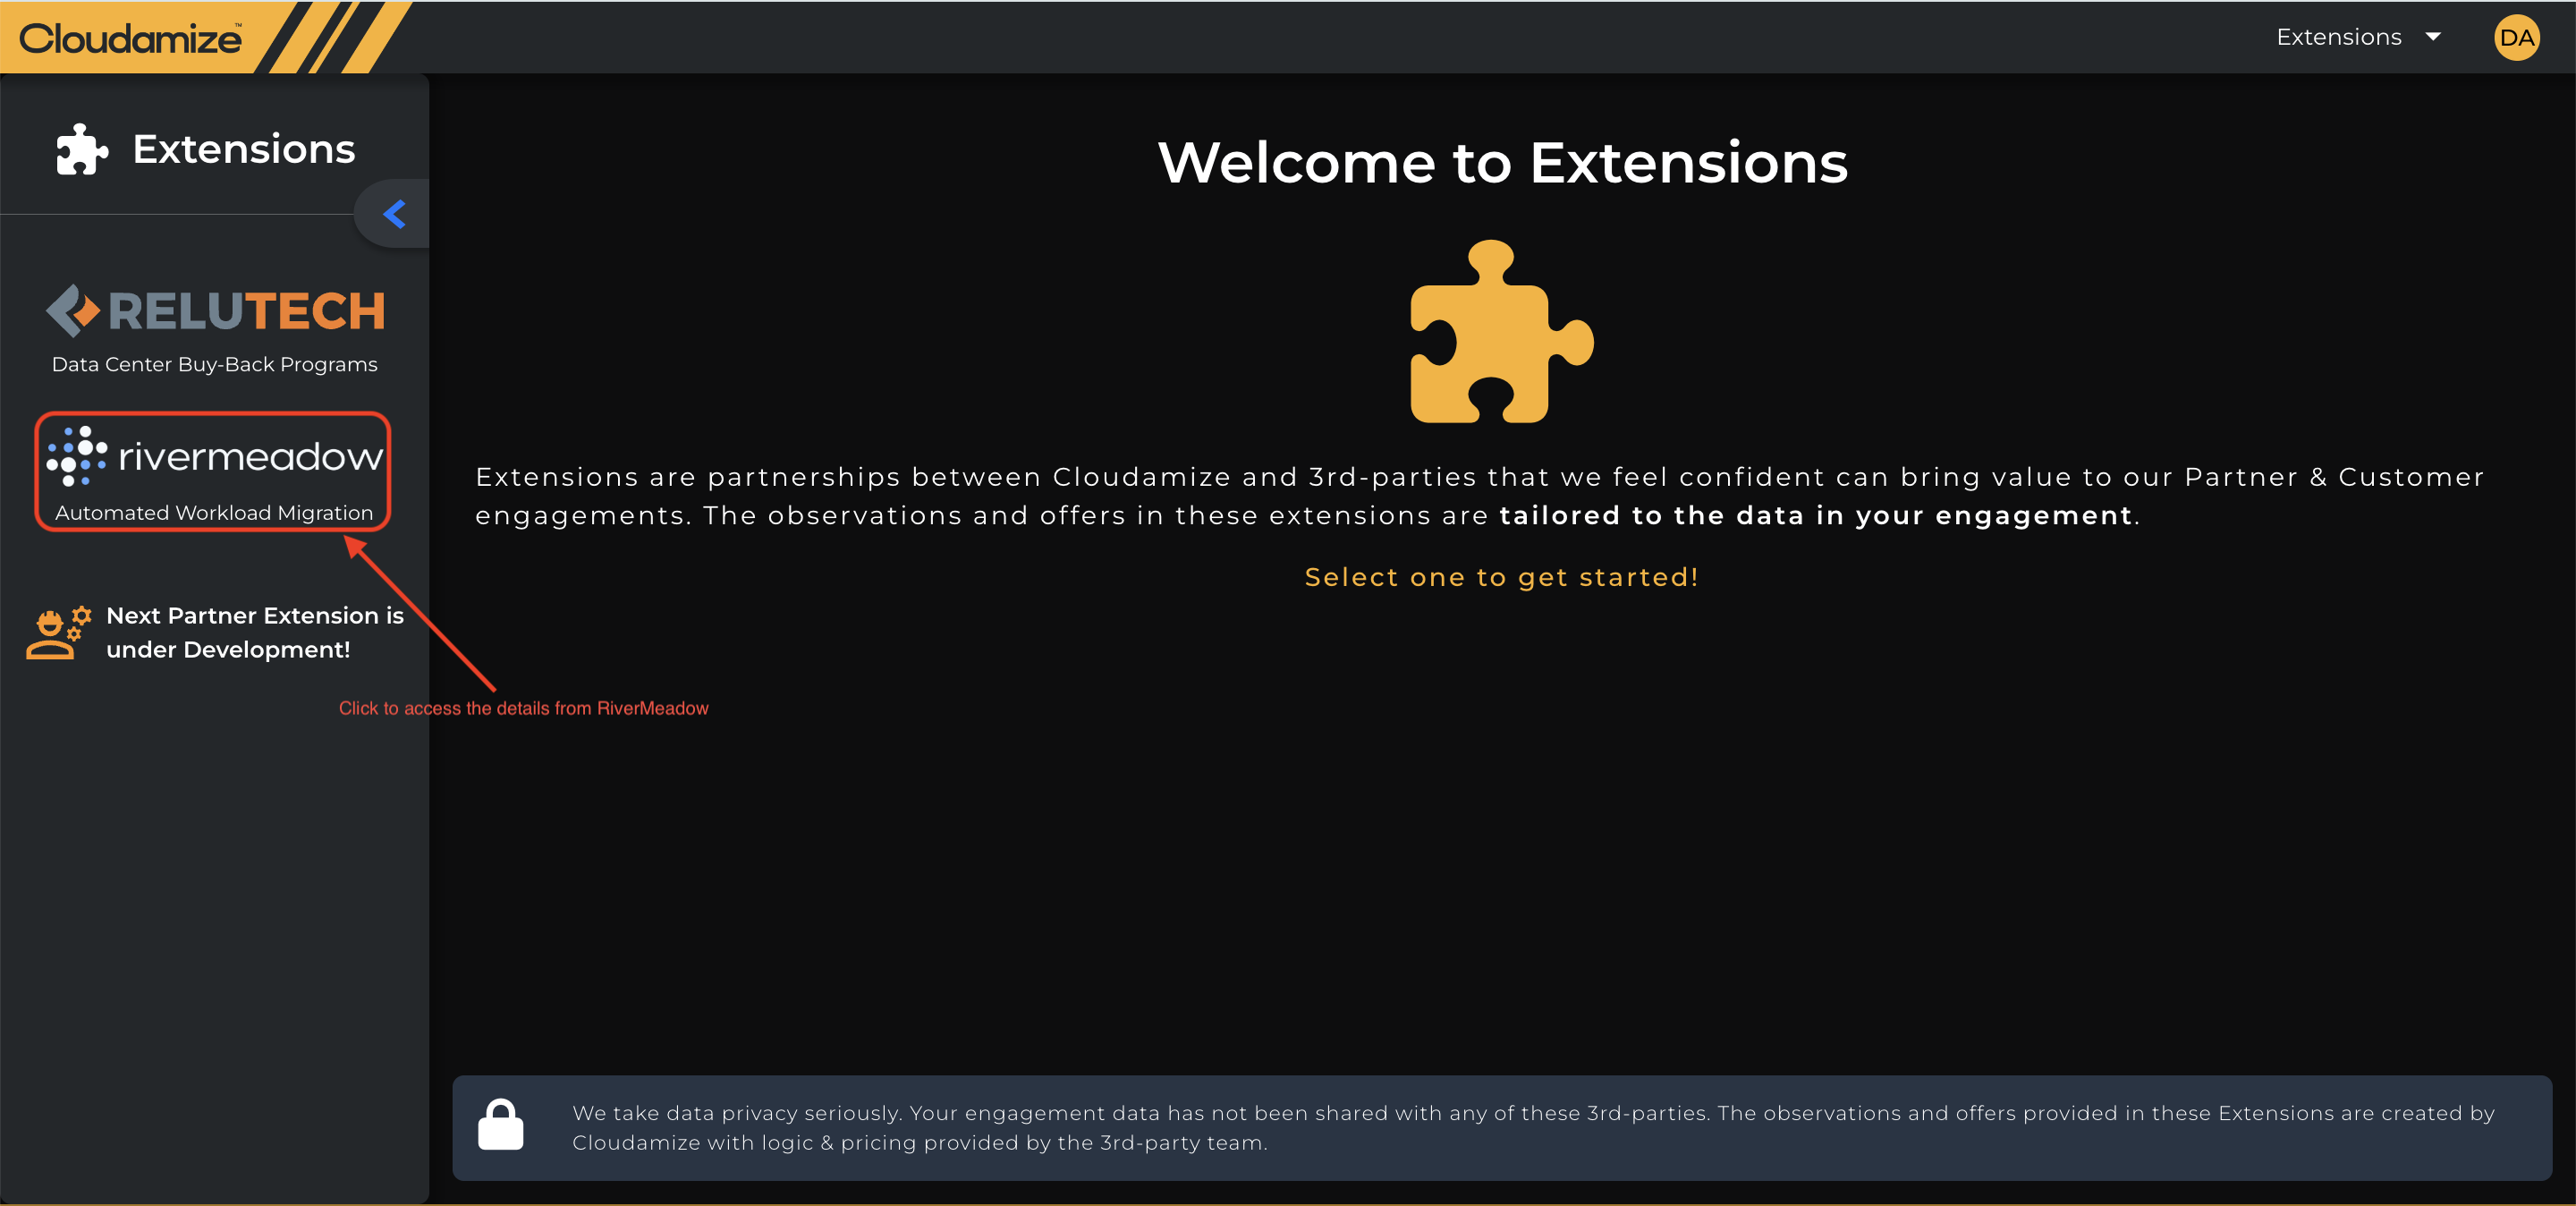
Locate the Extensions Tile: Click on the large puzzle piece tile labeled "Extensions" on the right side of the main dashboard. This tile is described as "Extended Capabilities via Cloudamize Partnerships".
-
Select the Component: On the Extensions page, locate and click the "RiverMeadow" extension, which is typically listed under Automated Workload Migration.
How the RiverMeadow Extension Works
As soon as you click on the RiverMeadow extension for the first time, it will land a page as shown below. To access this, you need to either create a New RiverMeadow Account or Integrate existing RiverMeadow account with Cloudamize by providing your Organization ID or Project ID’s if you have already.
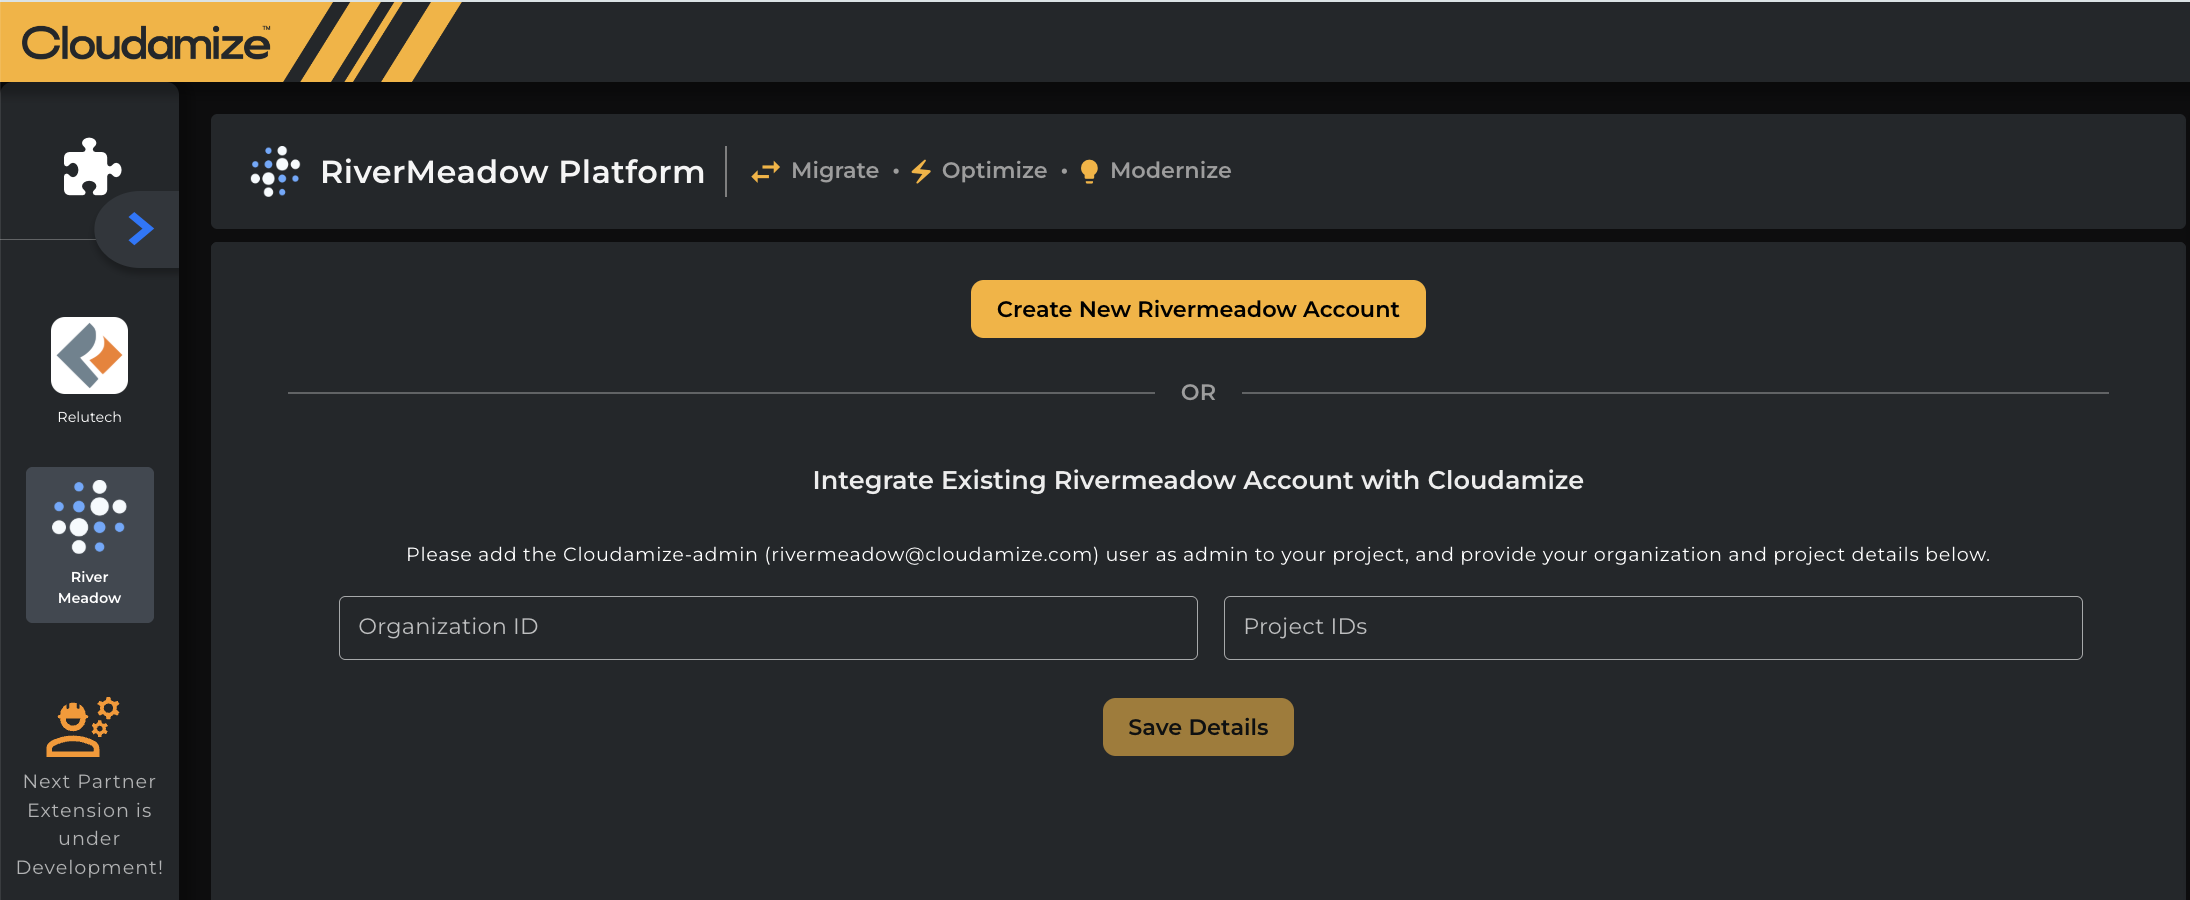
Step 1: When you click on a Create New RiverMeadow Account button, the email will be sent to all the users who are part of the assessment in the console portal.
Step 2: Kindly click on the Register button in the email that has been sent as shown below and set a password, accept the terms and conditions and then click on Register and this will navigate you to the RiverMeadow site.


-
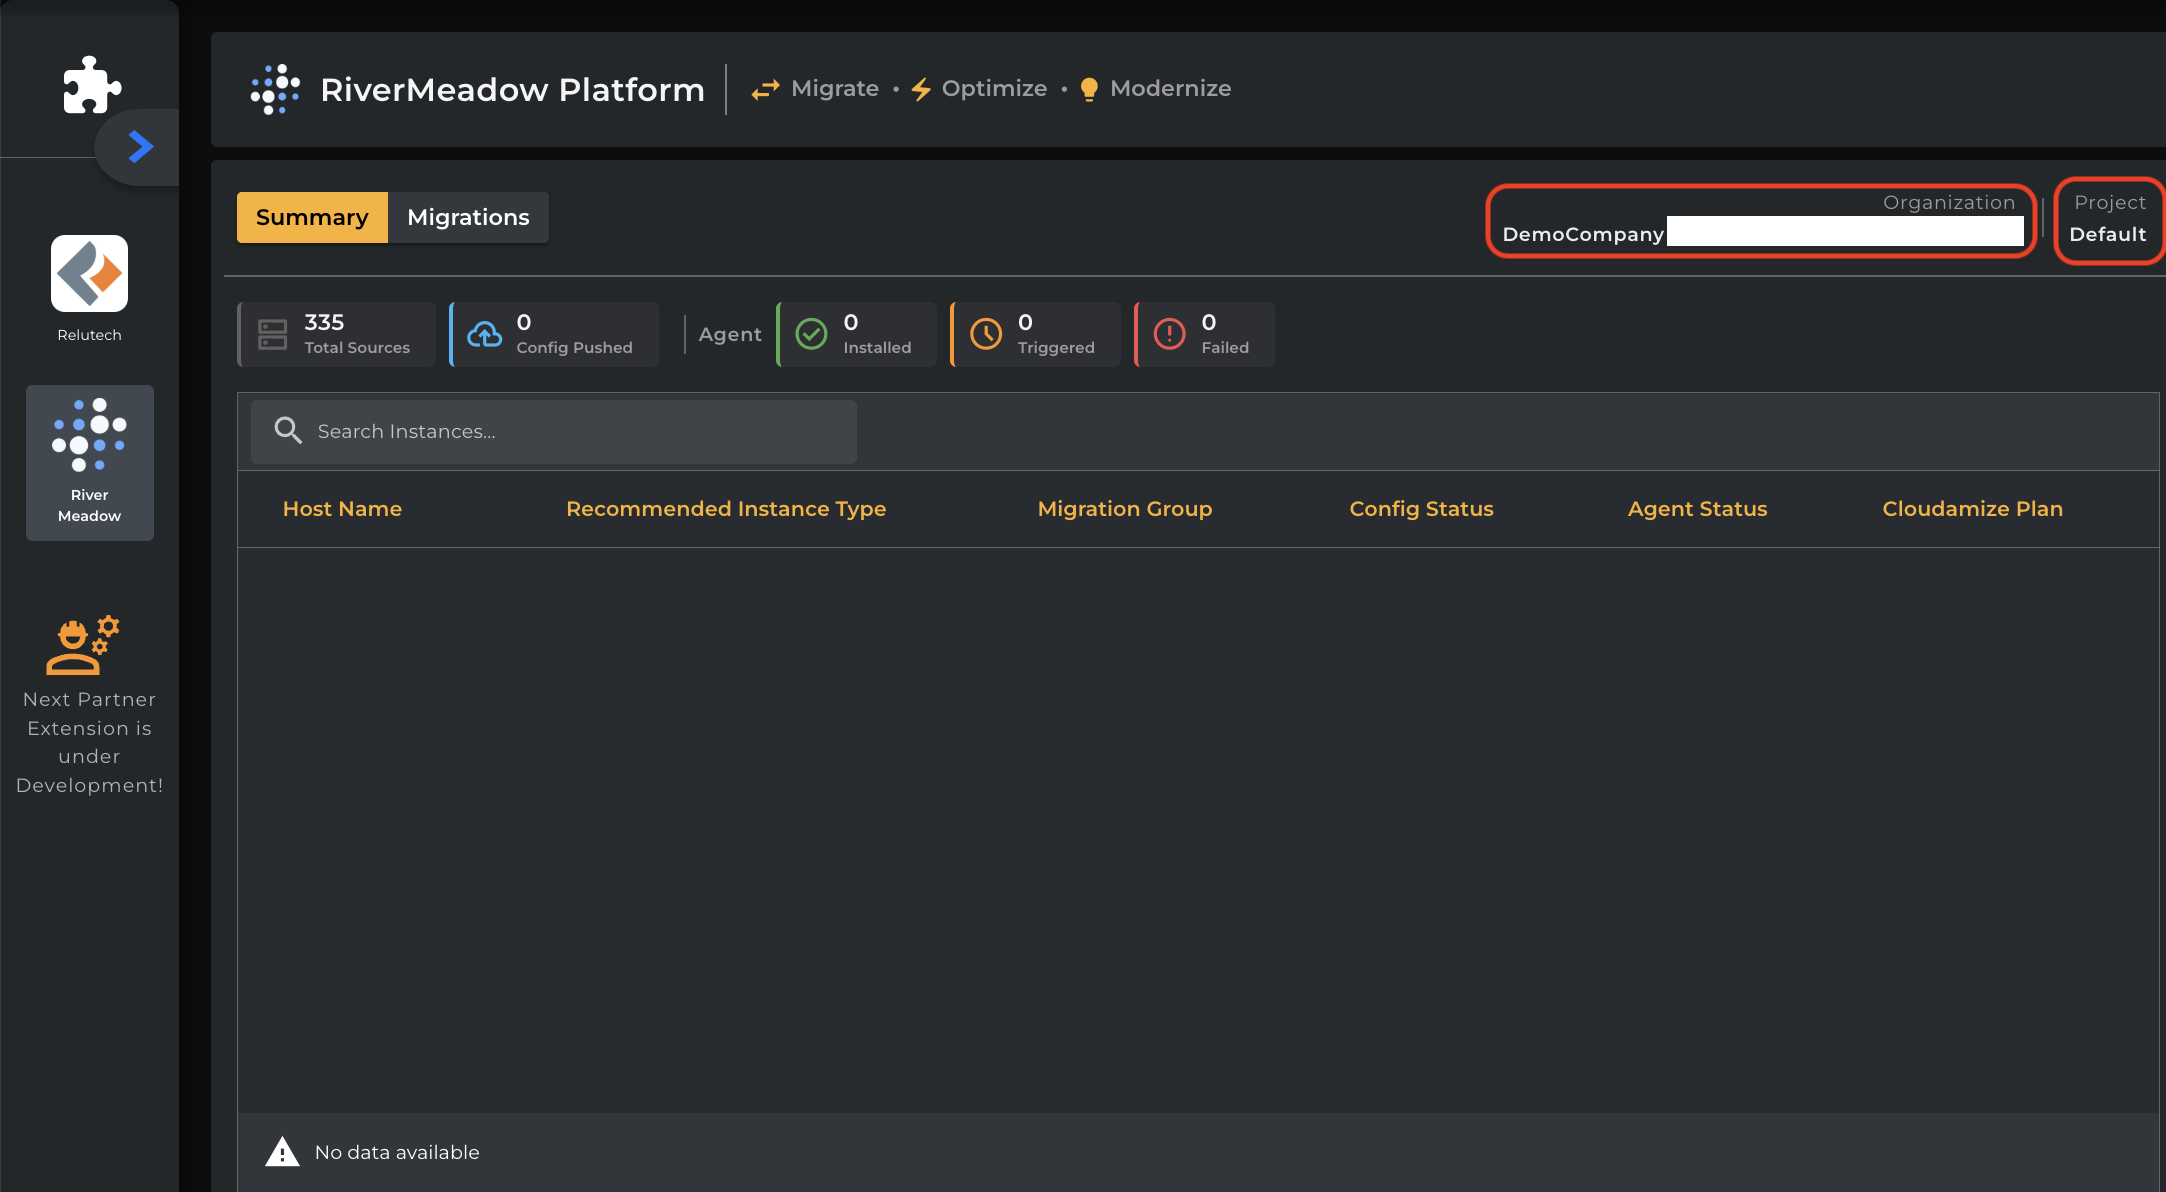
On the RiverMeadow site, at the right top corner of the page, you will see the Organization and Project details and these should match exactly the same with the information being shown under the RiverMeadow Platform on the Console portal(Organization and Project) at the top right corner and this indicates that you are connected to the right Organization and the Project.
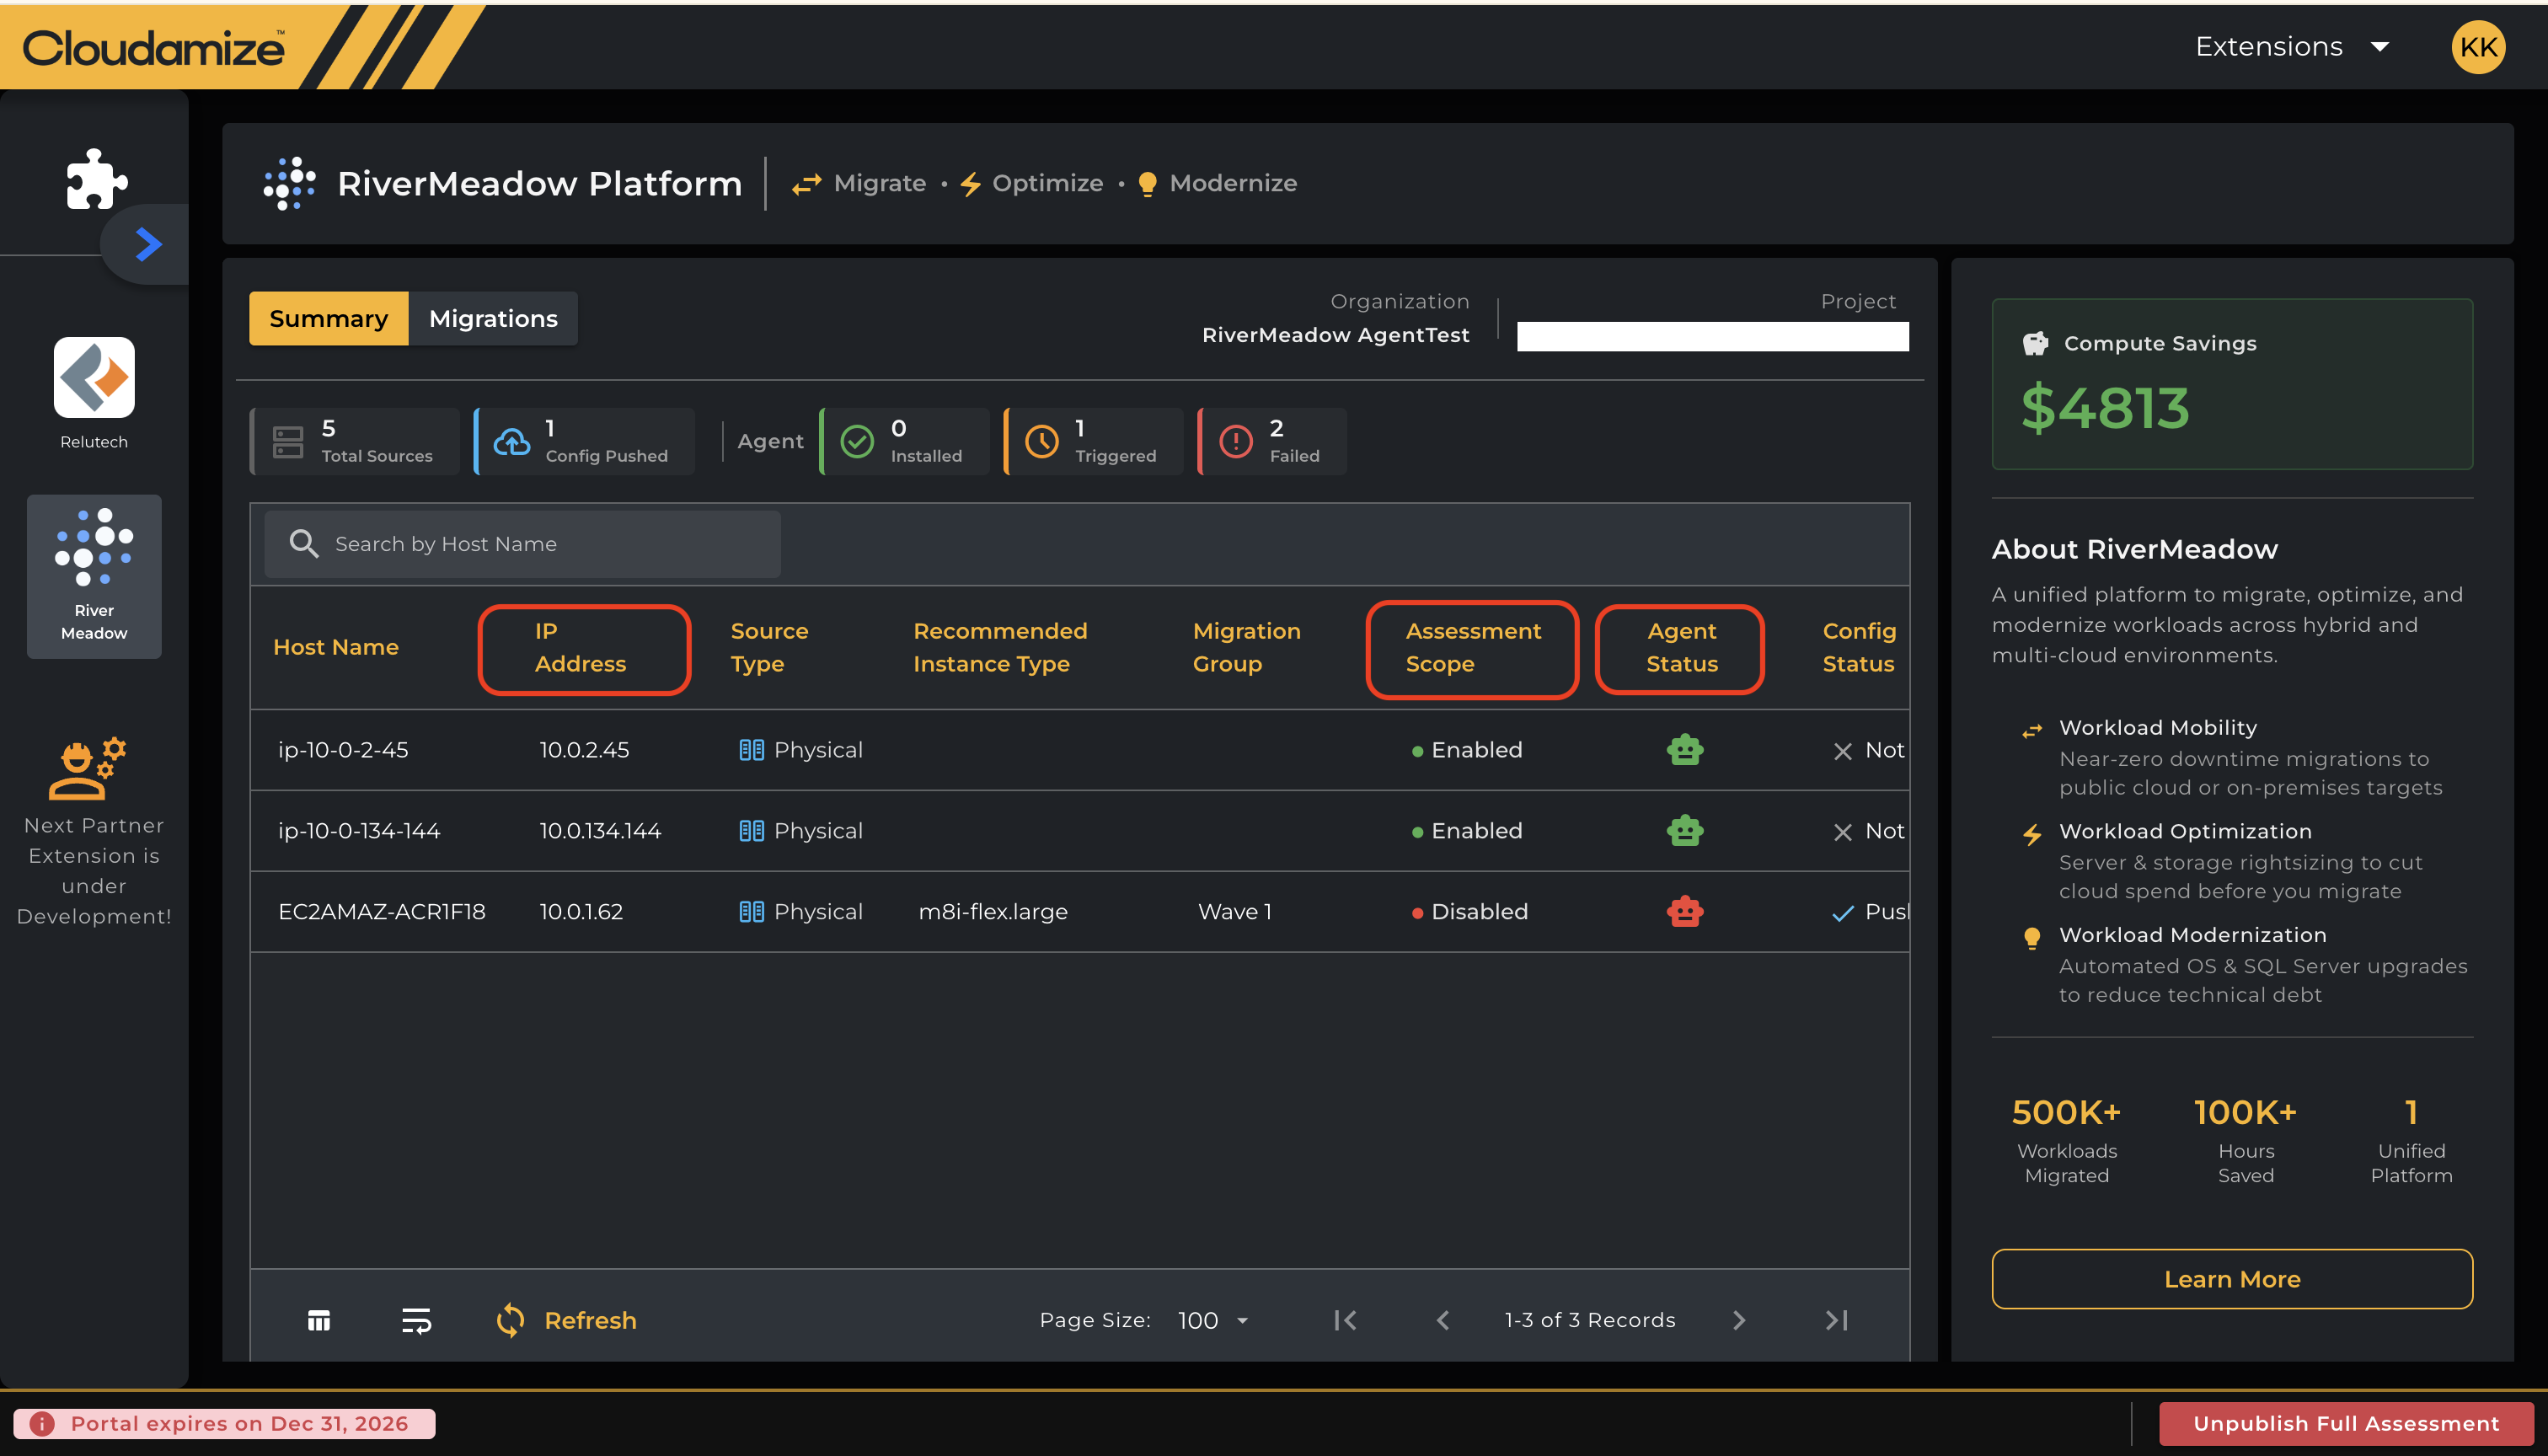
As soon as you are connected to the RiverMeadow account, you will see the initial page as below on the console portal with the Summary and Migrations tabs-
Summary:
Summary Table Enhancements
The RiverMeadow Summary tab has been enhanced to provide additional machine information, making it easier to review installation readiness and quickly identify machines during migration planning and troubleshooting.
The following additional columns are now available in the Summary table:
|
Field |
Description |
|---|---|
|
Assessment Scope |
Indicates whether the machine is included in the current assessment scope. This helps determine whether the machine is expected to participate in the assessment and configuration push. |
|
Cloudamize Agent Status |
Displays the current status of the Cloudamize agent on the machine, allowing users to verify agent readiness and identify potential installation issues. |
|
IP Address |
Displays the machine's IP address to simplify machine identification and provide additional context during troubleshooting. |
-
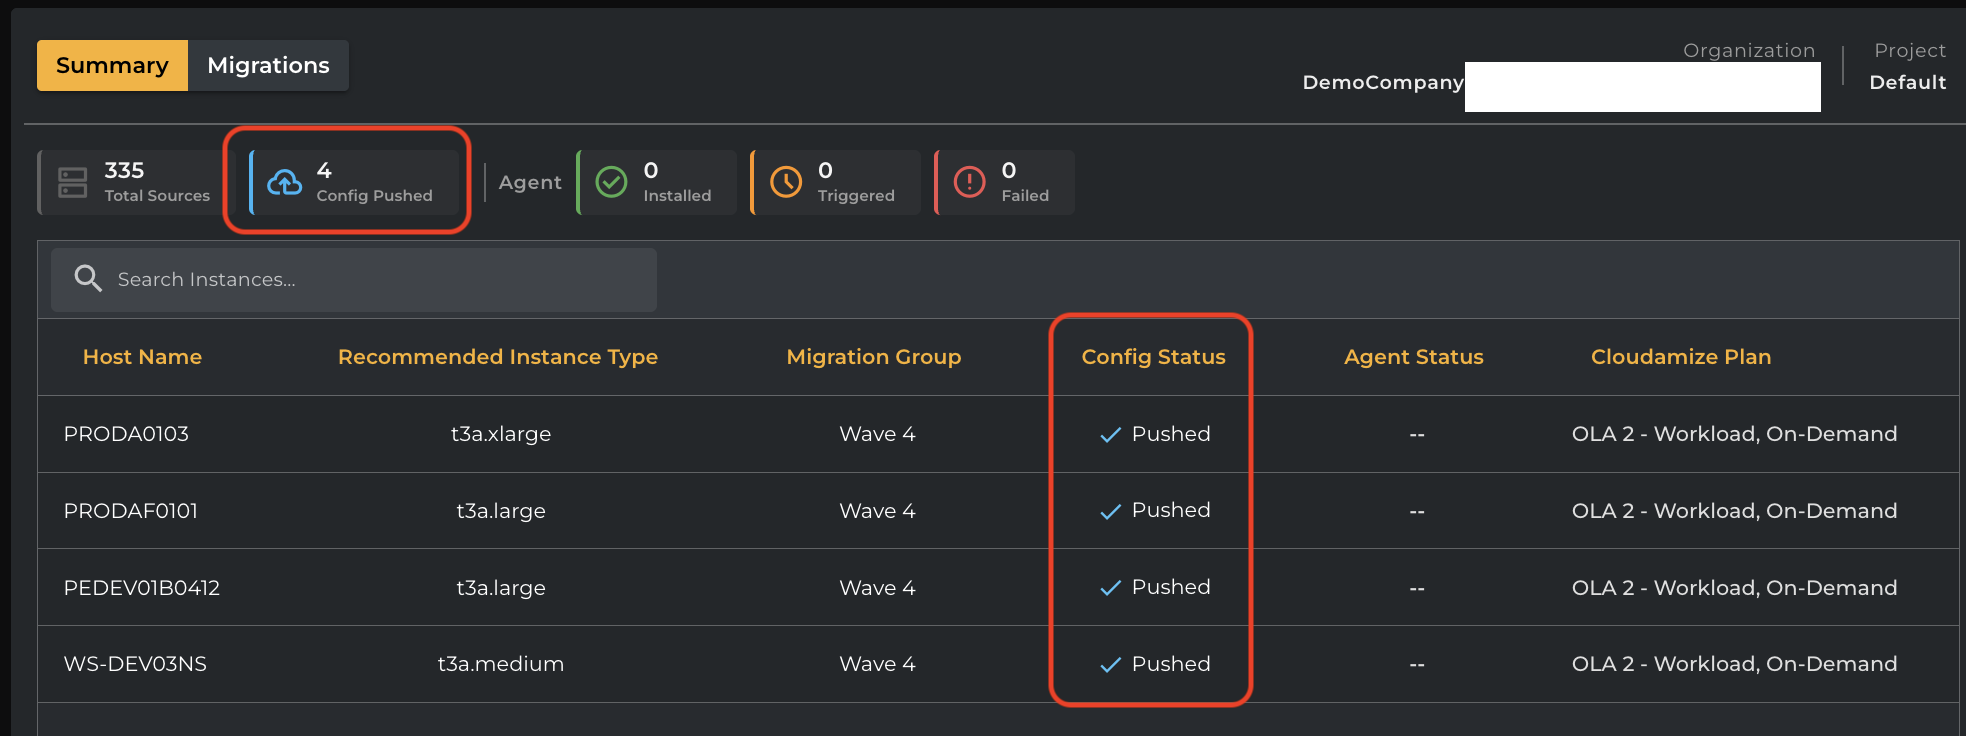
Total Sources - It indicates the total number of servers that the assessment has.
-
Config Pushed - It indicates that the number of machines that you pushed config to the RiverMeadow.
-
Host Name - It indicates the Name of the server
-
IP Address - Displays the machine's IP address to simplify machine identification and provide additional context during troubleshooting.
-
Source Type - It identifies the type of source machine that has been discovered and is being managed within the RiverMeadow platform.
-
Recommended Instance Type - This column indicates type of instance recommended as per the cloudamize plan
-
Migration Group - It indicates the name of the Group type
-
Assessment Scope - Indicates whether the machine is included in the current assessment scope. This helps determine whether the machine is expected to participate in the assessment and configuration push.
-
Agent Status - It indicates the status of the agent
-
Config status - It provides the status of the config (Eg: Pushed)
-
Cloudamize Plan - This column provides the design name that was selected during config push
-
Agent:
Installed - It provides the count of the servers on which agent has been installed.
Triggered - It provides the count of the servers on which agent has been triggered.
Failed - It provides the count of the servers on which agent has been failed. -
Search Instances - This allows you search the Instances directly from search option
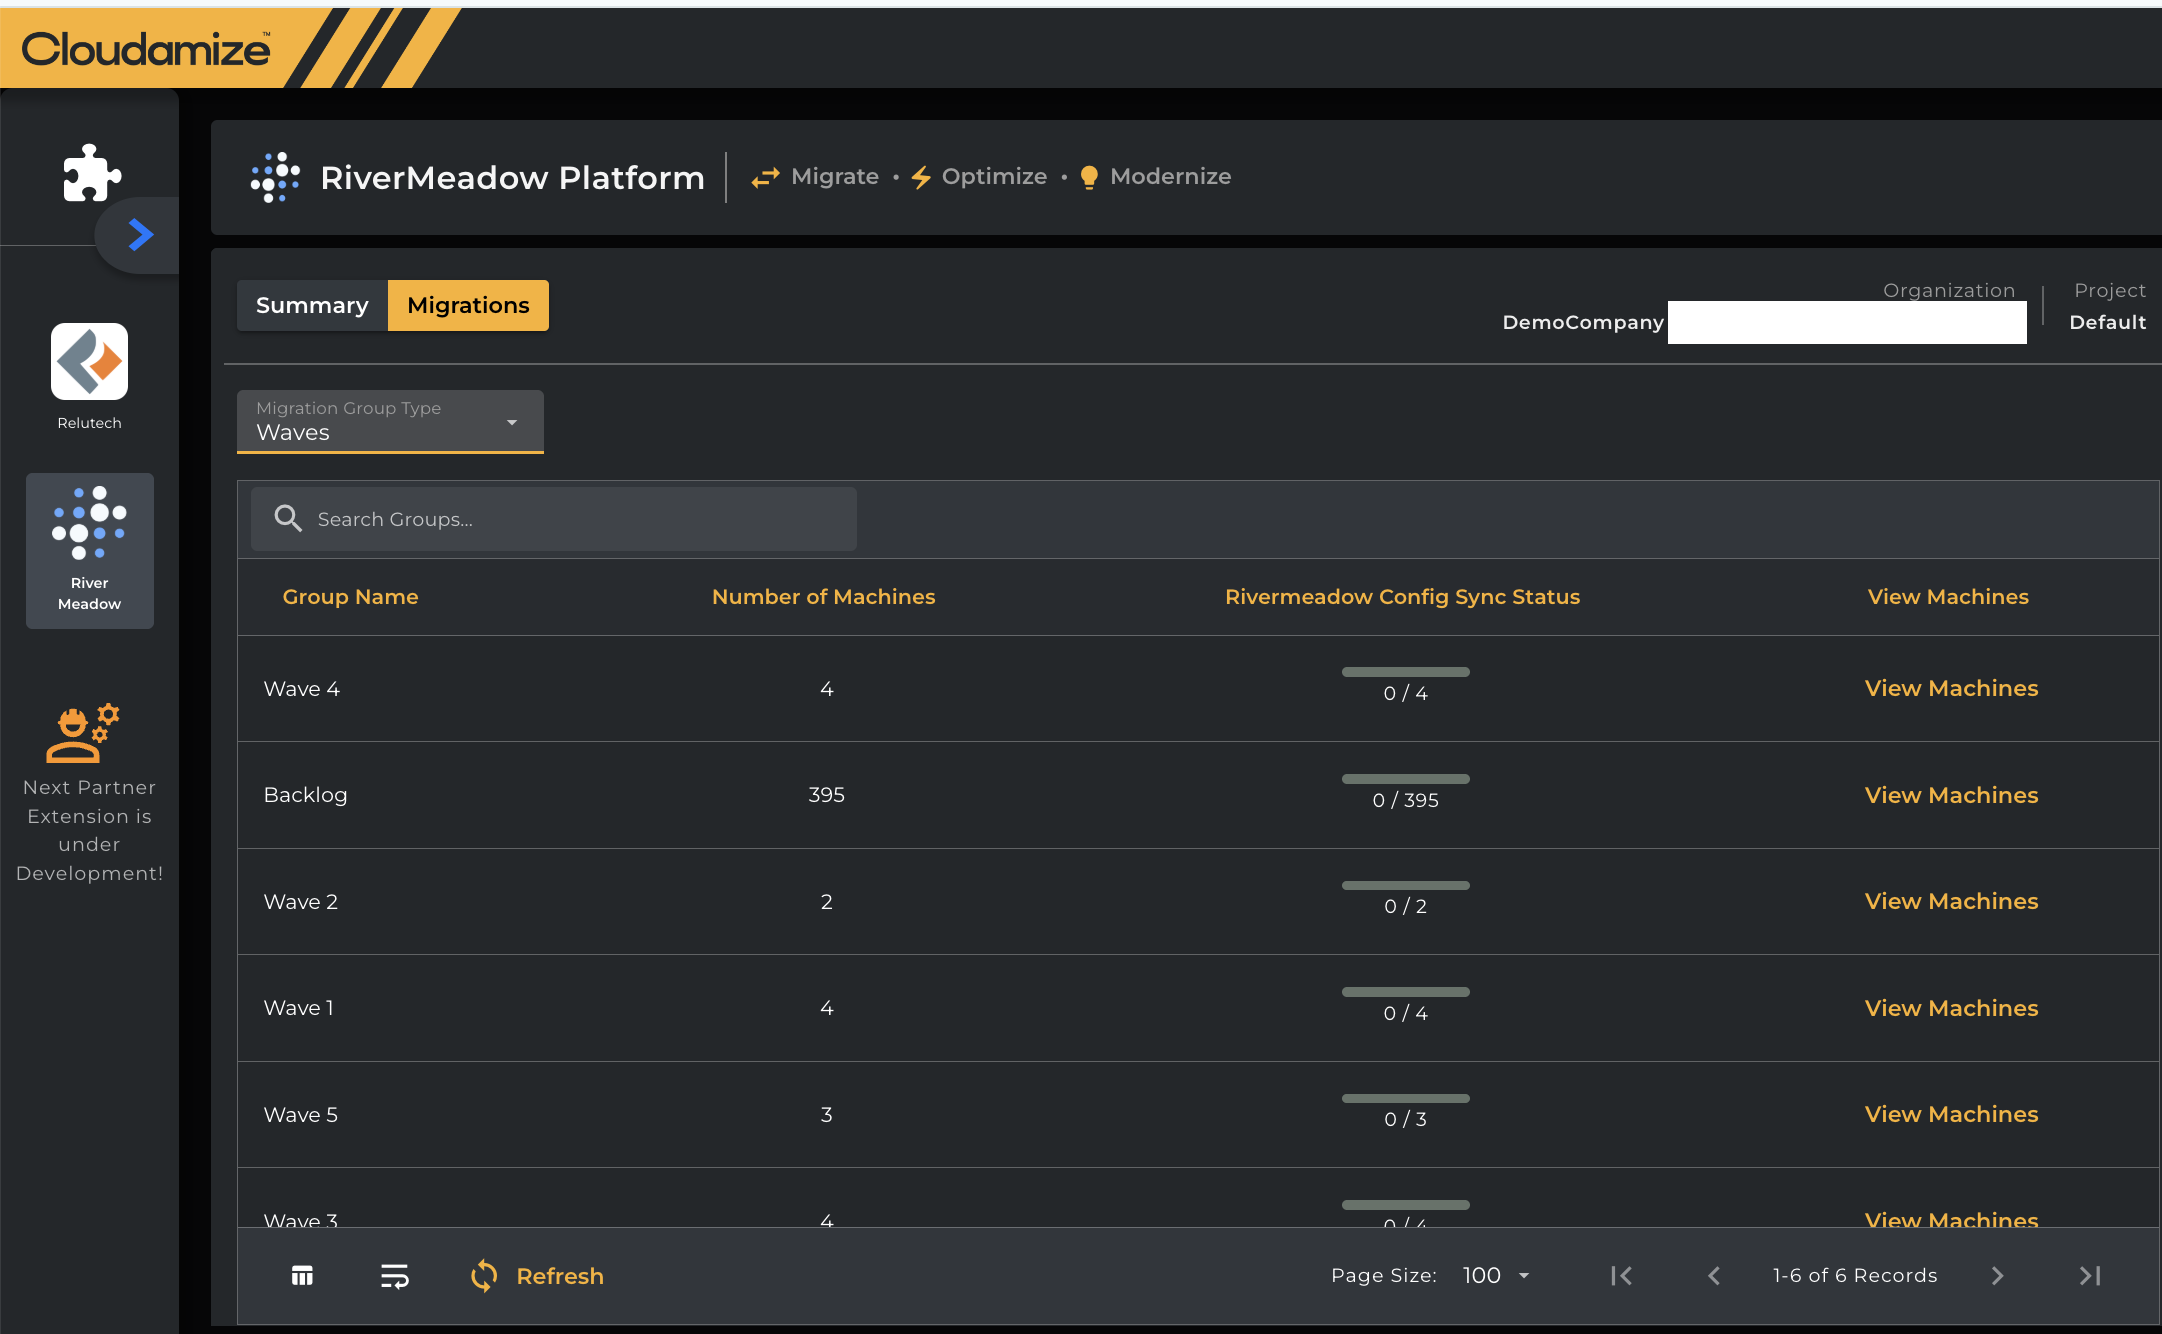
Migrations:
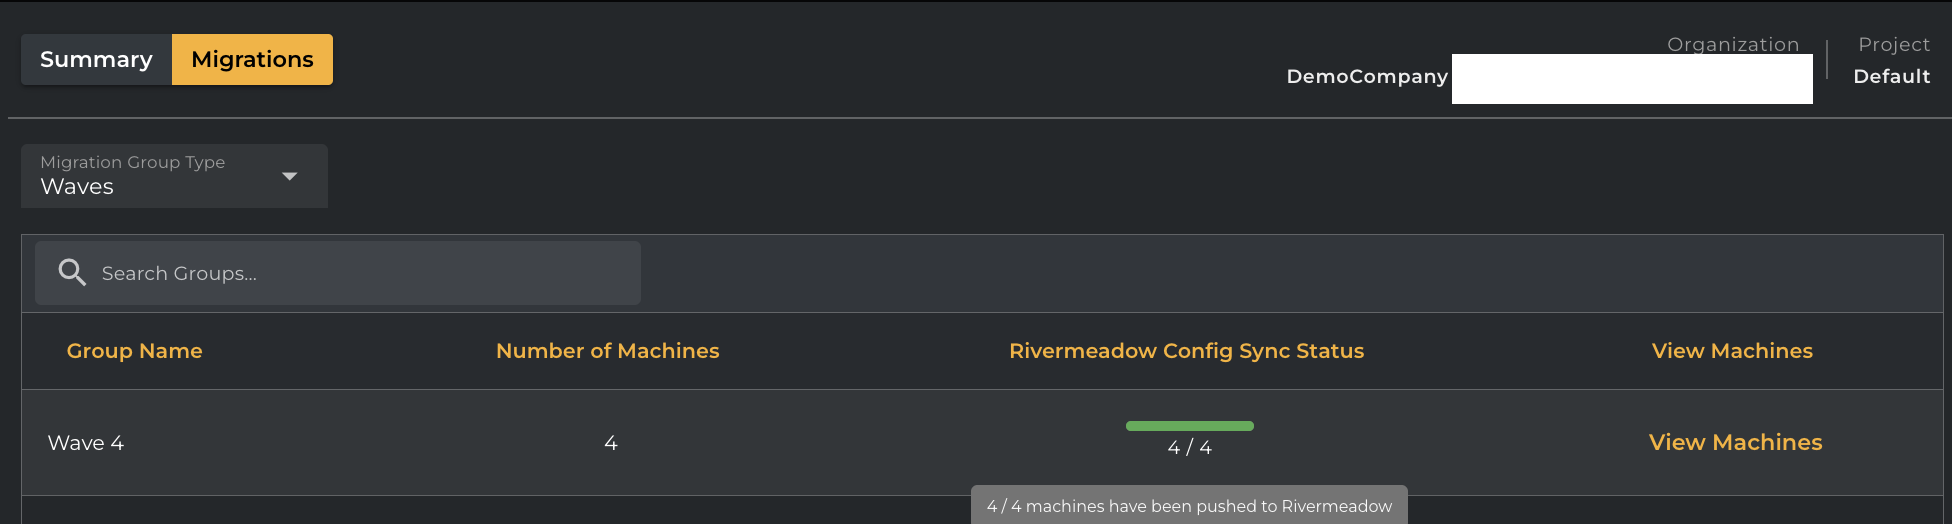
This tab allows you navigate to push the configurations to the RiverMeadow by selecting Migration Group Type. You will see the different Migration Group Type from the drop down button as shown below and you can select any one of the Group Types as needed from the below list.
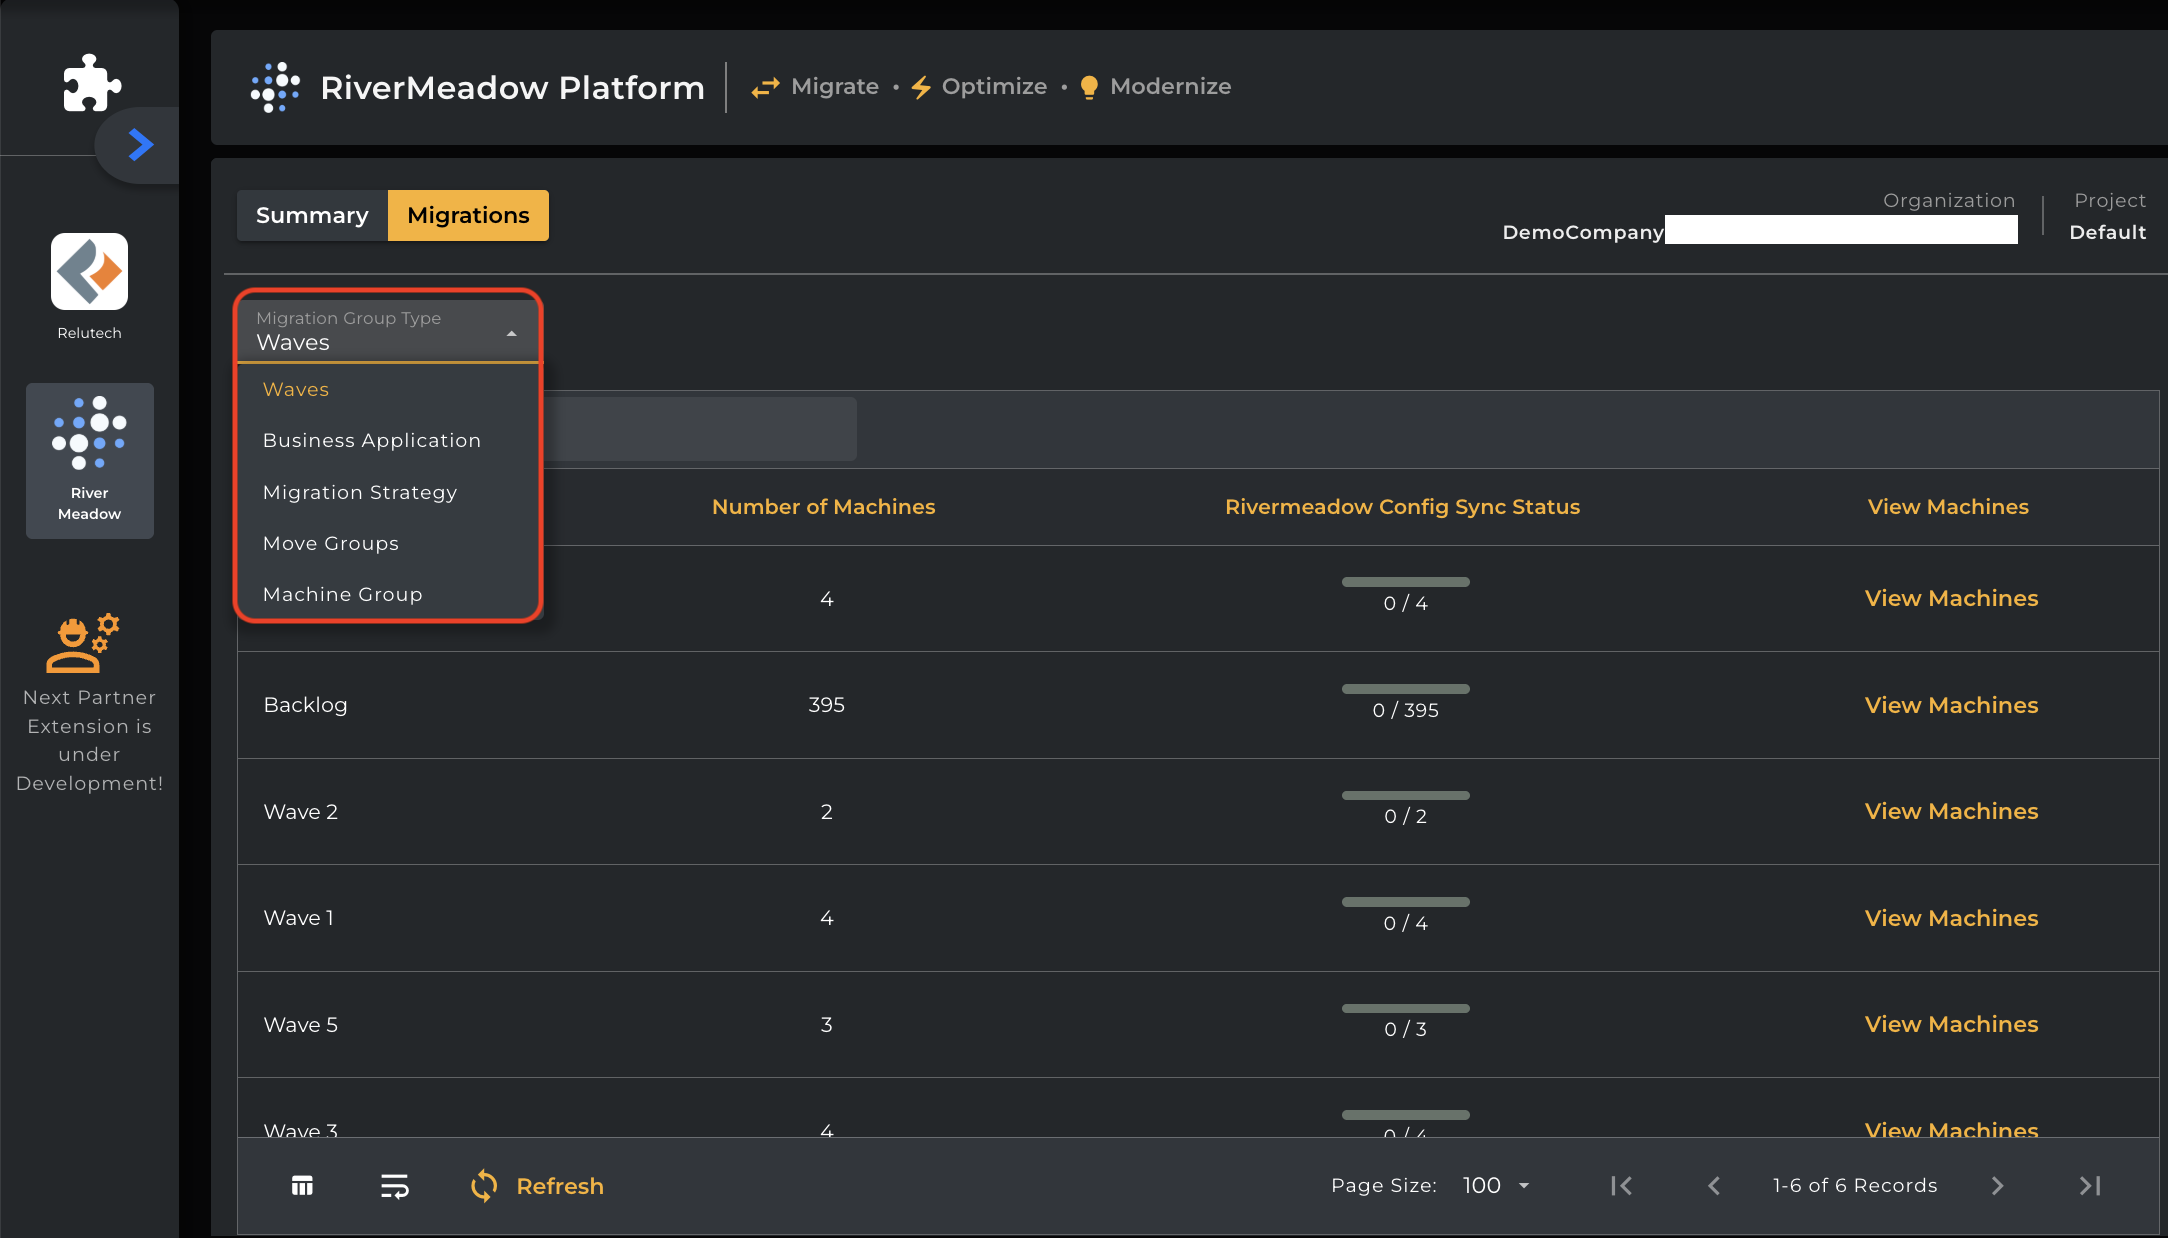
Migrations tab also shows the below details-
-
Group Name - It indicates the name of the group.
-
Number of Machines - It indicates the number of machines currently under the Group.
-
RiverMeadow Config Sync Status - Total number of machines that have been pushed to RiverMeadow.
-
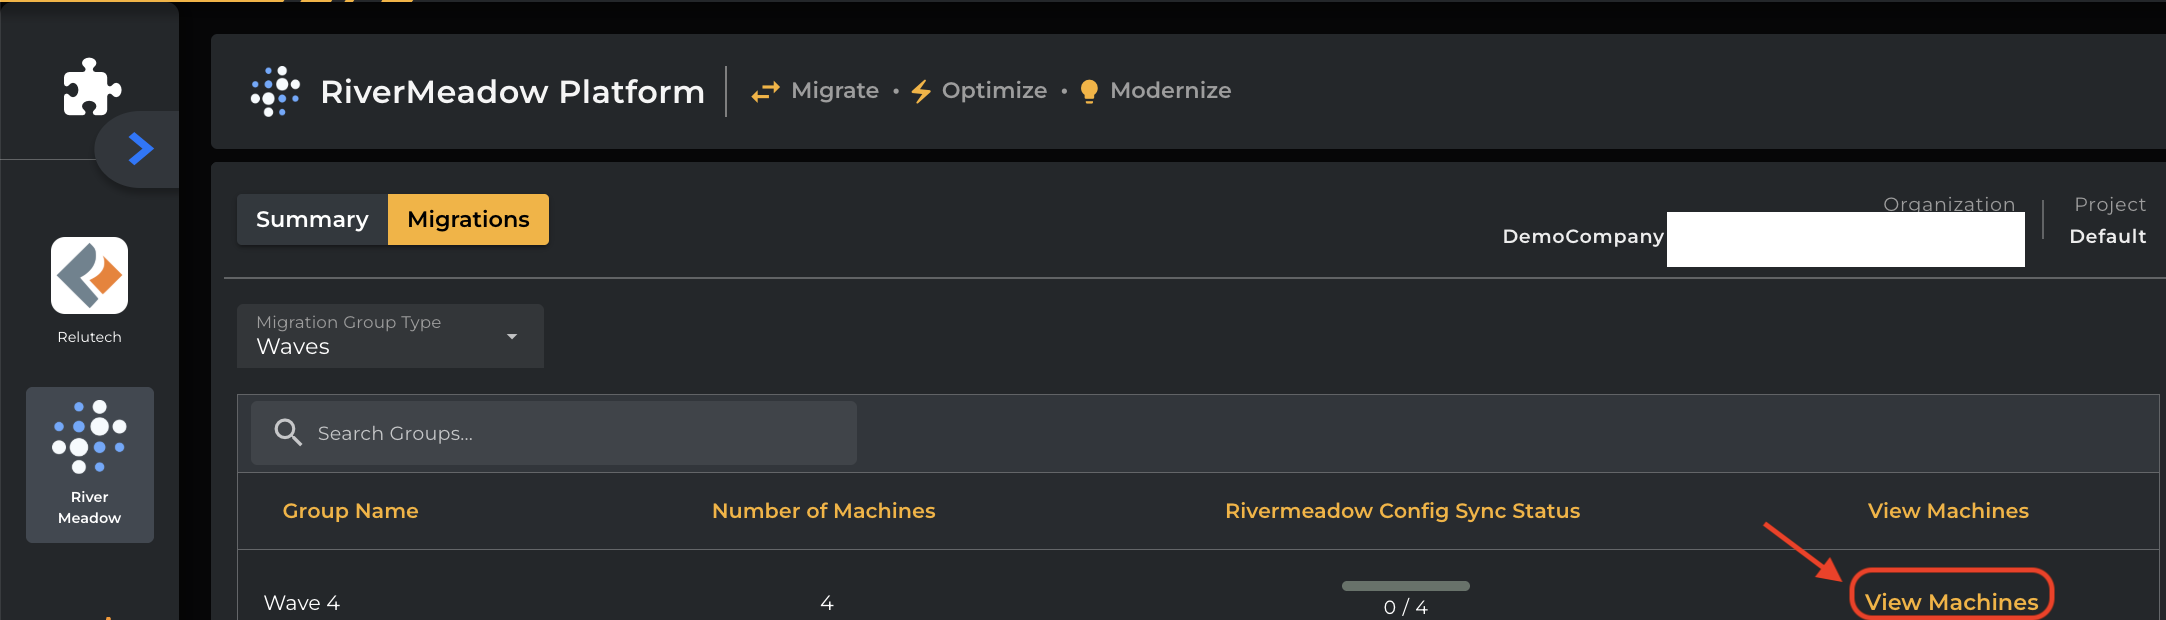
View Machines - It shows all the host names under the group when you click on View machines button as shown below for any particular group you wish to see the machine details.

-
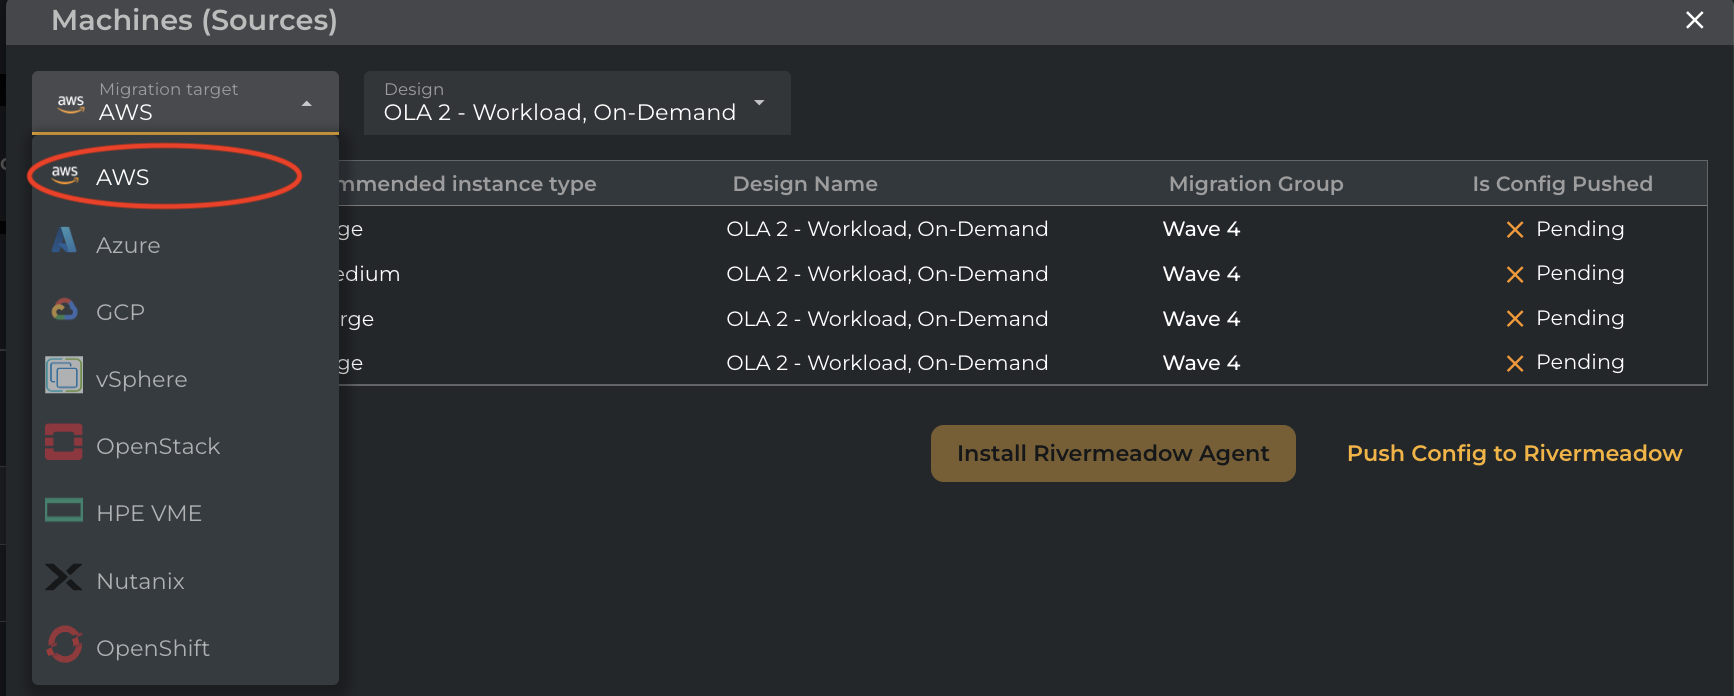
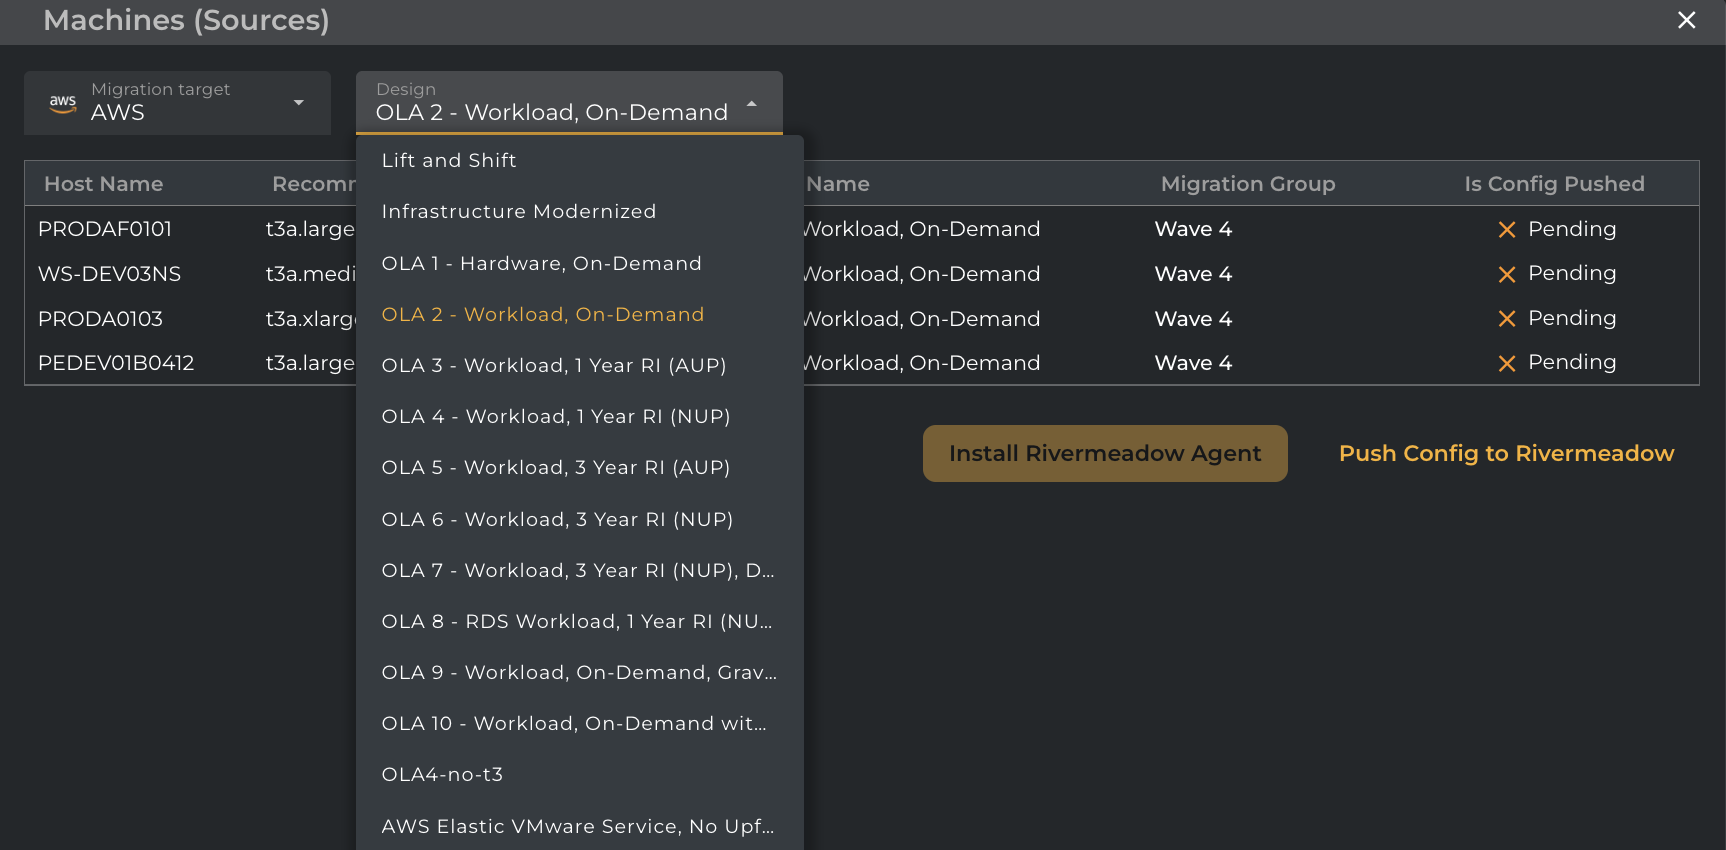
When you are ready to push the configs to the RiverMeadow, you can select the Migration Target from the below list that RiverMeadow supports. The currently supported Migration target is only AWS and it will show all the default AWS designs from which you can select the desired design from the drop down and the Recommended Instance Type gets refreshed and changes accordingly as per the selected design.
-
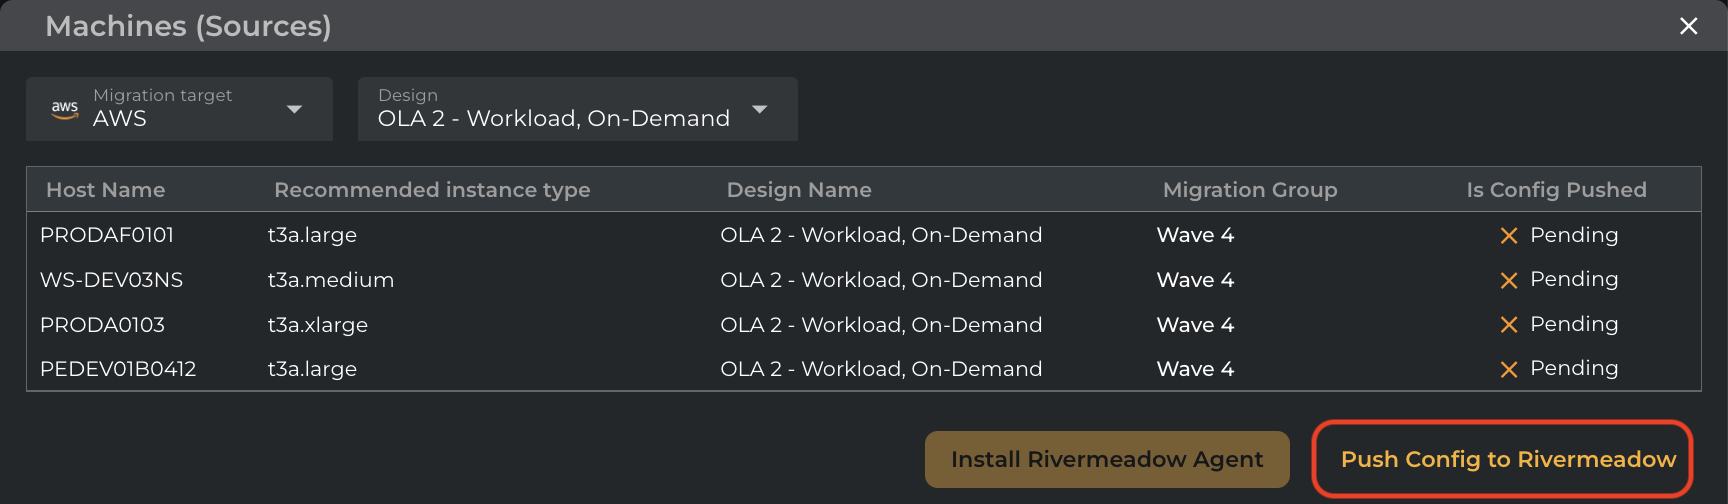
When you ready to push the configs to RiverMeadow click on Push Config to RiverMeadow button as shown below.
-
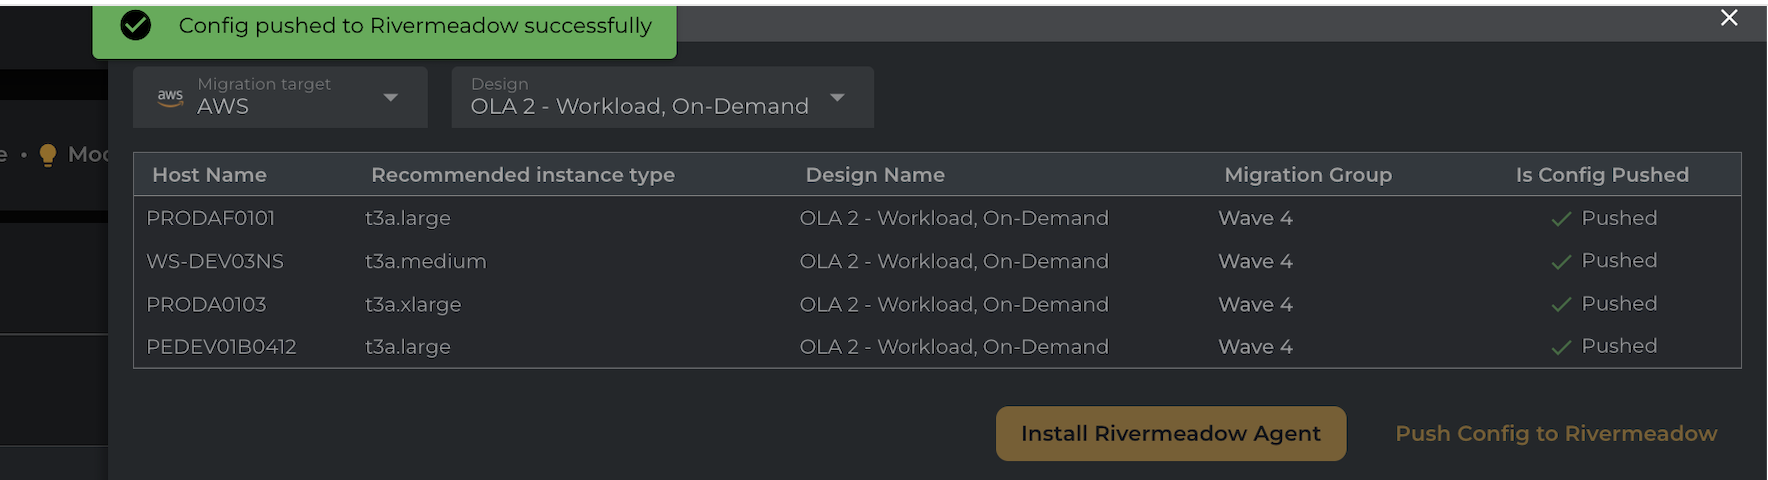
Once the Configs are pushed, you will see a pop-up showing Config Pushed to RiverMeadow successfully.
-
NOTE: Any server can be pushed only once on the RiverMeadow side, since the Push Config to RiverMeadow button will be disabled once the config push to RiverMeadow happens successfully.
-
Once the configs are pushed, the Summary tab will be auto updated with the config status and the count of machines where the config has been pushed.
-
You can also see under Migrations on the status of RiverMeadow Config Sync being updated once the push is completed successfully.
-
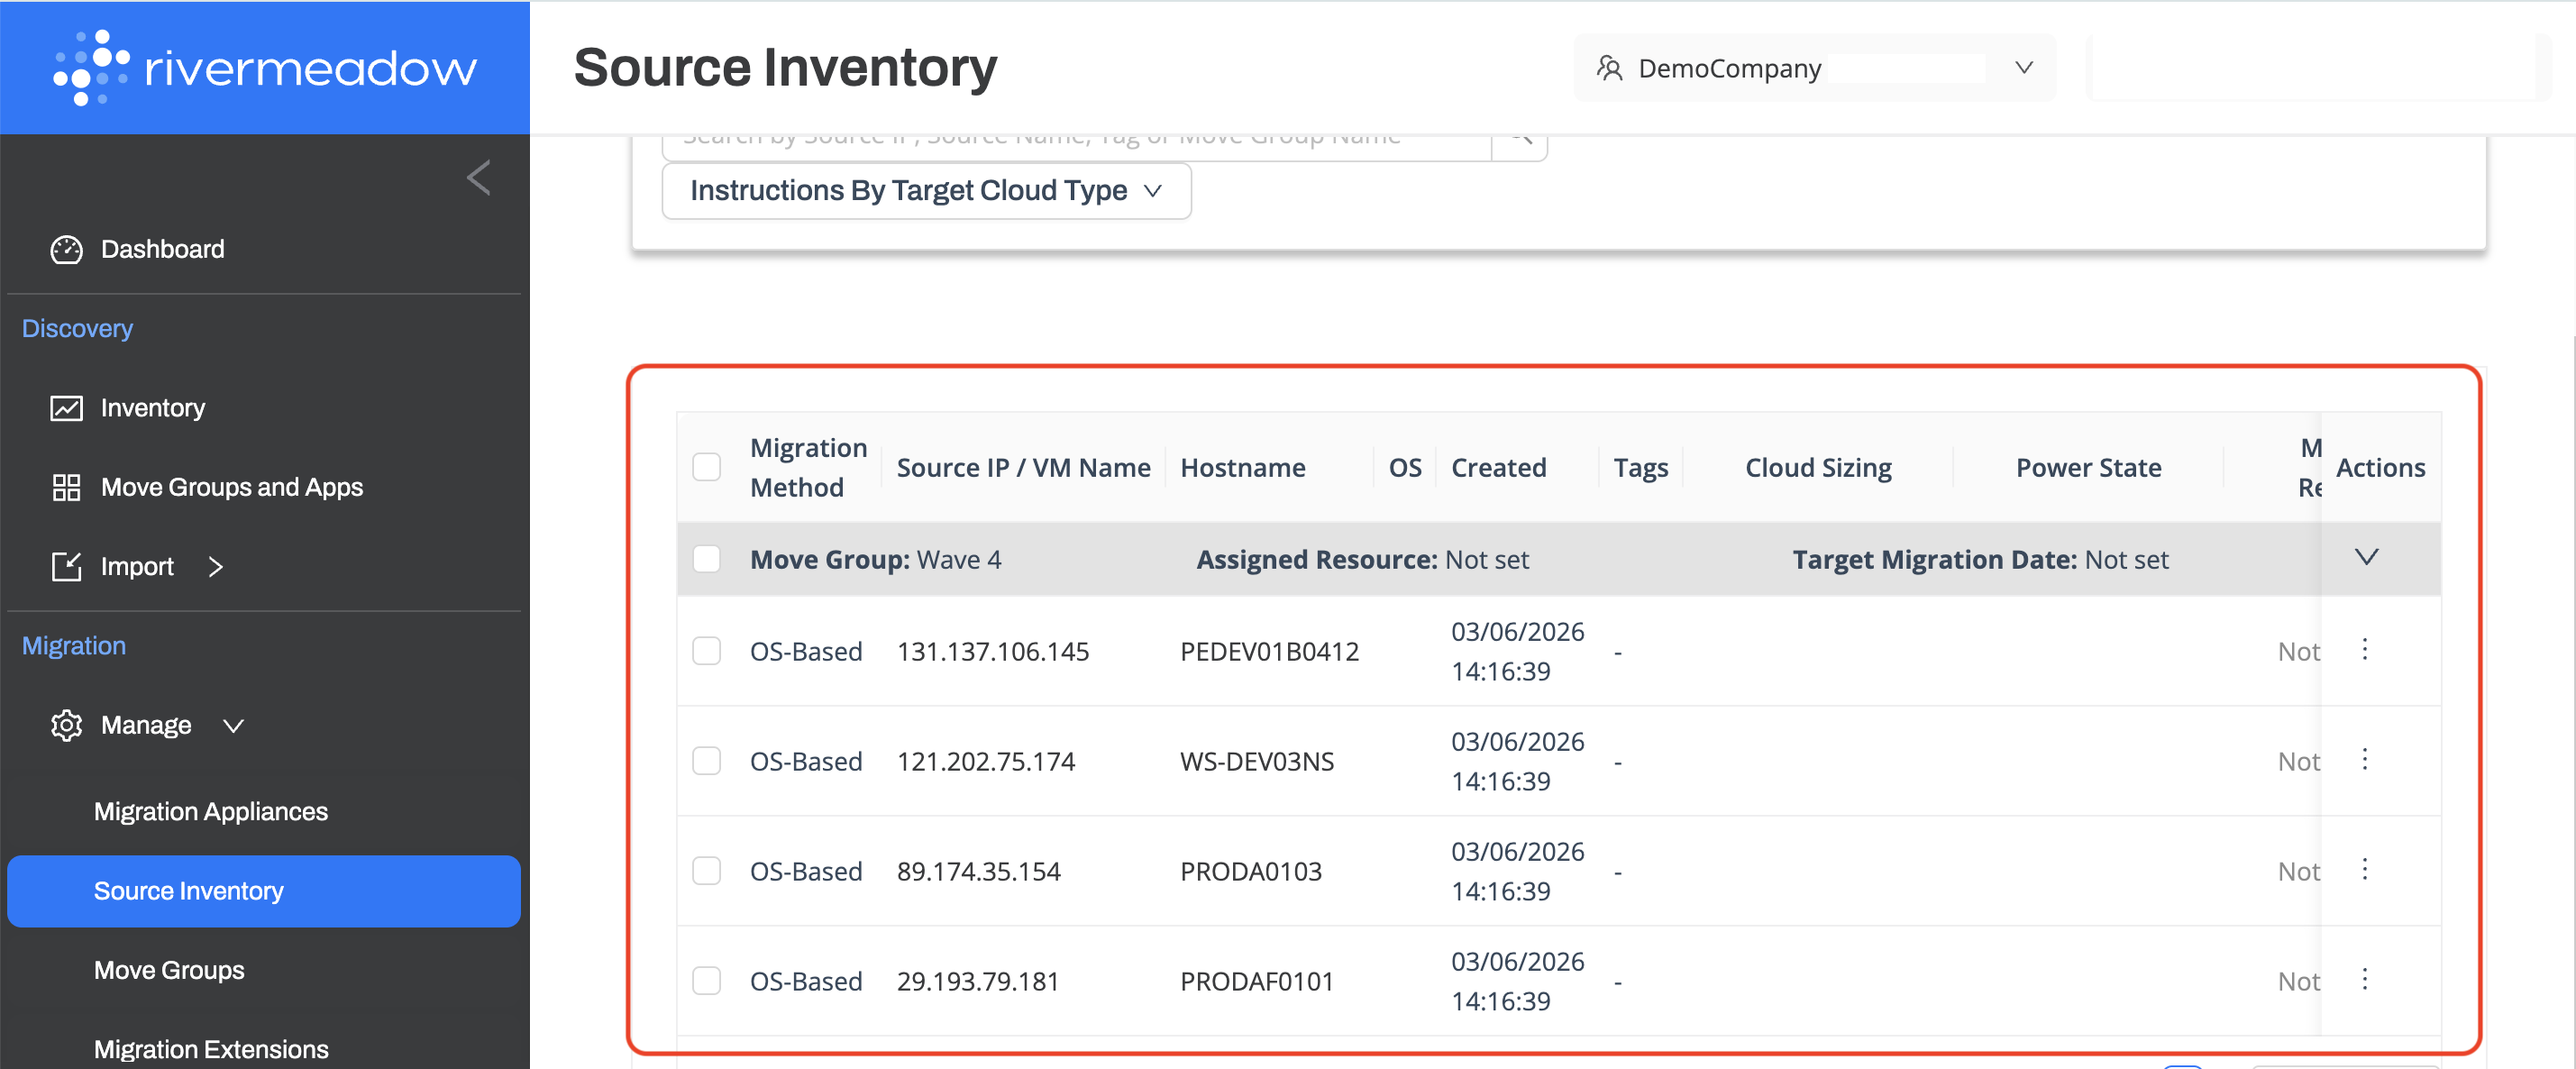
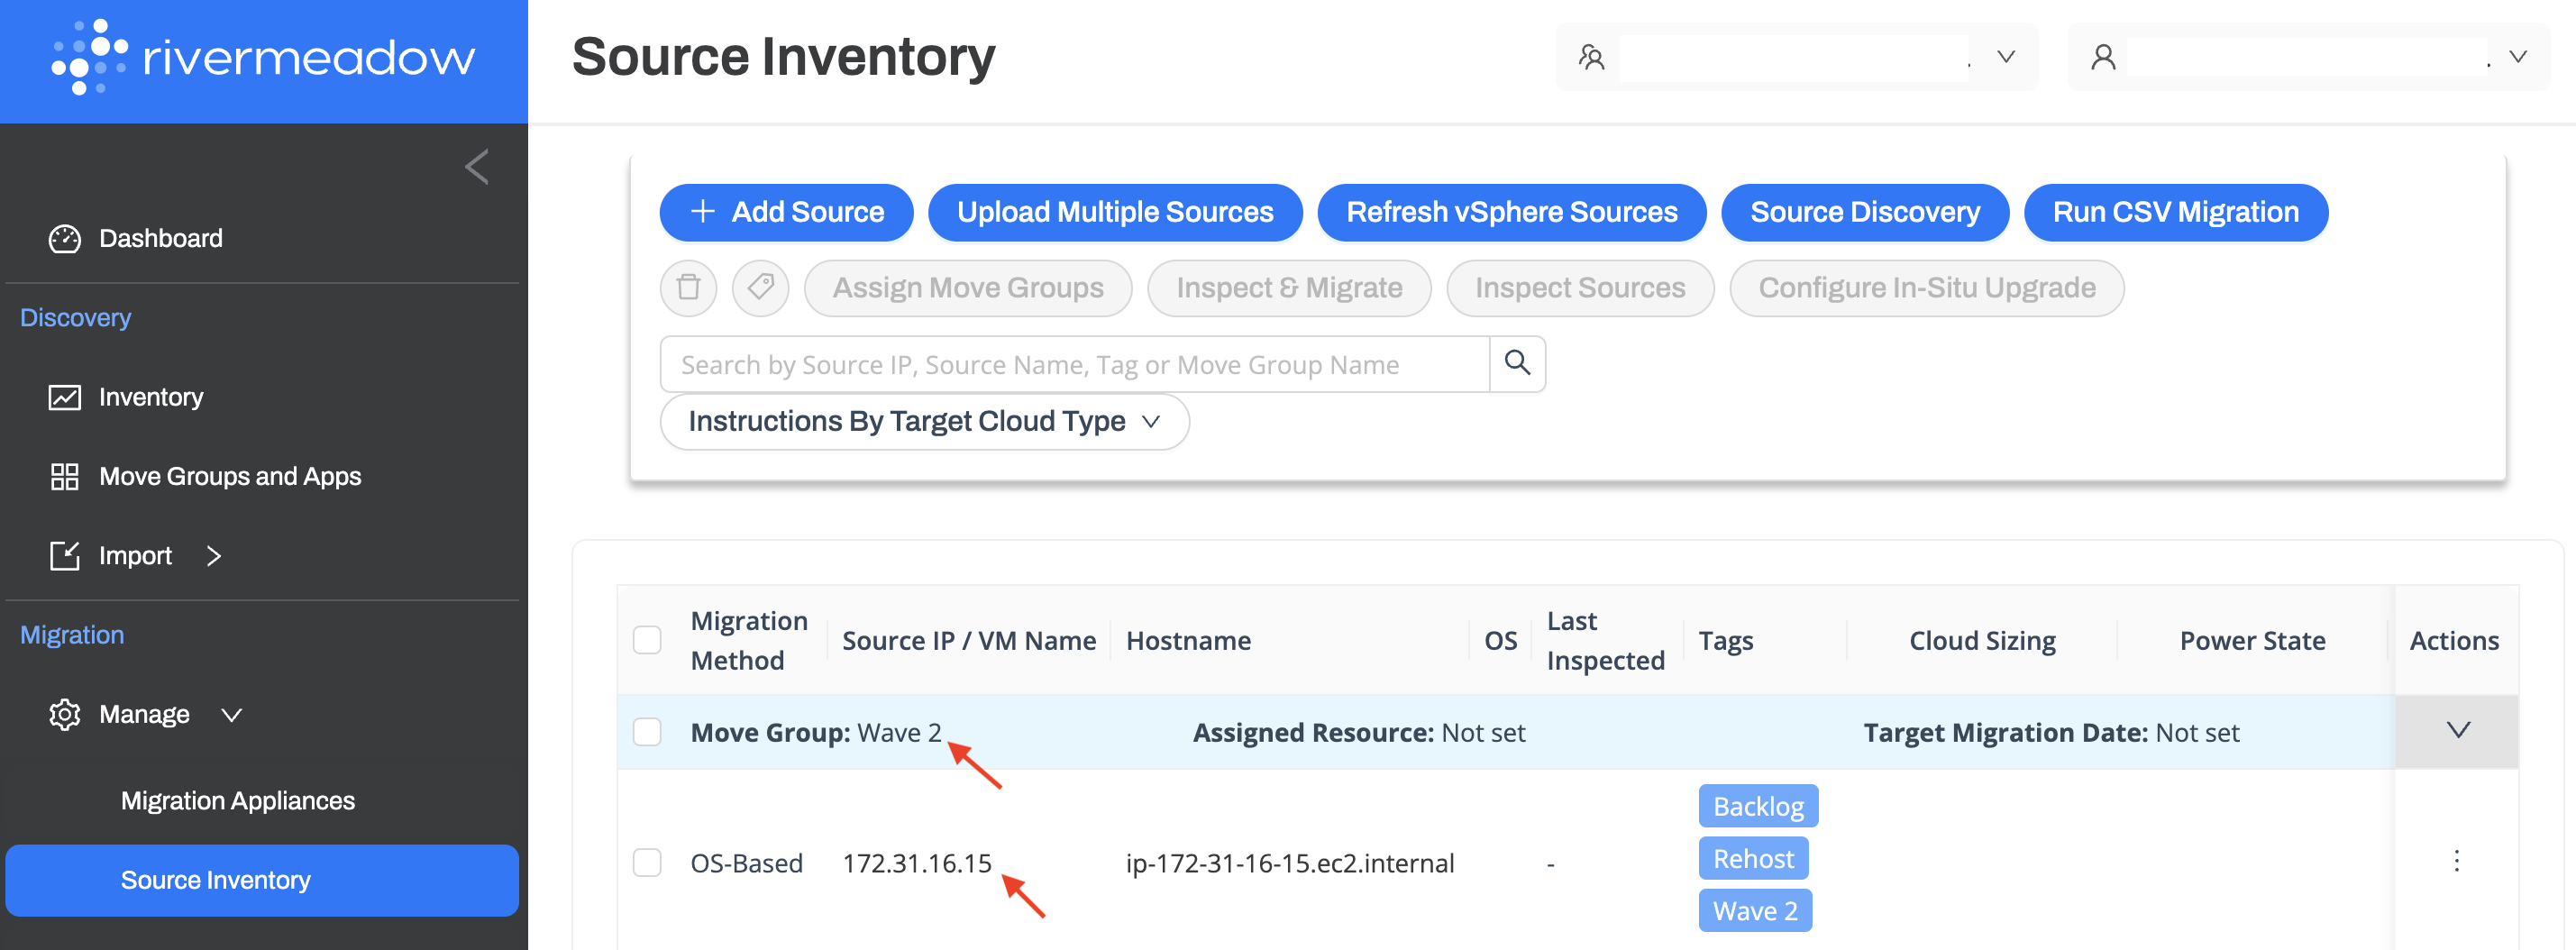
Now, You can navigate to the RiverMeadow site to check the configs pushed to RiverMeadow under Manage → Source Inventory at the left side showing the details of Host machines, Move groups that were pushed.
-
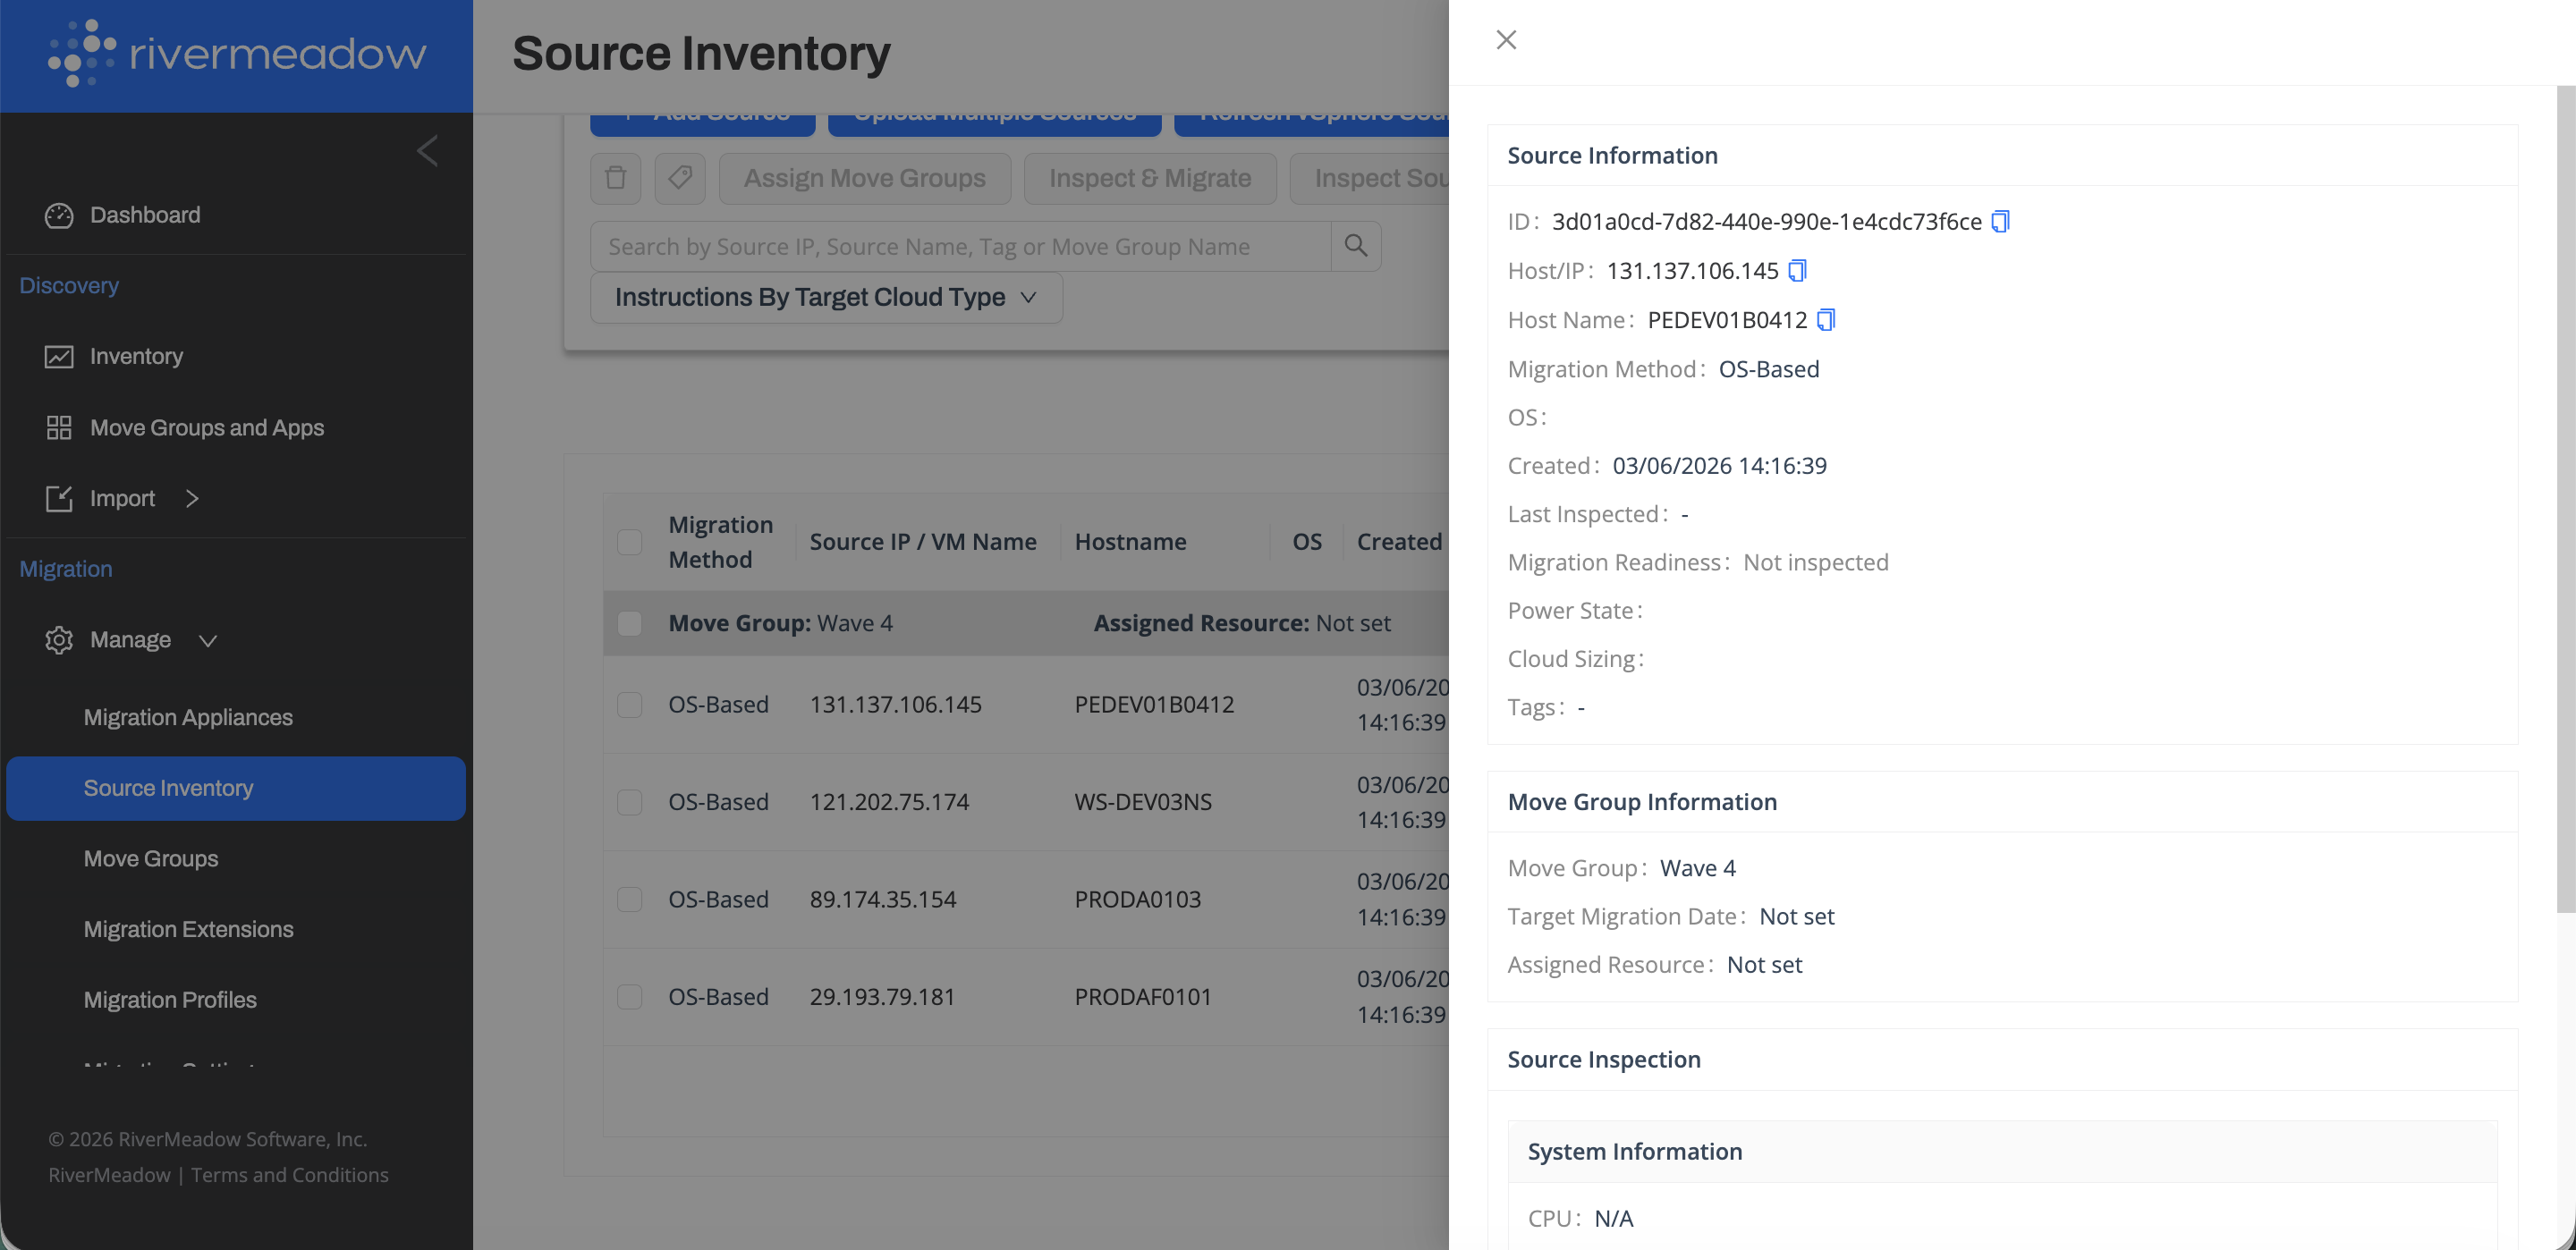
You can see more information as well by clicking on the individual hosts that were pushed to RiverMeadow as shown below like the hostname, IP address, OS version etc.
-
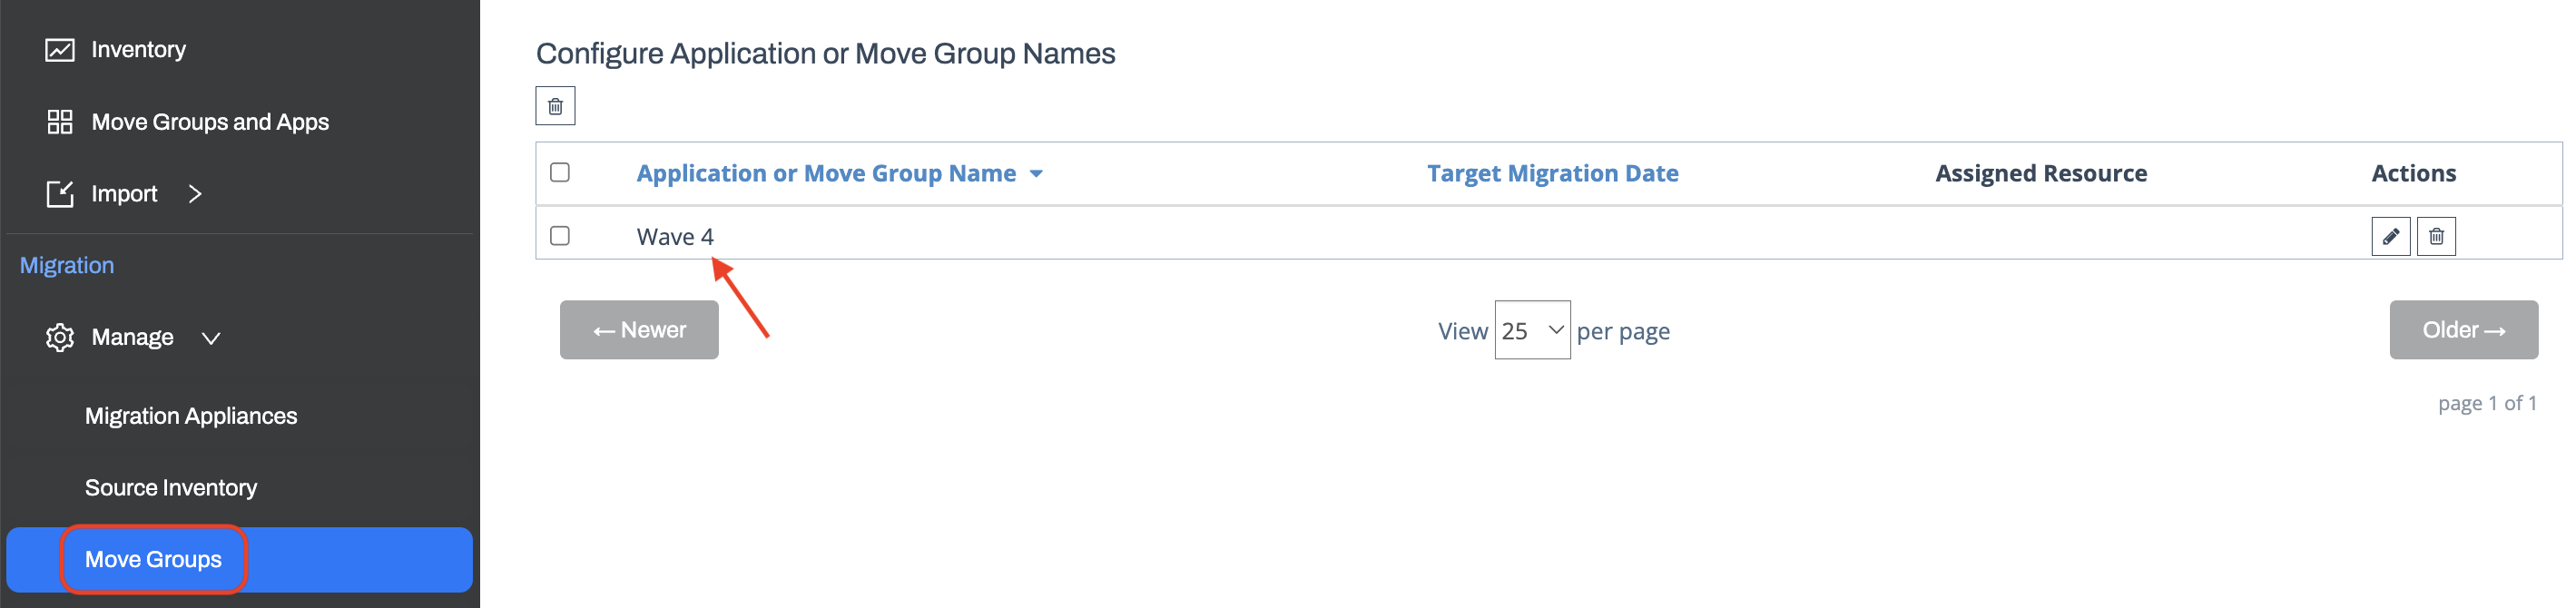
You can also see the Move Groups that were pushed under the Manage → Move Groups as shown below
-
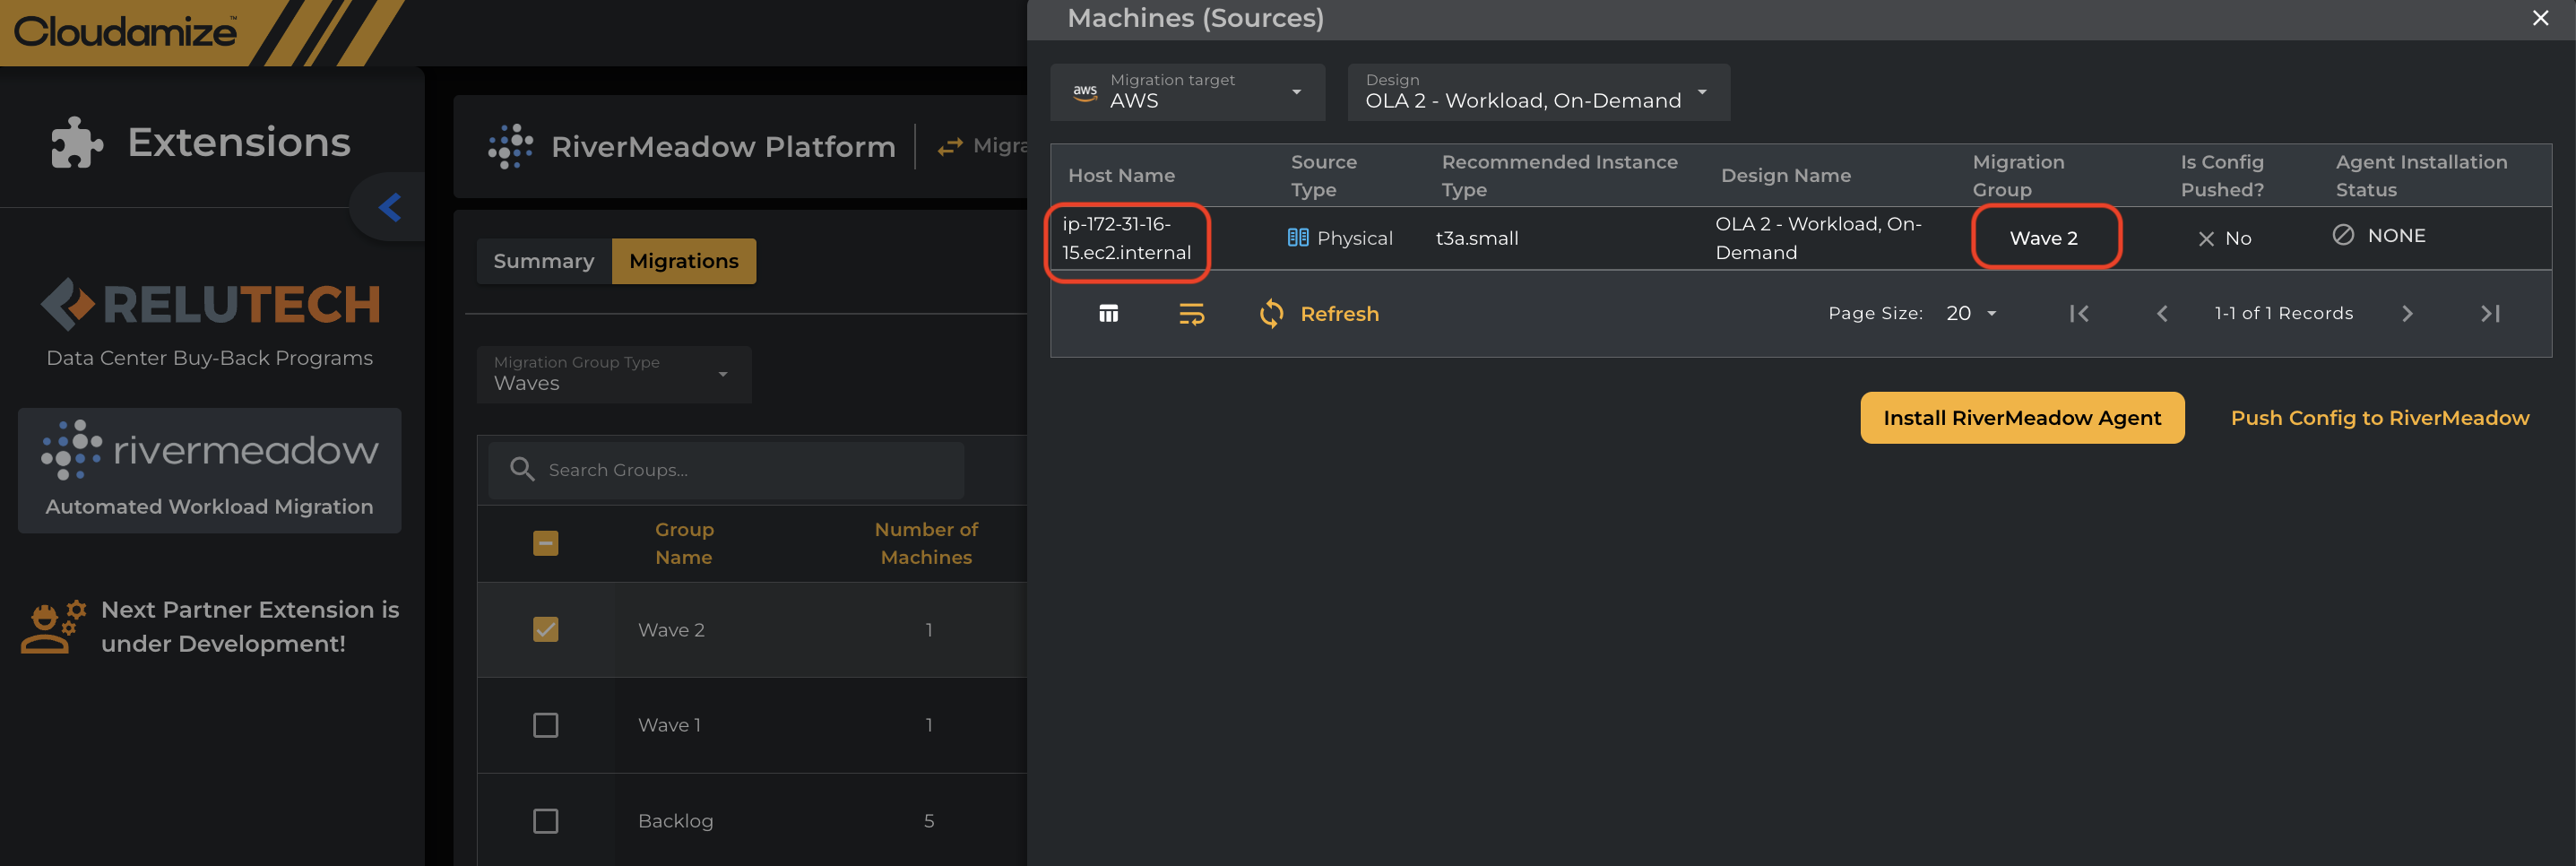
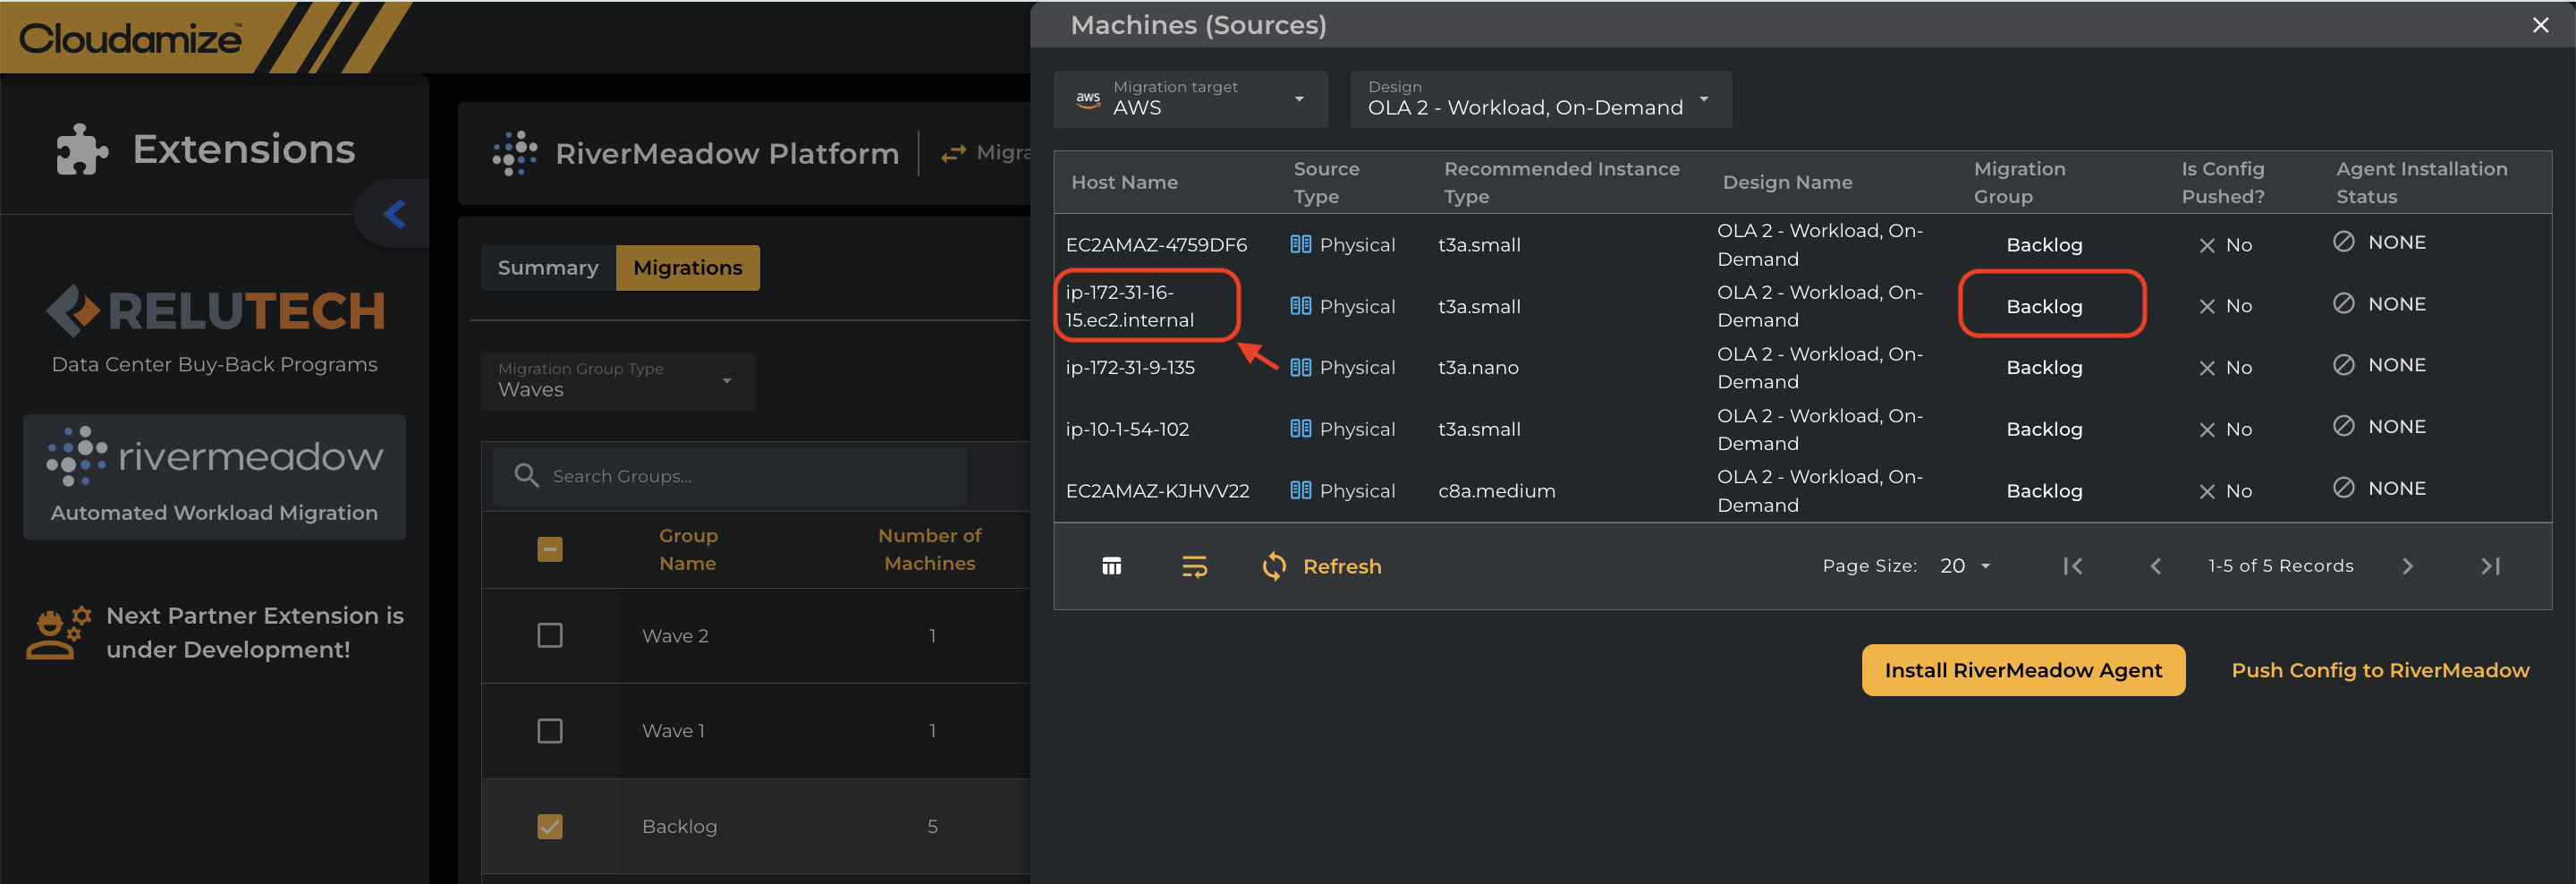
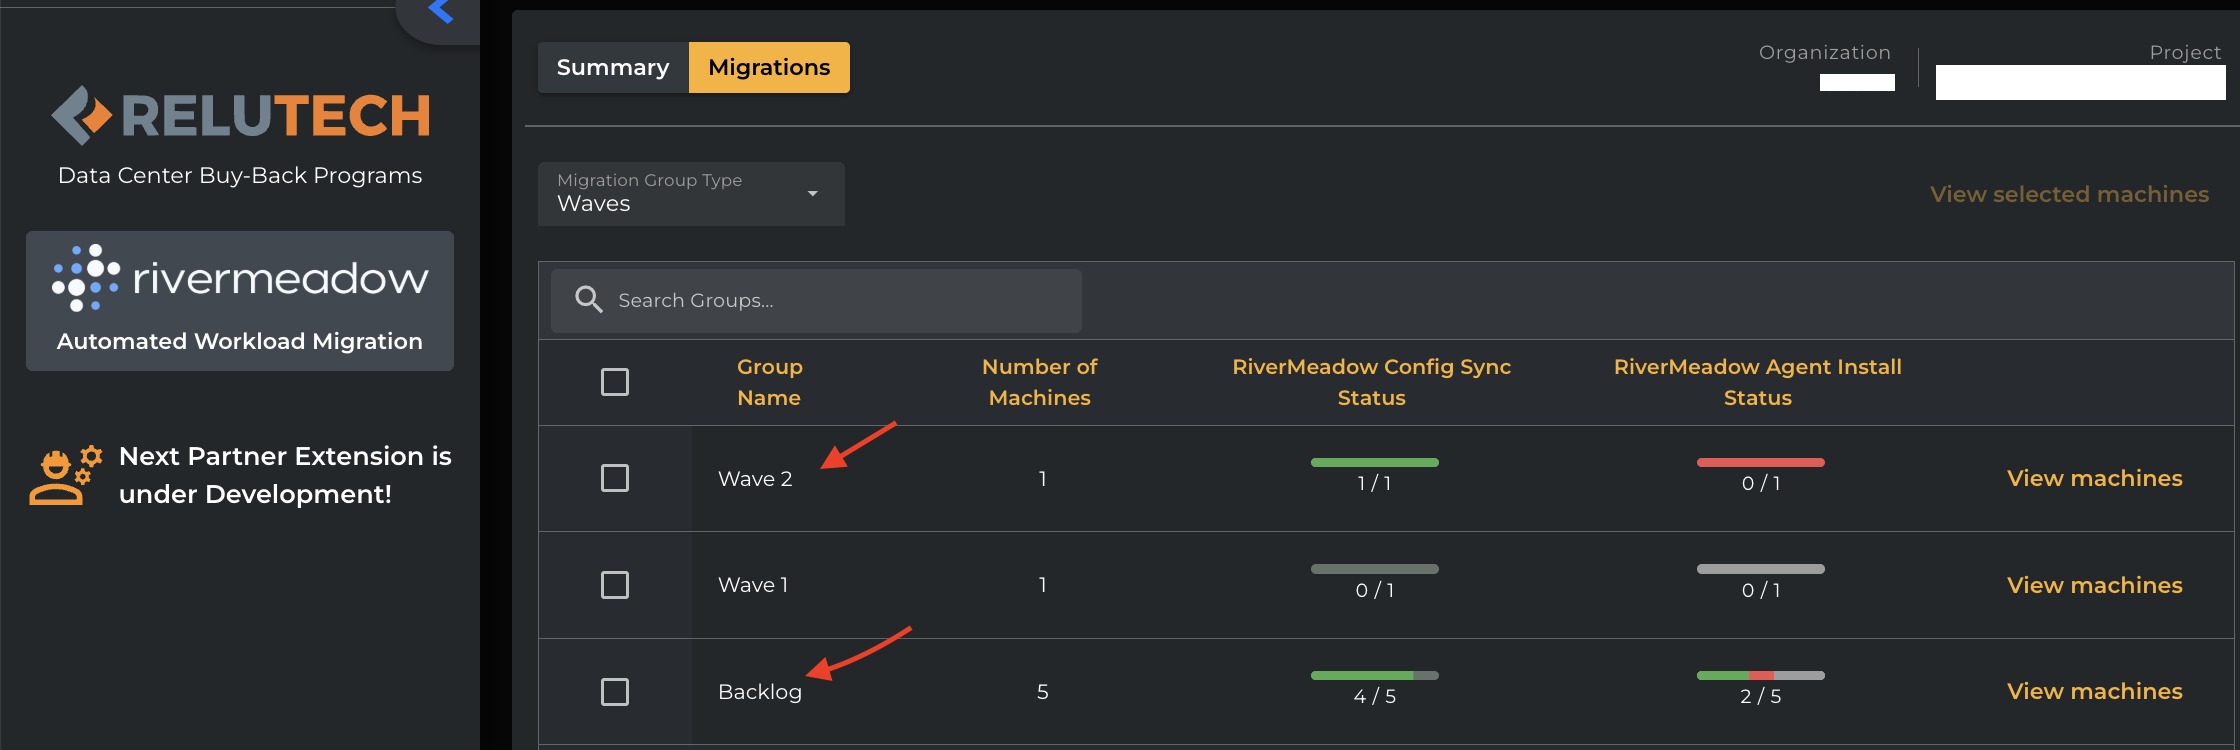
When a single machine is manually tagged to multiple migration waves (e.g., Wave 1 and Wave 2) and it now allows an option to select the required Migration Group during a configuration push to RiverMeadow. The same is shown in the below screenshots.
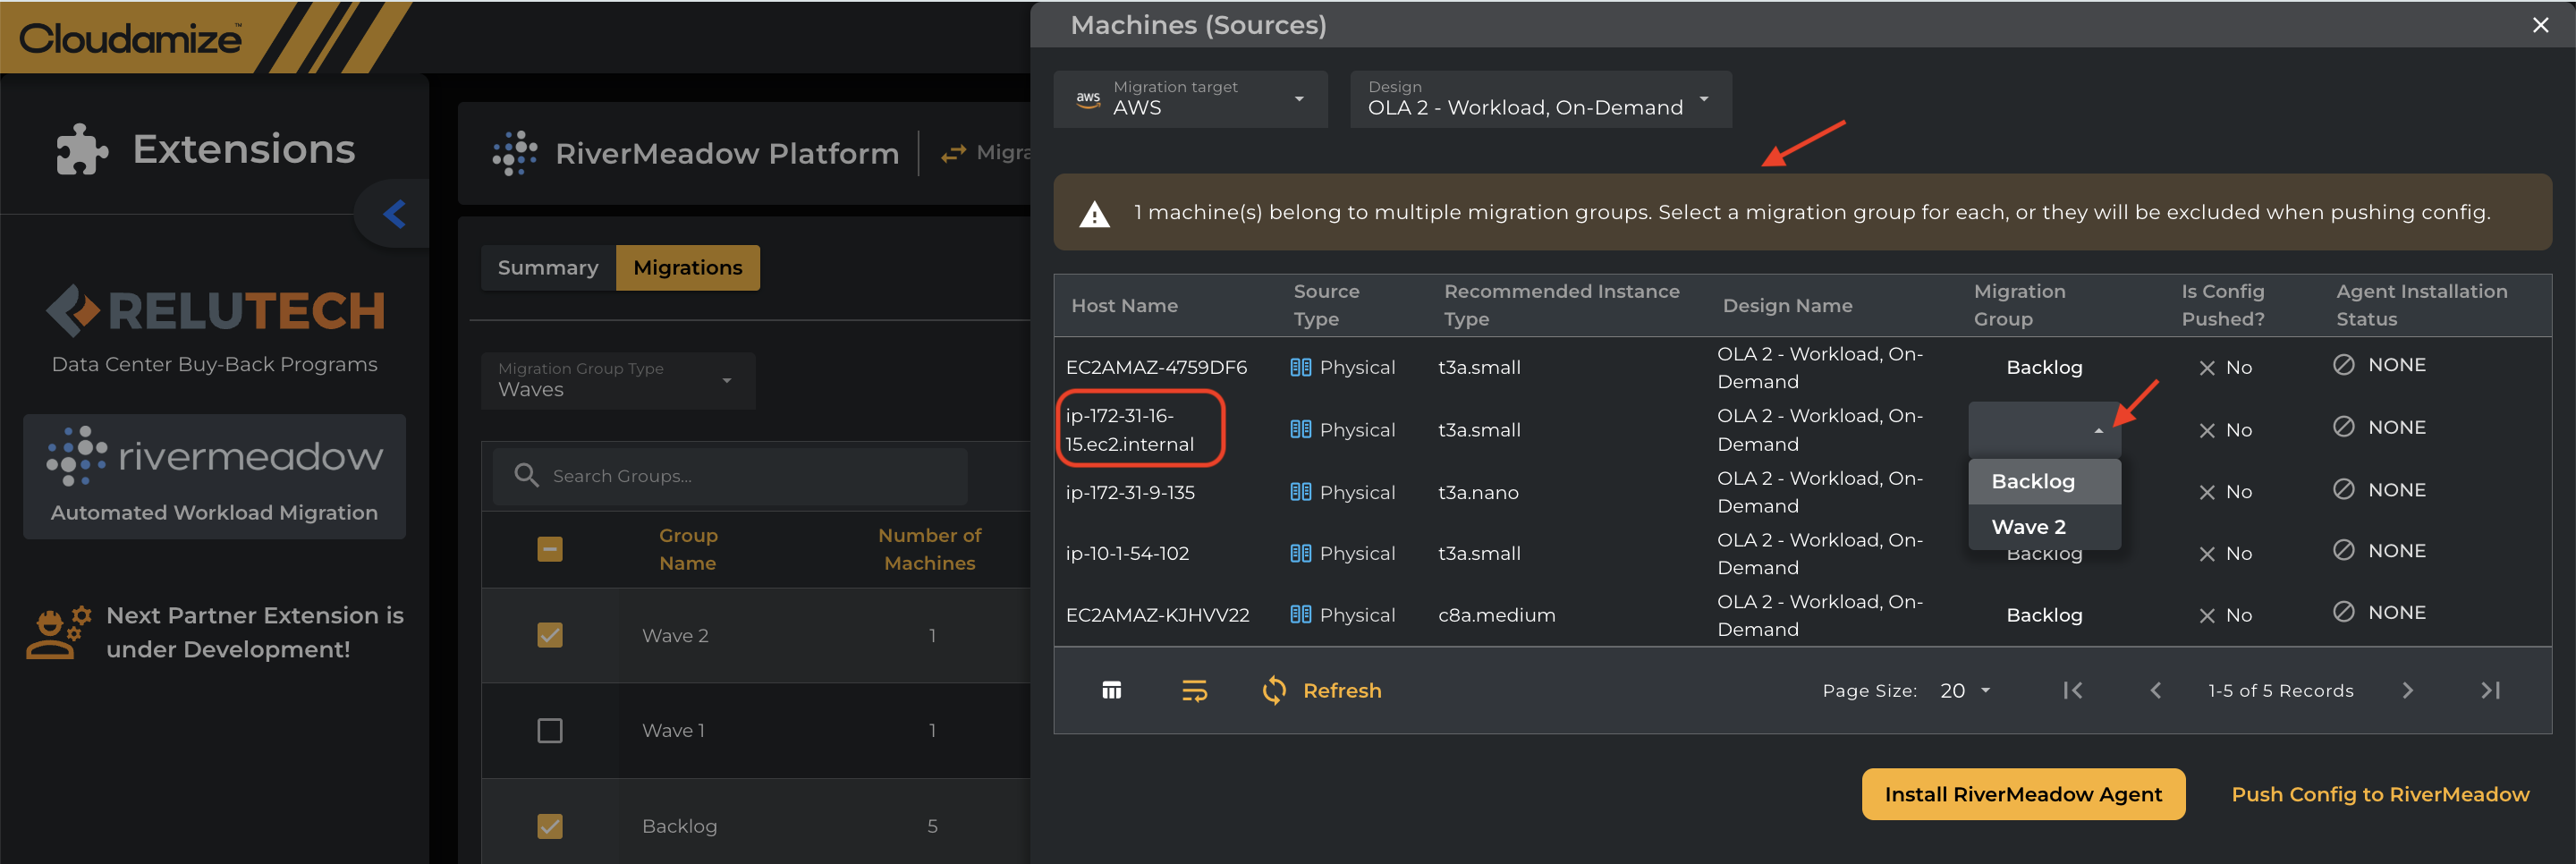
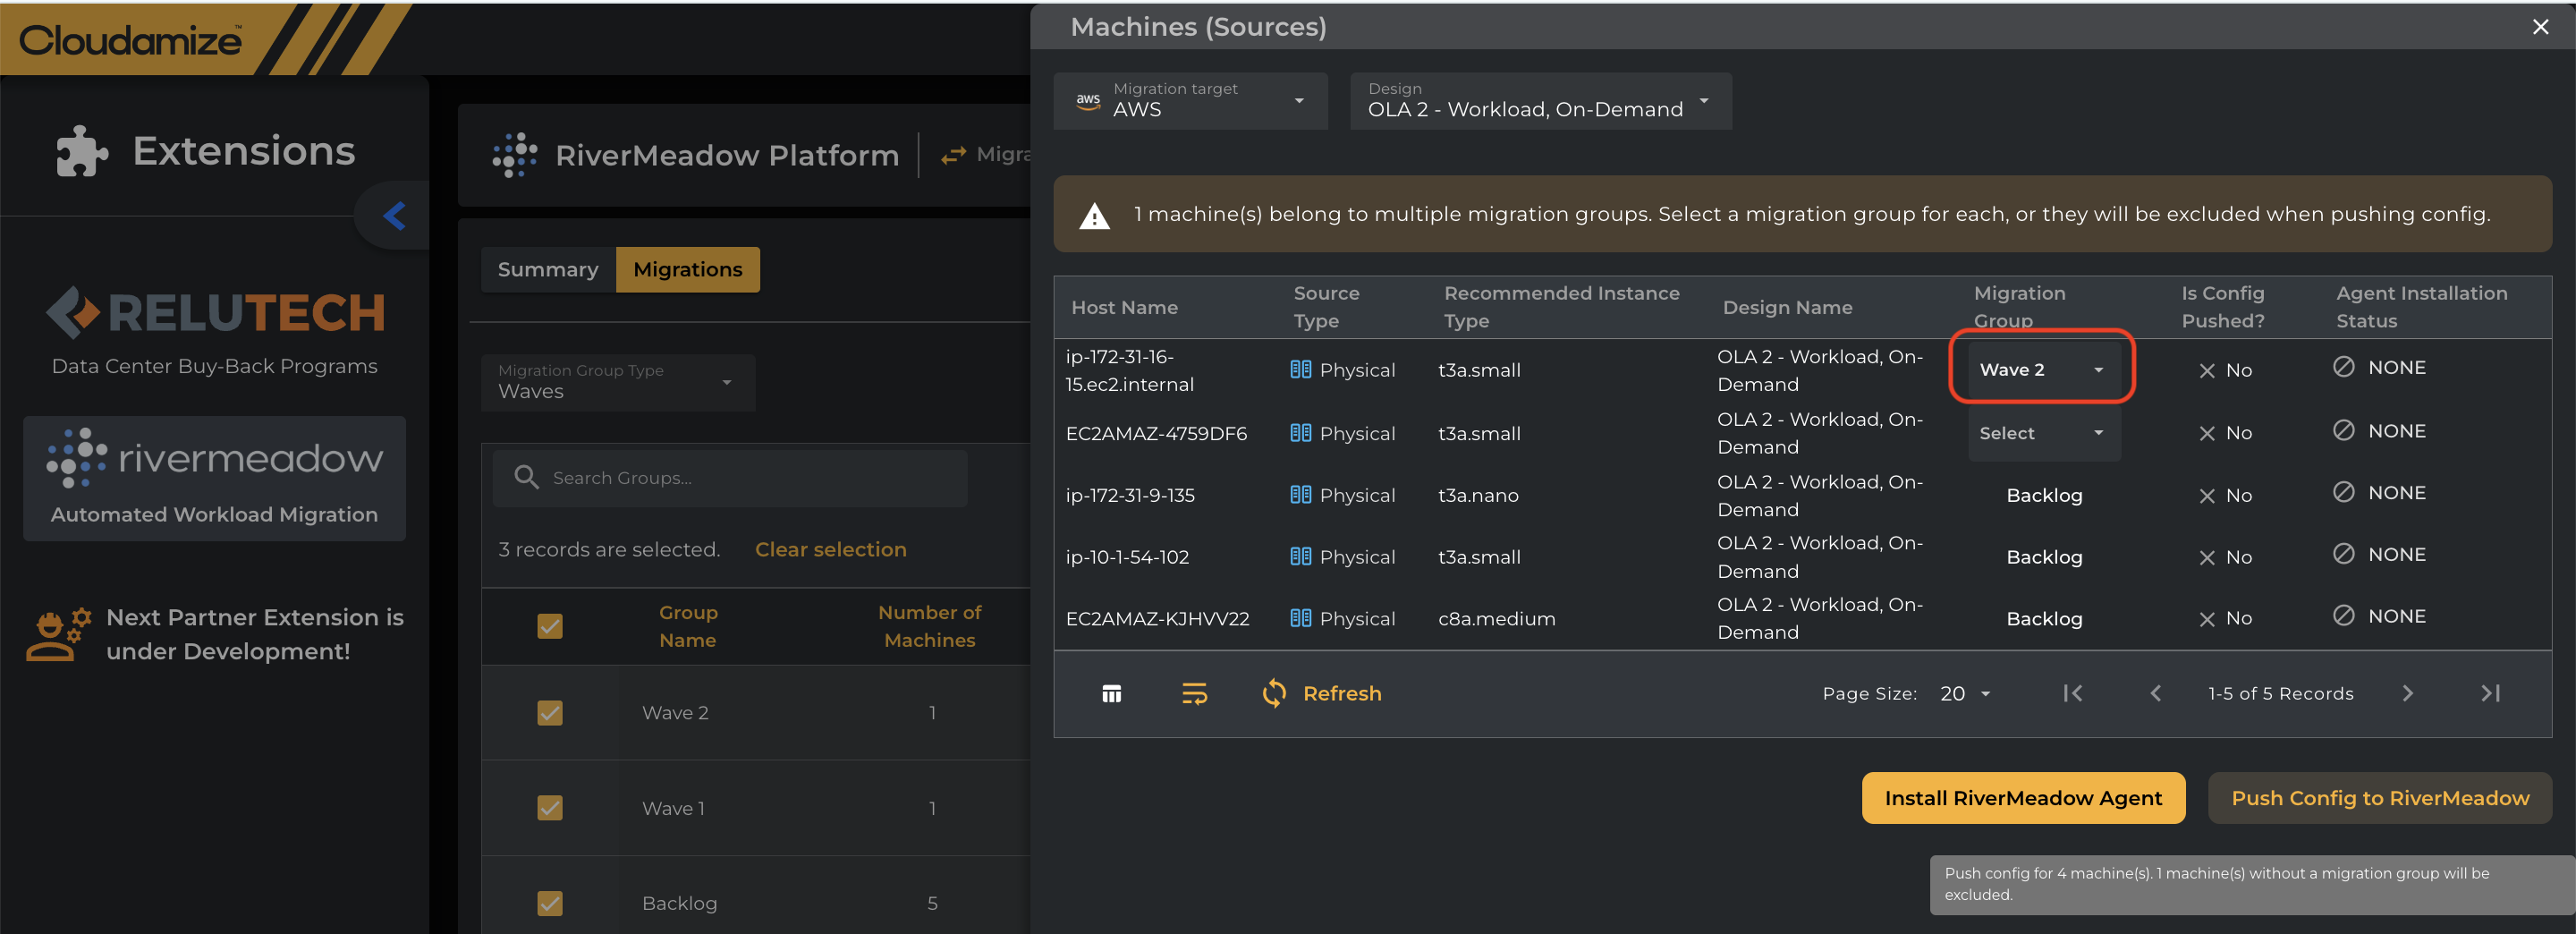
When the Group names are selected, it will allow you to select the Migration Group after clicking the View machines, and then config is pushed after selecting the Migration Group.
The dashboard in RiverMeadow displays accordingly as per the selected Move Group as shown in the screenshot below.
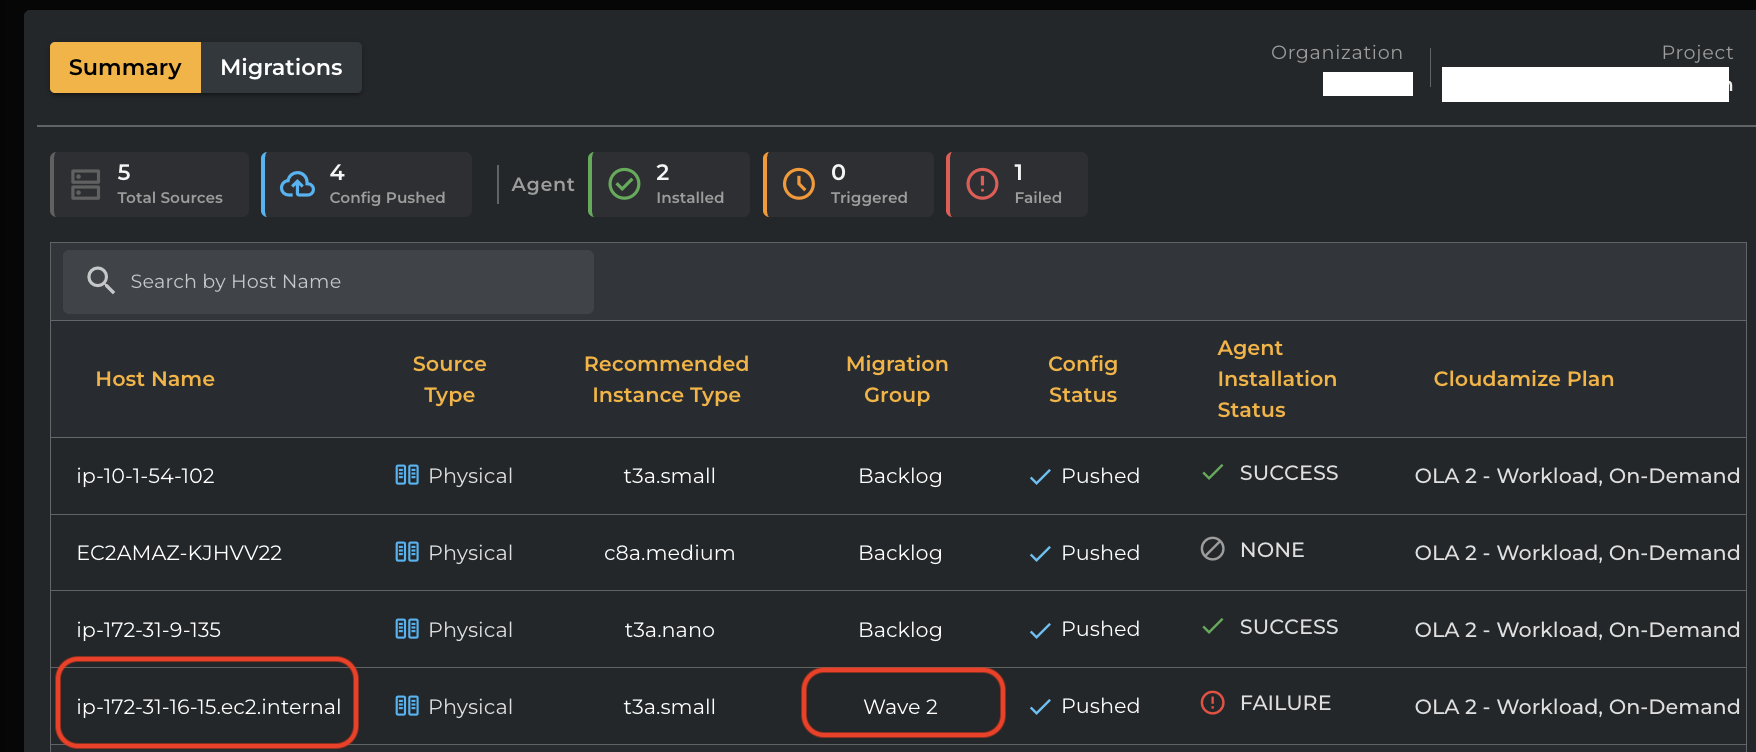
On the cloudamize console's summary tab, the machine shows an entry associated with a selected migration group once the config is pushed.
Getting Started
To learn more about the RiverMeadow extension, please click here or contact your Cloudamize Engagement Manager or Cloudamize Partner.
If you have any queries, please get in touch with the helpdesk via our Helpdesk Portal or by email at helpdesk@cloudamize.com.