

Overview
The AWS Migration Acceleration Program (MAP) helps customers move to AWS with a proven migration method, AWS Partner support, and funding and credits that offset the cost of running two environments while a migration is underway.
MAP in AWS Transform brings the whole MAP process into one guided, AI-assisted workflow inside AWS Transform. Deal qualification, funding requests, MAP terms, resource tagging, and incentive payouts all happen in one place, eliminating the need to move between separate portals or manually compile the MAP submission package. By pairing Cloudamize’s normalized dataset with AWS Transform’s built-in automations, partners significantly reduce manual effort and accelerate the MAP approval timeline.
Cloudamize is a MAP Ready Assessment Tool and a beta partner for MAP in AWS Transform. A Cloudamize assessment can be exported in the format AWS Transform expects (the MAP Ready Third Party Normalized Schema), so AWS Transform can read your total cost of ownership (TCO) data directly. That means fewer forms to fill in by hand and a faster eligibility decision.
This article covers how to bring a Cloudamize assessment into MAP in AWS Transform, with a summary of the steps that follow. For the full process, see the AWS links at the end of this article.
This isn’t the same as the AWS Transform Extension in the Cloudamize console, which builds an AWS landing zone from your design. See AWS Transform Extension.
Who this is for
-
MAP Certified AWS Partners who want to qualify and fund a MAP deal using a Cloudamize assessment
-
Customers working with an AWS Partner on a MAP migration
Before you start
You need:
-
AWS Transform set up in your AWS account. See Setting up AWS Transform.
-
AWS Partner Central 3.0 (Partners only), connected to AWS Transform as described in Step 1.
-
The usual MAP partner requirements. They haven't changed for MAP in AWS Transform.
-
A completed Cloudamize assessment with at least one AWS TCO Design.
How it works
-
Connect AWS Partner Central to AWS Transform
-
Create an engagement
-
Export your assessment from Cloudamize
-
Add the Cloudamize export to the engagement
-
Create or import the opportunity
-
Request funding and credits, and accept the MAP terms
-
Tag migrated resources
Steps 3 and 4 are where Cloudamize comes in. The other steps happen in AWS Transform and are summarized below.
Step 1: Connect AWS Partner Central to AWS Transform
AWS Transform reaches Partner Central through a connector. You create the connector, and an administrator approves it.
If Partner Central is in the same AWS account as AWS Transform
-
In AWS Transform, go to Connectors and open the Source connectors tab.
-
Create a connector of type Partner Central for the same account.
-
When asked to choose a policy type, choose Managed Policy. The connector shows Pending approval.
-
On the Incoming connectors tab, open the new connector, choose to create a new role (AWSPartnerCentralFullAccess), then choose Save and Approve.
If Partner Central is in a different AWS account
-
In the AWS Transform console, go to Service management > Settings > Cross-account access and add the 12-digit ID of the Partner Central account.
-
Create the connector as above. It now waits for approval in the Partner Central account.
-
Sign in to the Partner Central account, go to Connectors > Incoming connectors, create a new role (AWSPartnerCentralFullAccess), and choose Save and Approve.
More detail: AWS Transform Connectors and the AWSPartnerCentralFullAccess policy.
Step 2: Create an engagement
An engagement holds everything for one MAP request.
-
In the AWS Transform chat, tell the agent you want to start a new engagement, then give it a name and a short description. You can also use the engagement form in the navigation pane.
-
Choose the partner type you're acting as for this engagement. It decides who accepts the MAP terms later on.
|
Partner type |
Who accepts the MAP terms |
Customer must be added to the engagement? |
|---|---|---|
|
Consulting Partner |
Customer |
Yes |
|
Distributor |
Partner |
No |
|
Solution Provider |
Partner |
No |
Step 3: Export your assessment from Cloudamize
The MAP-ready export is a .json file for one Cloudamize Design. Creating it also builds an AWS Pricing Calculator estimate for the same servers, which AWS Transform asks for in Step 4.
Option A: Download from the Cloudamize Console
-
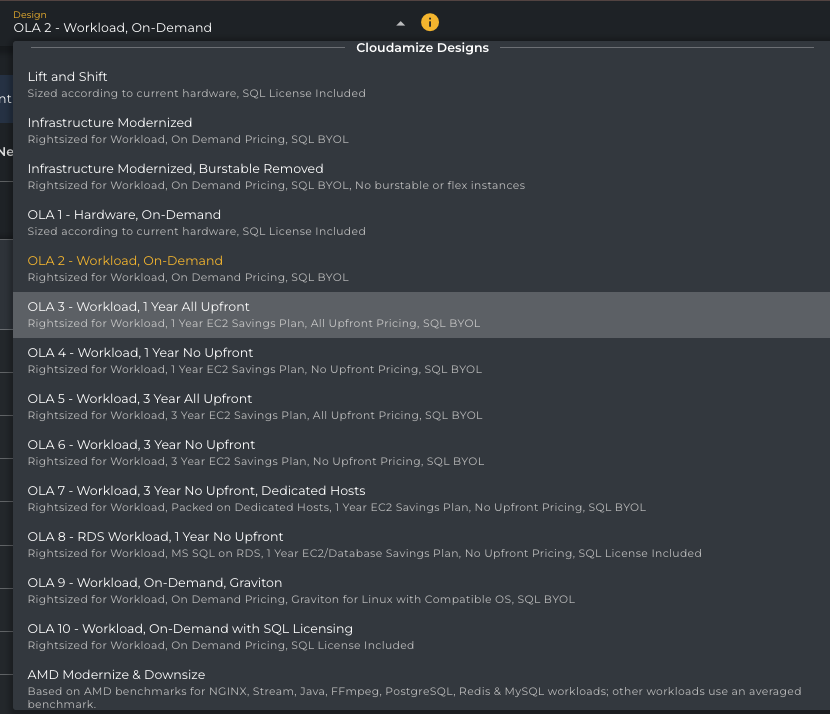
Open your assessment and pick the Design you want in the Design selector at the top of the page.
-
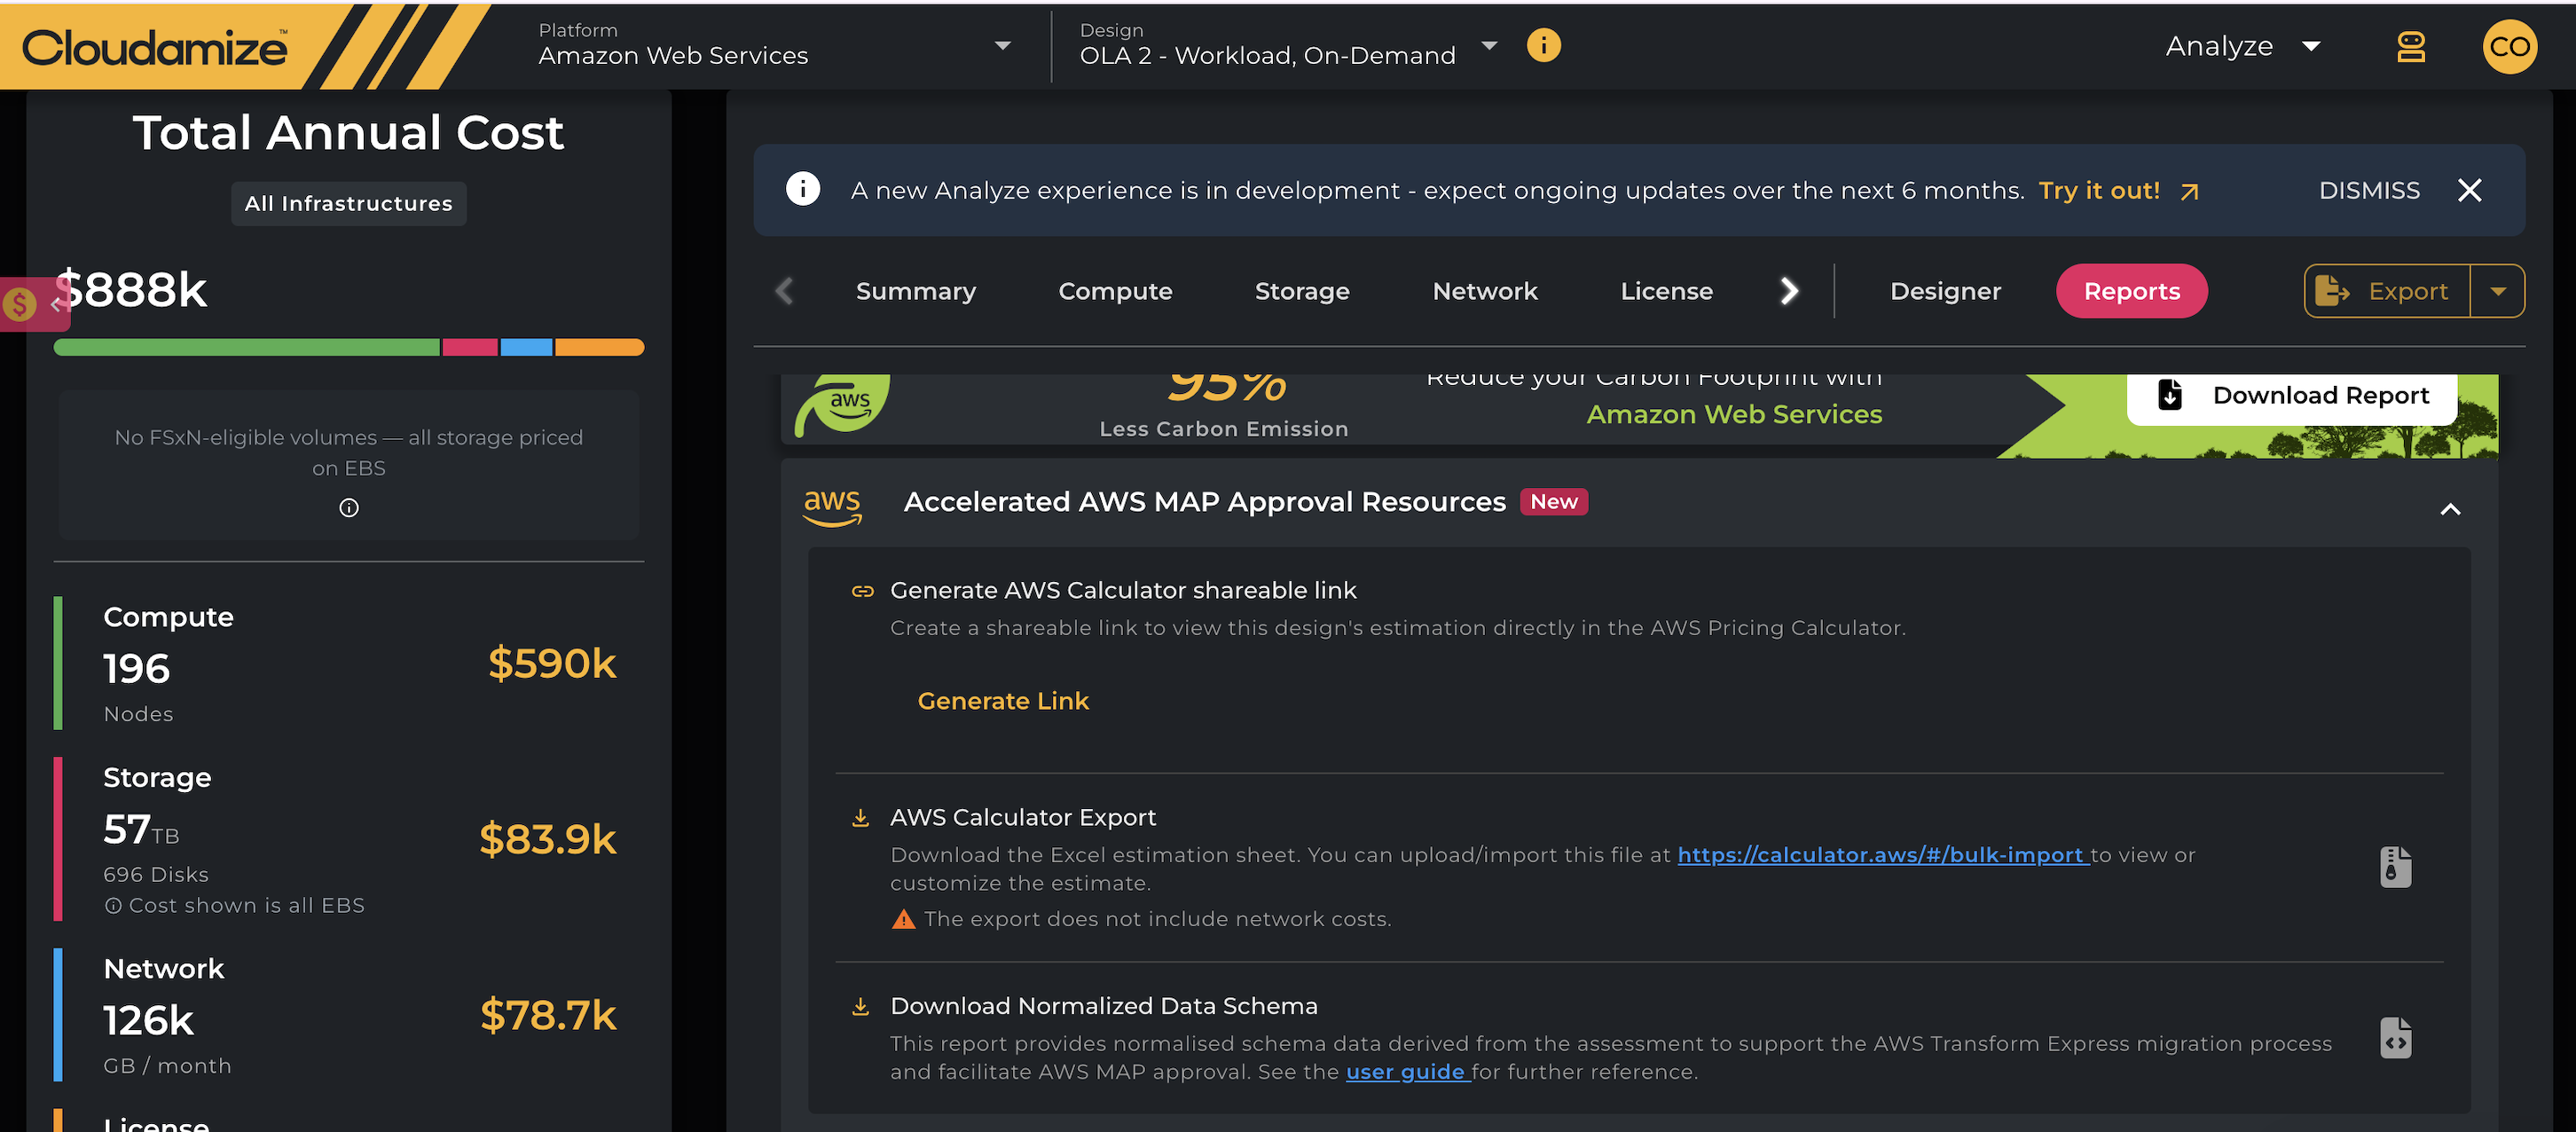
Go to Reports and expand Accelerated AWS MAP Approval Resources.
-
Choose Download Normalized Data Schema to save the .json file. Don't edit or reformat it, because AWS Transform rejects files with changed or extra fields.
-
Create the AWS Pricing Calculator estimate. Choose Generate AWS Calculator shareable link to open it straight in the calculator, or choose AWS Calculator Export to download an Excel sheet and import it at https://calculator.aws/#/bulk-import. The Excel sheet doesn't include network costs.
-
In the AWS Pricing Calculator, use Export to save a copy of the estimate for Step 4.
Option B: Use the Cloudamize MCP server
If you already connect an AI assistant (such as Claude Desktop or Cursor) to Cloudamize, you can create the export yourself. To set up the connection, see the Cloudamize MCP Server End User & Integration Guide.
-
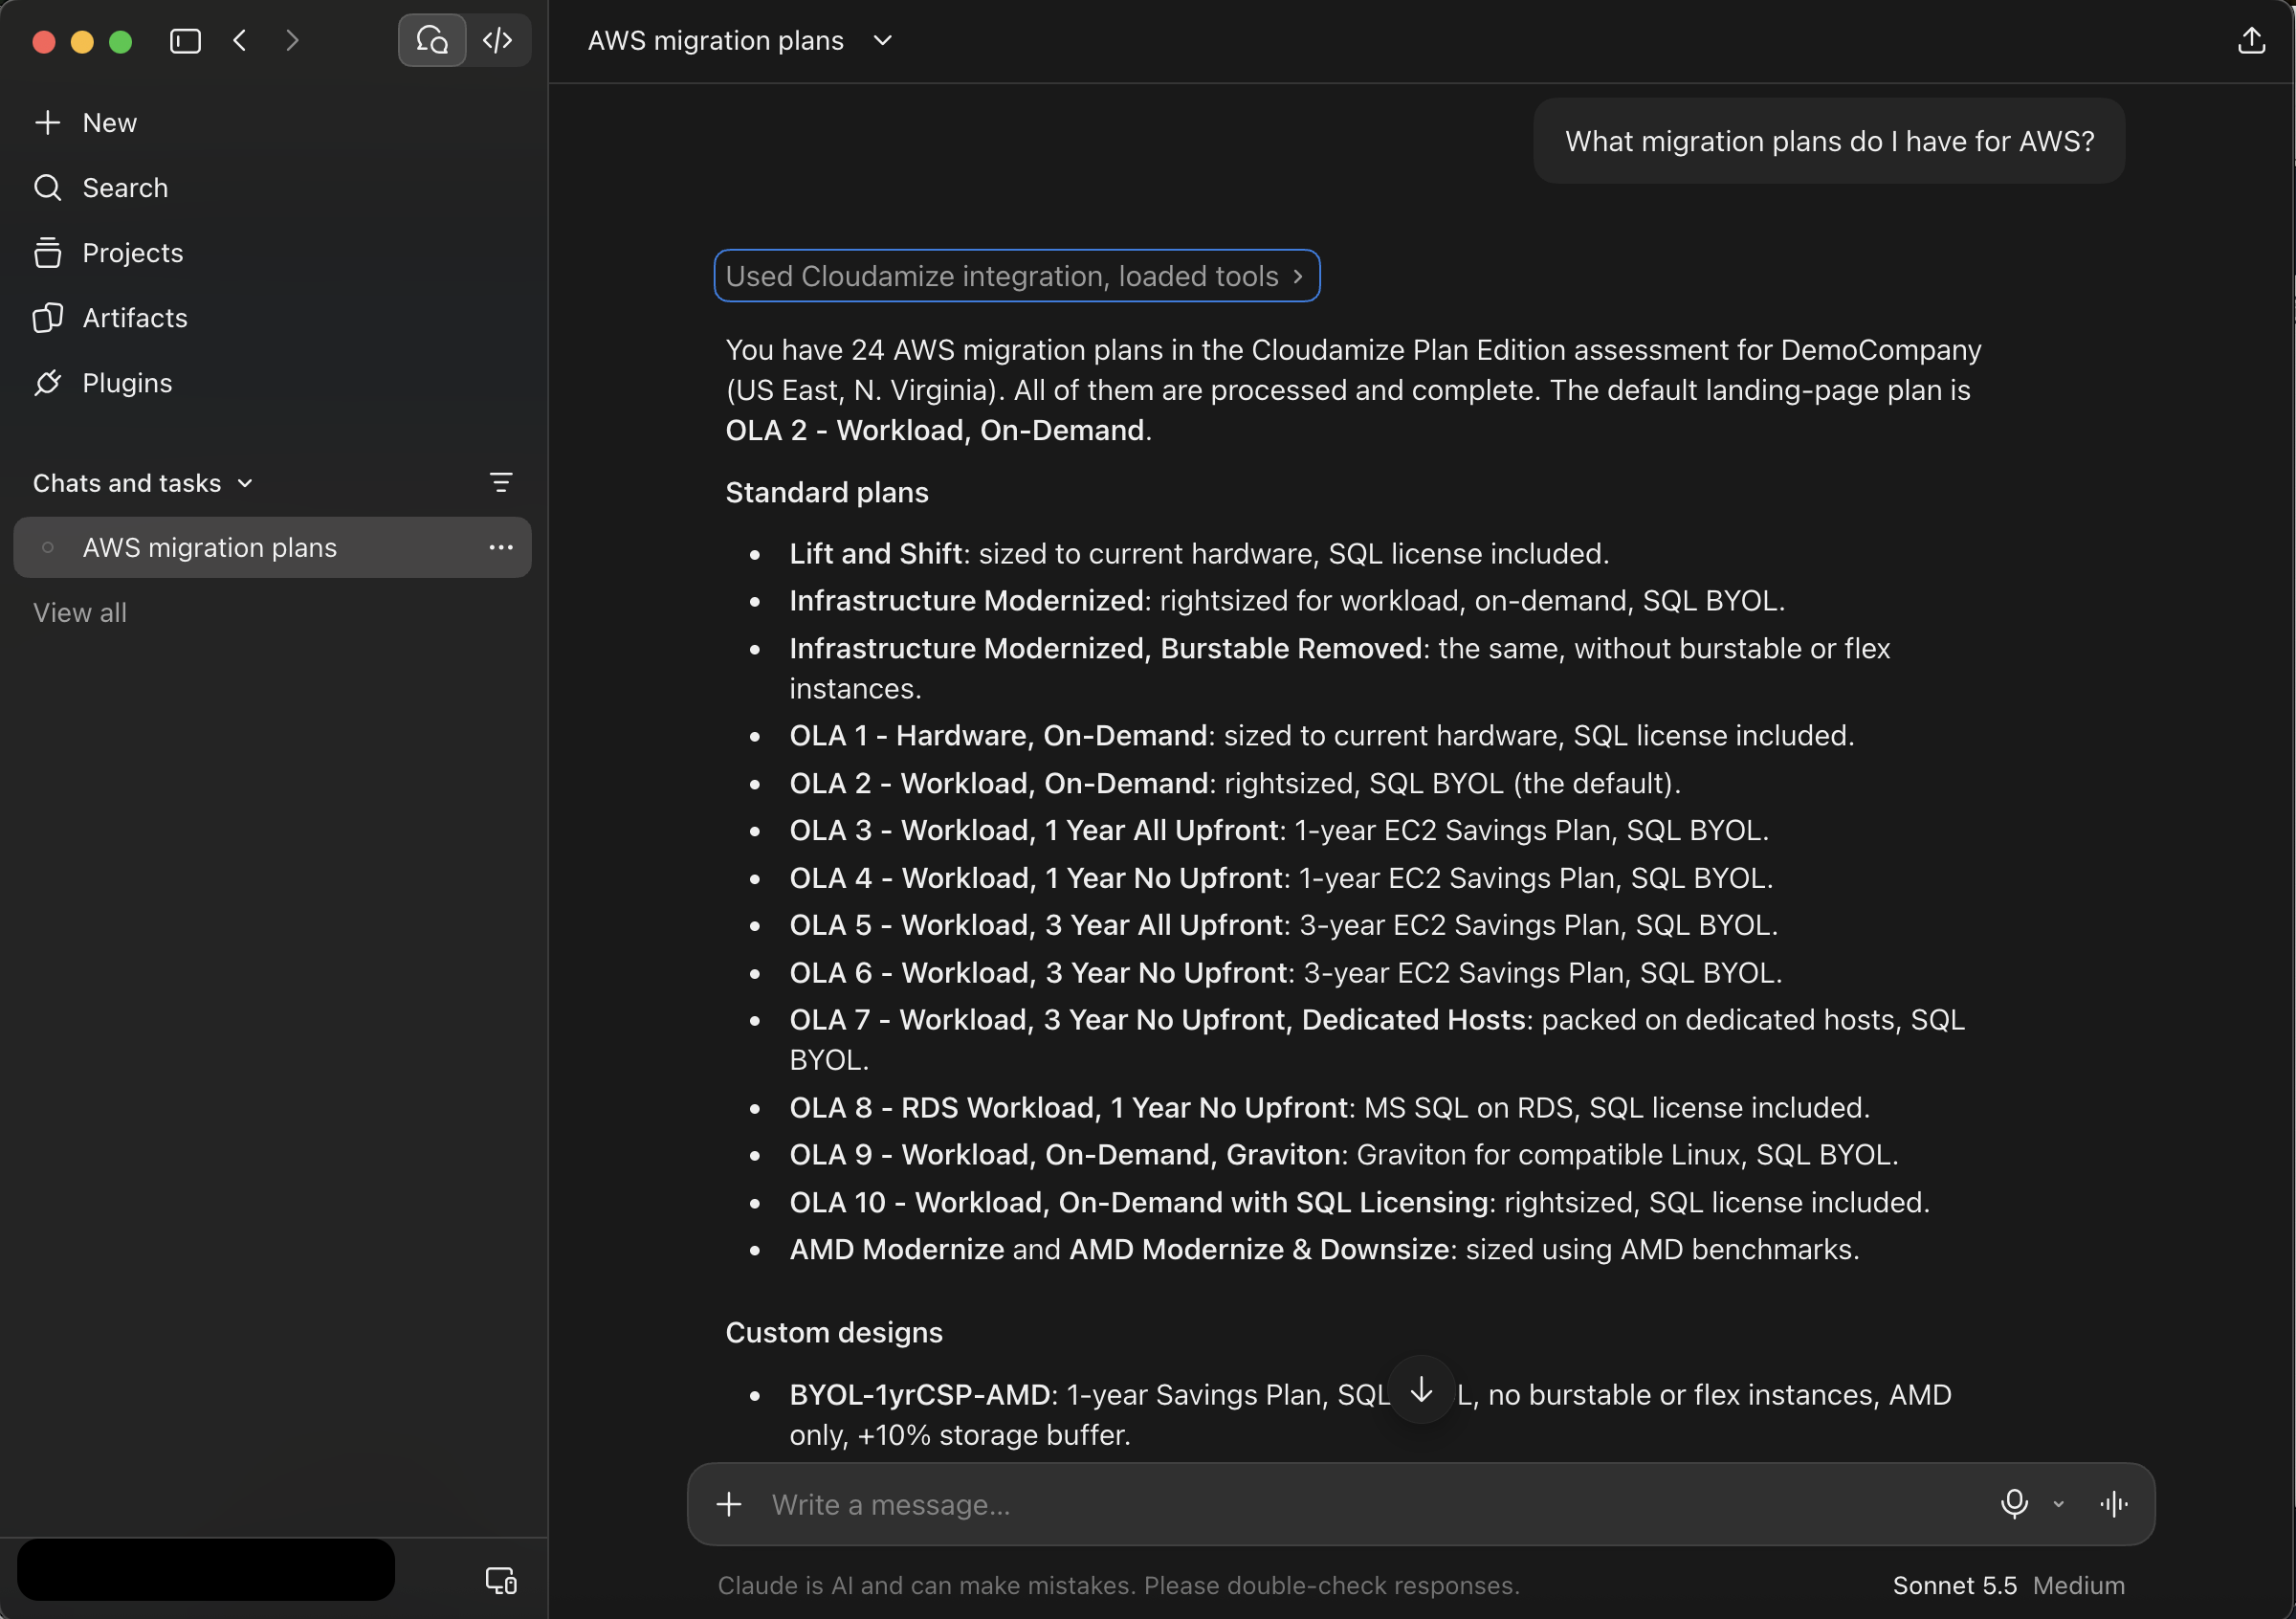
Ask the assistant to list your AWS designs and note the ID of the one you want. The assistant may call them migration plans.
-
Ask it to get the AWS Express Migration details for that design ID (the tool is called
getATXExpressMigrationDetails).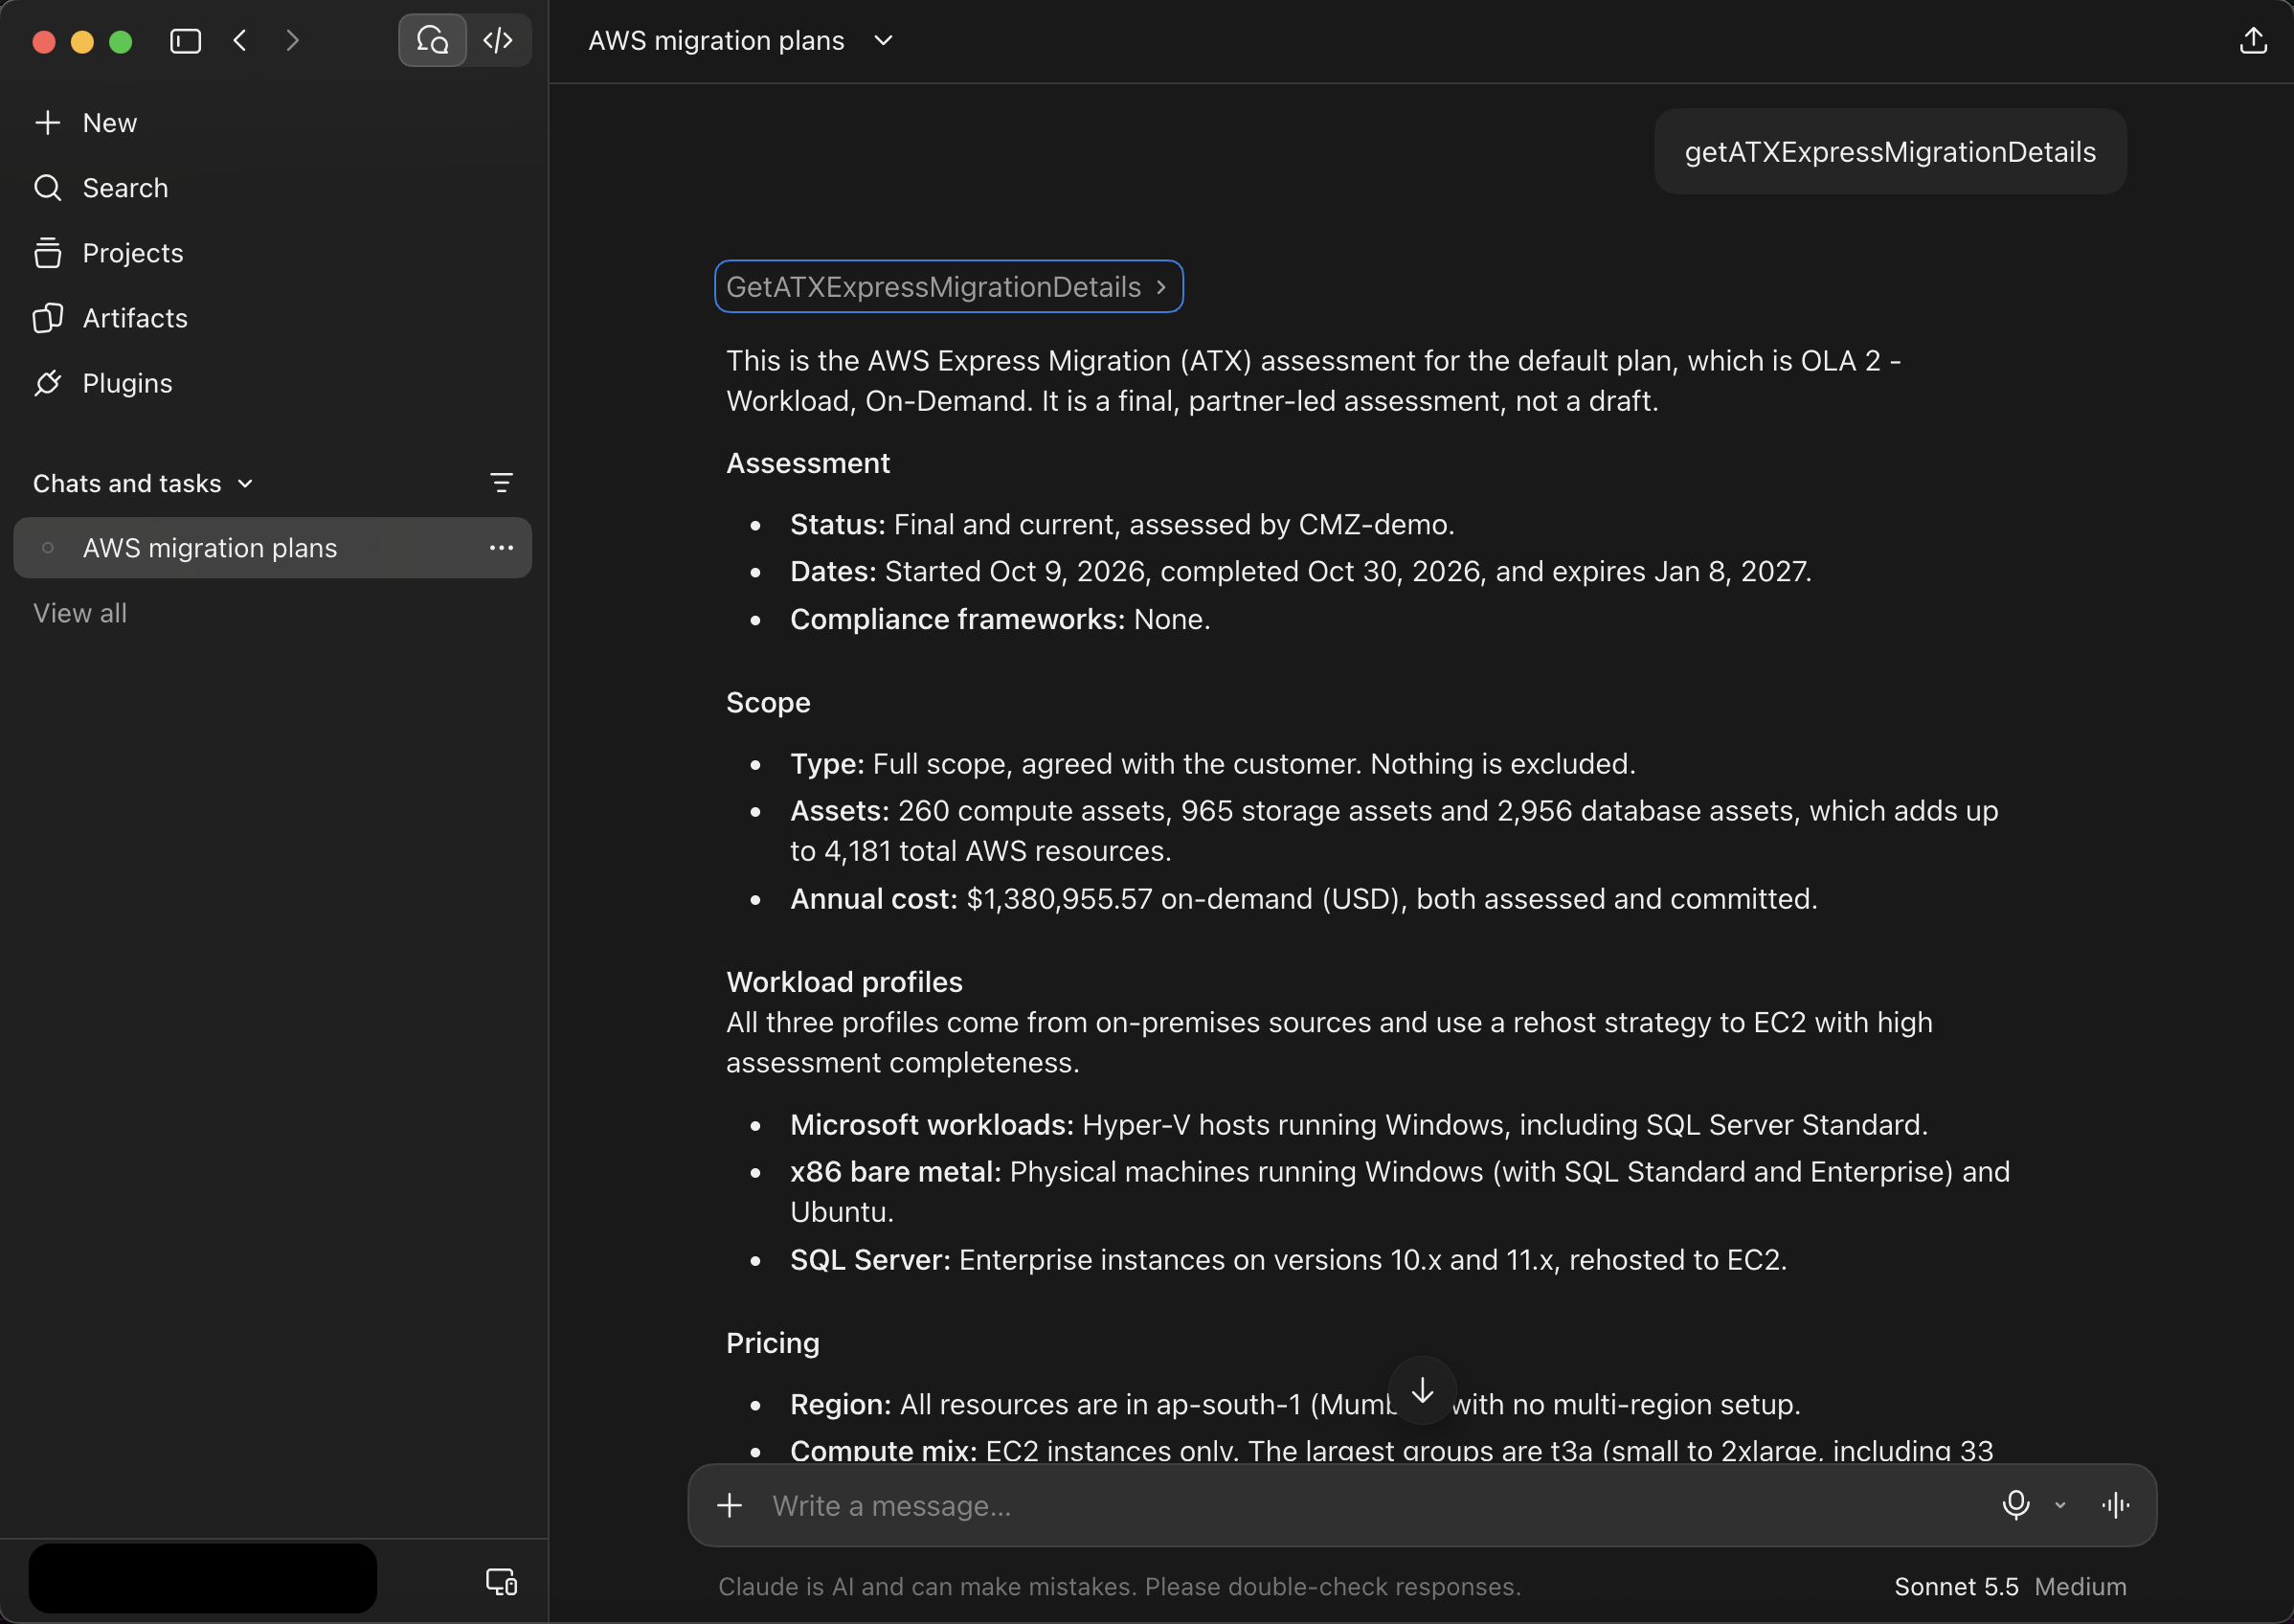
-
Save the response as a .json file exactly as it comes back. Don't edit or reformat it, because AWS Transform rejects files with changed or extra fields.
-
Open the AWS Pricing Calculator estimate link included in the export and use Export in the calculator to save a copy.
For large designs, the export can take a few minutes because it processes every server. Please wait for it to finish rather than asking again.
Option C: Ask Cloudamize Support
Email helpdesk@cloudamize.com with your Cloudamize account and the design you want to use. We'll send you the .json file and the AWS Pricing Calculator estimate link.
Step 4: Add the Cloudamize export to the engagement
-
In the engagement chat, attach the Cloudamize .json file and the AWS Pricing Calculator export. You don't need an AWS Transform workspace or assessment job for this.
-
Enter any additional values the agent asks for and save.
-
Check that the pricing the agent shows matches both the Cloudamize export and the AWS Pricing Calculator export. Make any updates and submit.
-
Select the committed annual recurring revenue (ARR) tier for the migration.
This initial TCO speeds up qualification. It's separate from the MAP Assess phase, and you can still request Assess funding for additional work later on.
Step 5: Create or import the opportunity
-
Create: Ask the agent to create an opportunity for your engagement. The form opens with details filled in from your assessment data. Complete the rest and submit it for AWS review. AWS Transform shares the opportunity with Partner Central and APN Customer Engagements (ACE).
-
Import (Partners only): If the opportunity already exists in Partner Central, ask the agent to import it and give it the opportunity ID.
Step 6: Request funding and credits, and accept the MAP terms
You start each of these by asking the agent in the engagement chat. AWS reviews each request.
|
Stage |
When |
What you need |
|---|---|---|
|
Assess fund request |
Before the Assess project |
Partner Scope Checklist |
|
Assess fund claim |
After the Assess project is complete |
MAP Customer Sign-Off, plus an updated scope of work (SoW) if deliverables changed |
|
Mobilize fund request |
After the Assess project. It can't be submitted at the same time as an Assess request |
Partner Scope Checklist, Migration Assessment Report, the customer's migration executive sponsor email, and the payer accounts in scope |
|
Migrate credits |
Any time you want to add customer credits |
Another AWS review. Consulting Partners must first invite the customer using the customer's AWS Transform tenant ID |
|
Accept MAP terms |
Once credits are approved |
Done by the party in the partner type table in Step 2, who must be authorized to sign |
|
Mobilize fund claim |
After Mobilize work is complete |
MAP Customer Sign-Off, plus an updated SoW if deliverables changed |
After the MAP terms are accepted, you can ask the agent for an amendment, for example, to add or remove payer accounts, change the credit cap or credit period, turn on linked account disbursement, change the assignee, or add AMS or Connect.
Step 7: Tag migrated resources
MAP in AWS Transform uses Partner Revenue Measurement (PRM) tags instead of the traditional MAP tags, with a different tag key and value. AWS Transform shows you the exact tag to use.
-
The AWS Transform migration agent (server and VM rehosting, and containerization to ECS or EKS) and the Windows modernization agent (database modernization to Aurora) tag resources automatically.
-
Everything else must be tagged by you. For bulk tagging, you can add the tag to CloudFormation, CDK, AWS MGN, Cloud Migration Factory, or SAM templates, or use AWS Tag Editor.
-
Spend that happens before a resource is tagged doesn't count toward MAP, so tag as soon as resources are created.
See the MAP 2.0 Tagging Guide for AWS Transform.
Frequently asked questions
Have the MAP funding policies changed?
No. The program and partner requirements are the same. Only the way you work through it has changed.
Why did AWS Transform reject my .json file?
Usually because the file was changed after export. Field names and values are case-sensitive, extra fields aren't allowed, and every required field must be present. Export the Design again from Cloudamize and attach the file without editing it.
Can I use MAP in AWS Transform for only part of a deal?
Yes. You can use it for a single stage, such as Assess funding only, or for the whole MAP lifecycle. Opportunities still live in ACE, and fund requests in the AWS Partner Funding Portal (APFP). AWS Transform connects to them.
Can I keep using APFP directly for some deals?
Yes. Existing MAP agreements aren't affected.
Is my assessment data shared with other partners?
No. Third-party assessment files are only used to qualify and build the MAP business case in AWS Transform. They're stored in your AWS Transform workspace in the region where it was created, and you can delete them at any time. See the AWS Transform FAQ.
Getting help
-
Your Cloudamize assessment or export: email helpdesk@cloudamize.com.
-
The MAP in AWS Transform workflow: use the support option in the AWS Transform chat or contact your AWS Partner Development Manager. You can also open a case in AWS Partner Central under Partner Central support > Contact support > CRM Integration.