

Problem:
-
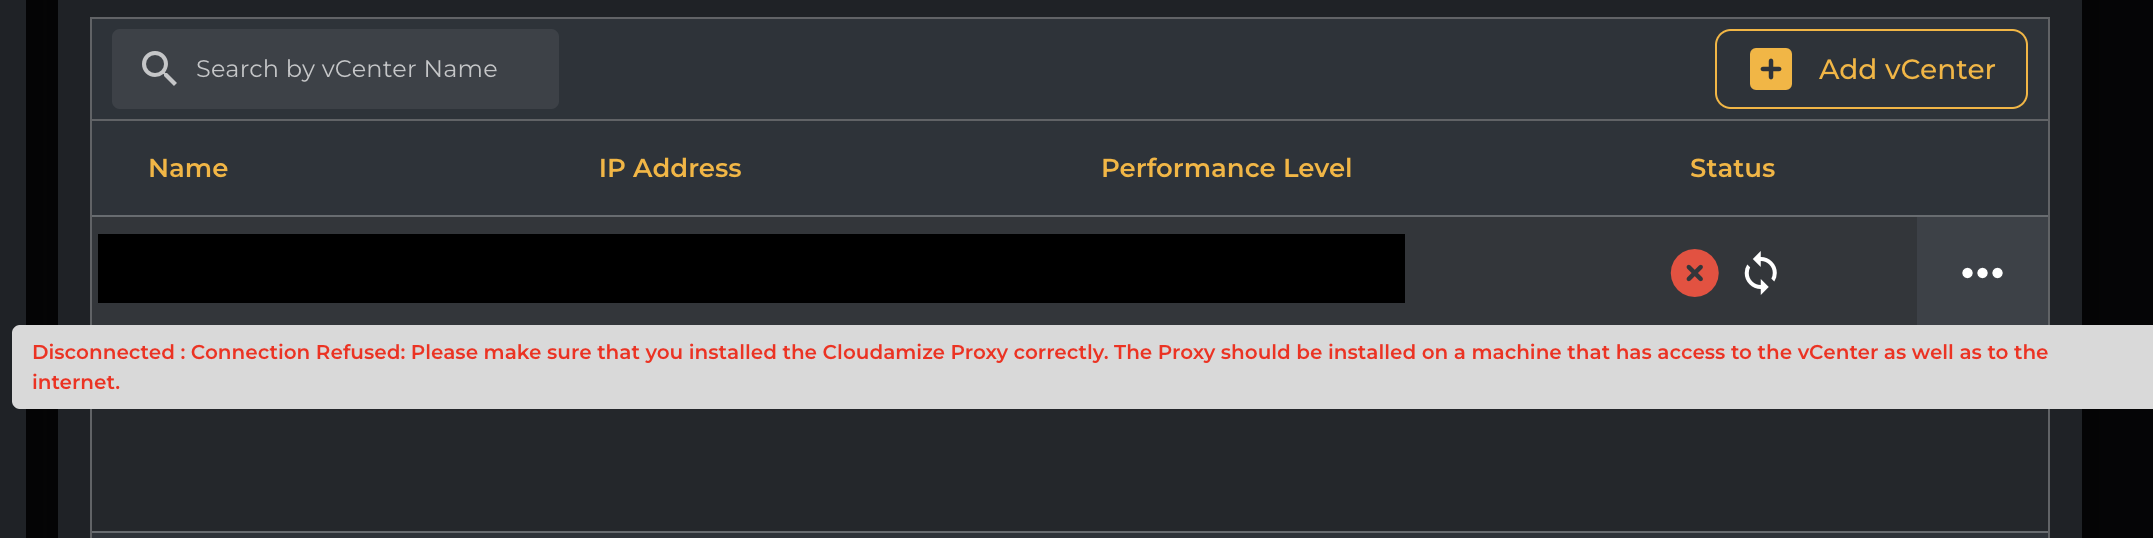
After the installation of the Cloudamize proxy, the status of the connection to your vCenter is "DISCONNECTED" with a message such as:
-
"Connection Refused: Please make sure that you installed the Cloudamize Proxy correctly. The Proxy should be installed on a machine that has access to the Vcenter as well as to the internet."
-
Alternatively: "UnknownException: An unknown error was encountered using the information entered. Please check the information that you provided and contact helpdesk@cloudamize.com for further assistance".
-
Solution:
-
The machine where the Cloudamize Proxy is installed needs to have access to the internet and to your vCenter machine.
-
Check that your machine is permitted to send outbound traffic to Cloudamize servers on port 443:
Using Curl:
command:curl.exe 52.202.114.20:443output:SSH-2.0-OpenSSH-
Note: Curl is not installed by default in some windows version, please follow these steps here to install curl on your machine:
Using Telnet:
telnet 52.202.114.20 443-
Note: Telnet is not installed by default in some windows version, please follow these steps here to install telnet on your machine:
-
http://technet.microsoft.com/en-us/library/cc771275(v=ws.10).aspx
-
-
-
If unable to connect please check that your machine is permitted to send outbound traffic to google.com on port 443:
Using Curl:
command:curl.exe google.com:443output:<HTML><HEAD><meta http-equiv="content-type" content="text/html;charset=utf-8">.....-
Note: Curl is not installed by default in some windows version, please follow these steps here to install curl on your machine:
Using Telnet
telnet google.com 443-
Note: Telnet is not installed by default in some windows version, please follow these steps here to install telnet on your machine:
-
http://technet.microsoft.com/en-us/library/cc771275(v=ws.10).aspx
-
-
-
If unable to connect please check that your network firewall allows outbound traffic on port 443 to IP 52.202.114.20.
-
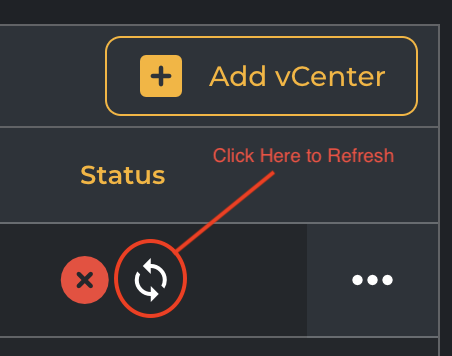
Please wait 2 minutes and refresh your configuration on the Cloudamize Setup page:
-
-
-
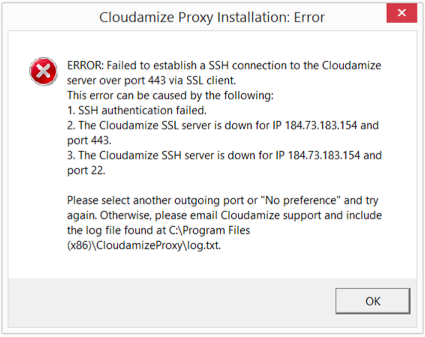
If the curl connection to 52.202.114.20 succeeds and you are still getting the same error message, please check that the Cloudamize Proxy is installed and working properly.
-
Check that the Proxy is running:
Command:tasklist /svcoutput:Cloudamize-Connector.exe <pid> Cloudamize-Connector -
If you do not see the Proxy installed then please re-install the previously downloaded proxy.
-
Check that the connection is established with the Cloudamize servers
Command:netstat -anotoutput:TCP <localip>:<localport> 52.202.114.20:443 ESTABLISHED
-
-
If the connection is established, please wait 2 minutes and refresh your configuration on the Cloudamize Setup page:
-
If the error message on the Cloudamize connection status page has changed to "CONNECTED" then the installation is successful.
-
If you notice that you are getting a different error such as "Connection Refused: We notice that you installed the Cloudamize Proxy correctly but we are unable to reach your vCenter", please go to Post-Installation Proxy to vCenter Accessibility for direction on how to solve that problem.
-
If the error message remains the same "Connection Refused: Please make sure that you installed the Cloudamize Proxy correctly."
-
-
After going through these steps, please contact helpdesk@cloudamize.com with the results of the above tests and the log.txt file located in either C:\Program Files (x86)\CloudamizeProxy or C:\Program Files\CloudamizeProxy.
-
Reference: Ports required for Cloudamize Proxy
|
IP Address/DNS name |
Port number |
Reason |
|---|---|---|
|
Proxy to 52.202.114.20 |
443 (option: 22, 80) |
Cloudamize Starter Edition Proxy Traffic |
|
Proxy to Vcenter IP address |
443 |
Cloudamize Starter Edition Proxy Traffic |
Problem
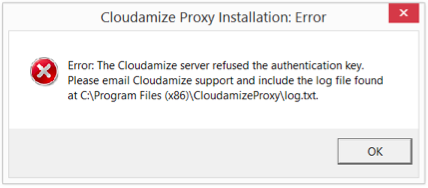
If you receive an error indicating that your customer code/authentication key is invalid, be sure to copy and paste the customer code from the Cloudamize Setup.
If you have any queries, please get in touch with the helpdesk via our Helpdesk Portal or by email at helpdesk@cloudamize.com.